A kitchen pass-through needs to be measured as a usable connection between rooms. Record its clear opening, lower ledge, wall depth and the surfaces where items are placed on both sides. Then add the proposed cabinets to the same views. Keeping part of the opening visible does not prove that a serving tray can pass or that someone can receive it comfortably. Define the serving task before filling the surrounding wall with storage.
Record both sides of the opening
Draw the kitchen elevation and the receiving-room elevation, naming the finished edges on each. Trim can reduce the passage differently on opposite sides. Measure clear width and height where an object must pass, and locate the opening from fixed room references. Keep the wall opening, decorative casing and ledge outline distinct. A dimension taken to the outside of trim is useful for positioning cabinets but is not the clear passage dimension.
KraftMaid’s measuring guide records openings and obstructions. This article applies that inventory to a pass-through while separating placement dimensions from the space used for serving.
A section through the opening should show the wall thickness, ledge projections and adjacent counter positions. Record heights from the relevant finished floor on each side; adjoining floors need not share the same elevation. Identify where the person passing an item stands and where the receiver can place it. An opening can be wide enough while the ledge is too deep for the intended handoff or lacks a useful landing area.
Add any proposed upper or side cabinet as a complete assembly, including doors, panels and projecting handles. Check the height at which the serving object travels. A cabinet that stops above the ledge may still narrow the opening where a tall pitcher or raised tray passes. Closed-door appearance is only part of the check; include the nearby fronts that are likely to open during the same routine.
ABCD
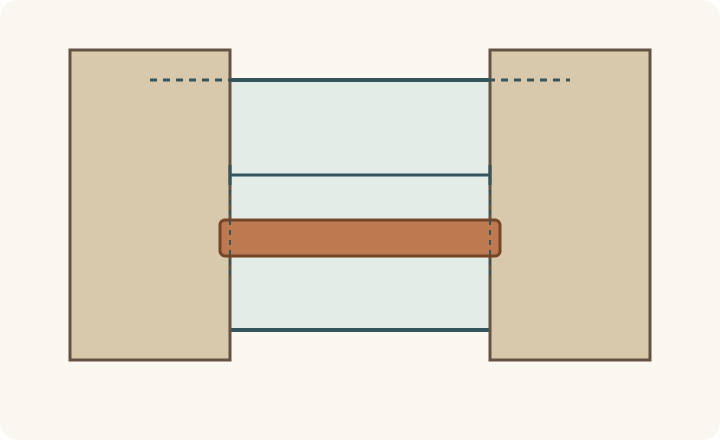
Diagram The original opening and the usable passage after adding cabinets are different. The tray illustrates a straight, level handoff in hypothetical geometry, not a recommended cabinet arrangement.
A
Original opening boundary continues behind the proposed side zones.
B
Proposed side cabinet zone that narrows the opening.
C
Remaining clear horizontal passage.
D
Rigid tray whose ends extend beyond the remaining passage.
A visible opening can still be too narrow for the task
In a hypothetical example, an opening has 42 inches of clear width before proposed cabinets encroach 8 inches from each side. The remaining passage is 42 - 8 - 8 = 26 inches. A rigid 28-inch-wide tray held level and straight exceeds that passage by 2 inches. The serving task therefore fails under those assumptions. These are teaching dimensions, not an opening standard; a real check also needs the user’s hands, object height and landing space.
Choose the function worth preserving
If the pass-through is used for plates individually, its useful arrangement may differ from one used for wide trays or tall serving pieces. Test the actual object group before choosing cabinet widths around it. More storage beside the opening may be worthwhile, but acknowledge which transfer tasks it changes. Avoid a compromise that leaves a decorative slot without useful serving access while still interrupting both rooms’ wall space.
Changing or enlarging the wall opening is a separate construction question. The visible opening does not establish its framing or concealed services. Cabinet plans can use its verified retained outline while any proposed alteration is assessed. Do not select upper cabinets on the assumption that the opening can be reshaped, and do not treat a planning sketch as a structural or fabrication instruction.
Hand over the opening and the serving sequence together
Provide both elevations, the depth section, clear dimensions, trim outline and a photograph from each room. Add the representative tray or serving object, its intended orientation and the landing positions. Identify cabinets that will open during use and any concealed edges still needing confirmation. This gives the designer a defined connection to preserve or revise. The final finish reference can then support visual coordination across the rooms without obscuring the transfer task.
Pure White
Cream White
Light Warm Gray
Gray
Navy
Black
Oak Tone
Dark Walnut Tone
Design study These finish studies are design references, not a list of currently orderable colors. Screens and lighting change the appearance; compare a physical sample before choosing.See all finish options →
Build a room sketch and a cabinet-run total that include the parts between the boxes. A worked example shows why the tighter measurement changes the filler allowance.
The sample shows the door frame, a separate center panel, the face frame and the cabinet box. Each component has its own place in this Shaker construction.
Shaker construction: door frame, center panel, face frame and cabinet box. The cutaway helps locate these parts; confirm each material in the specifications for the selected cabinet.
01 / Door frame
The Shaker door has rails and stiles around a separate center panel. The frame and center panel are different components; confirm their materials in the specifications for the selected cabinet.
02 / Face frame
The face frame surrounds the opening at the front of the cabinet box and sits behind the doors. The face frame, door frame and cabinet box are separate parts.
03 / Cabinet box
The sample exposes the cabinet sides, interior surfaces and layered edges. The image does not establish the wood species or material specification of a selected cabinet.