How to Measure for Kitchen Cabinets: Panels and Fillers
Build a room sketch and a cabinet-run total that include the parts between the boxes. A worked example shows why the tighter measurement changes the filler allowance.
Measure the room and the proposed cabinet run separately. A wall-to-wall dimension tells you the available envelope; it does not tell you how many inches of cabinet boxes to buy. Finished panels, fillers and any planned openings use that envelope too. Before ordering, ask for a drawing that adds up every piece along the run and identifies where each measurement starts and ends.
Start with a room record you can revise
Sketch each wall and give it a letter. Pick a finished corner as the horizontal starting point and keep using it for the window, sink center and appliance openings on that wall. Label whether the surfaces already have their final wall finish and flooring. If tile, flooring or a wall covering will change, a measurement taken today needs a note about the proposed finished surface. A hidden wall behind an existing cabinet is an unmeasured area, not a dimension to guess.
KraftMaid’s measuring guide asks for overall wall widths plus opening locations, utilities and ceiling or soffit height. It measures a trimmed opening across the outside edges of its trim. That distinction matters when a cabinet will end near a casing.
Keep a photograph beside the sketch for every wall. Include the corner and the obstruction in the same frame when possible, then take a close view with the tape endpoints visible. Name the images with the wall letter. If a second measurement disagrees, keep both readings and show where they were taken. Erasing the inconvenient one makes the room look simpler on paper than it is.
Decide which surfaces the dimension includes
For a cabinet width, ask whether the schedule uses the outside face-frame width, the outside case width or another stated product dimension. Use the dimension that the manufacturer tells the designer to lay out. A decorative end panel may be supplied separately or included in an assembly; it must appear only once in the total. The width inside a cabinet is a different number used for storage accessories.
KraftMaid describes its common 24-inch base depth from the face frame to the back panel, excluding doors and drawers. This is a useful example of a measurement definition, not a depth specification for every cabinet or for usaKT.com products.
On your proposed section drawing, identify the back, cabinet front, door face, pull and countertop edge separately. That lets you discuss how far each projects into the room without mistaking the box depth for the finished front. For height, record the finished-floor reference and distinguish cabinet height from the top surface height. Have the installer resolve uneven floors against the actual layout rather than averaging the room readings.
A filler and an end panel do different jobs
A filler closes or reserves space next to a cabinet; an exposed finished panel provides a visible end surface. A scribe piece deals with the visible junction to an irregular wall. A single order may include more than one of these. Ask which one is dimensioned on the elevation and whether its full supplied width or the intended fitted width has been included.
KraftMaid’s installation guide explains that fillers near a wall can allow full-overlay doors and drawers to open without hitting wall conditions or trim. The guide does not establish a universal filler width for your door, handle and room.
Check the opening action as well as the closed elevation. A drawer beside a casing needs its moving front and handle considered; a door may meet a return wall before it opens far enough for the planned accessory. The seller should identify the selected hinge, overlay and pull combination on the drawing. A leftover strip of space is not proof that the doors will work.
Add up the whole run, then test the tighter reading
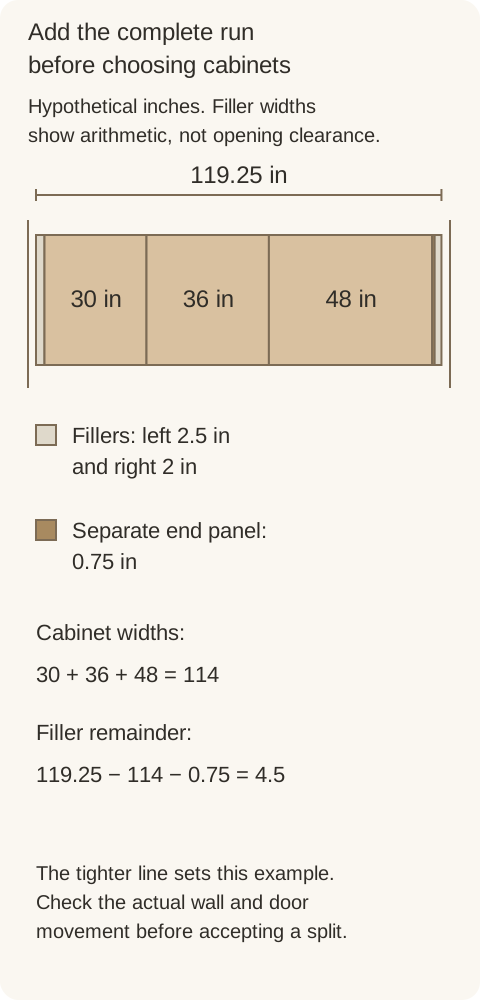
Diagram The diagram separates cabinet widths from the other pieces in the hypothetical example. The filler split illustrates the sum only; it does not establish opening clearance.
If the narrower width was recorded at another height, annotate that height rather than silently replacing every measurement with it. If the panel is already included in the cabinet dimension, remove the separate panel entry before recalculating. If the plan calls for a different cabinet mix, recalculate the whole run. Adding a filler somewhere else cannot repair an incorrect total.
Replacing the old run and changing the layout need different checks
For a replacement in the same footprint, photograph old filler locations and measure where the existing fronts meet the walls. Those details can explain how the previous doors cleared their surroundings. They are observations to investigate, not automatic dimensions for the new door style. A new pull or wider overlay can change the opening action.
For a new layout, mark the proposed cabinet front line on the room sketch and obtain the appliance specifications before assigning the remaining space. Do not use the width of an old appliance as the installation opening for a different model. If a wall, utility or appliance position is still changing, mark that portion of the cabinet plan unresolved instead of treating it as an order-ready dimension.
What to send with a request for a cabinet layout
Send the labeled room sketch, overall and segmented measurements, and photos showing where the readings were taken. State which surfaces are finished and which will change.
Attach the appliance model sheets and identify existing utilities. Note the proposed cabinet front line and any unmeasured hidden area.
Ask for a run total that lists cabinet layout widths, separate panels, fillers and openings. Request the dimension endpoints used by that cabinet system.
Have the installer check wall conditions and opening movement against the selected fronts and pulls. Confirm who owns the final field measurement before accepting the order.
Keep the reviewed drawing with the written quote and mark its revision. When a cabinet width or an end condition changes, both documents need the same update. The useful outcome of measuring is a cabinet list that can be checked against the room, with the remaining uncertainties plainly identified.
Finish references for the cabinet discussion
Pure White
Cream White
Light Warm Gray
Gray
Navy
Black
Oak Tone
Dark Walnut Tone
Design study These finish studies are design references, not a list of currently orderable colors. Screens and lighting change the appearance; compare a physical sample before choosing.See all finish options →
Buy a coordinated suite when every included appliance earns its place. Mix brands when a specific everyday task justifies the difference, after comparing the visible fronts and the complete installed purchase.
Compare the offered wood drawers by required length, opening method and complete construction. MOVENTO is not an automatic upgrade for every drawer, and one runner family need not serve every location in the kitchen.
Choose the dispenser package with your everyday glasses, bottles and ice routine. A plain refrigerator front can still conceal a water outlet, while a door dispenser changes access without creating a separate drinks station.
The sample shows the door frame, a separate center panel, the face frame and the cabinet box. Each component has its own place in this Shaker construction.
Shaker construction: door frame, center panel, face frame and cabinet box. The cutaway helps locate these parts; confirm each material in the specifications for the selected cabinet.
01 / Door frame
The Shaker door has rails and stiles around a separate center panel. The frame and center panel are different components; confirm their materials in the specifications for the selected cabinet.
02 / Face frame
The face frame surrounds the opening at the front of the cabinet box and sits behind the doors. The face frame, door frame and cabinet box are separate parts.
03 / Cabinet box
The sample exposes the cabinet sides, interior surfaces and layered edges. The image does not establish the wood species or material specification of a selected cabinet.