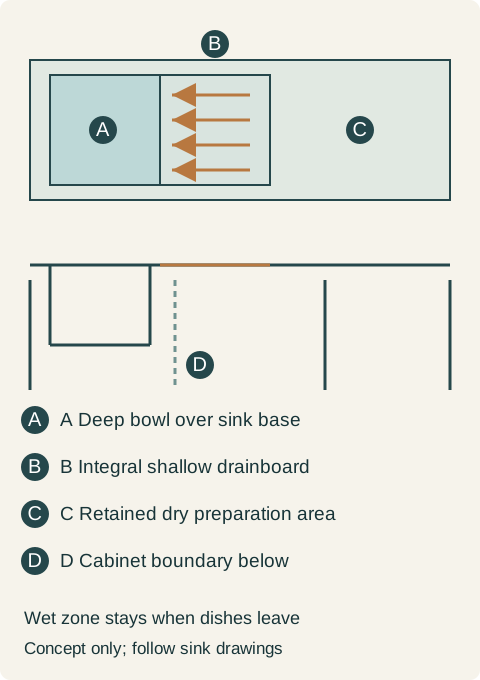
A sink with an integral drainboard: which counter and cabinet space does it take?
An integral drainboard creates a permanent wet zone beside the bowl. Choose its side and full footprint before assigning dry preparation counter or drawers below.
Count the drainboard as part of the sink footprint
Choose an integral drainboard when a permanent drying area beside the bowl is worth the counter it occupies. Its shallow surface can collect water without being another deep bowl, but it remains part of the sink after the dishes are put away. Do not count the same area as an uninterrupted dry preparation surface in the cabinet layout.
BLANCO's UK ZIA 5 S page describes drainer grooves that return water to the sink and a reversible layout with the bowl on either side of the drainer. This is a documented example of the arrangement, not a statement of US availability or a claim that every drainboard sink is reversible.
Bowl width, total sink width and cabinet width answer different questions
The bowl extends down into the sink cabinet. The drainboard spreads sideways across the countertop and can have a different underside depth. Consequently, a sink's stated minimum cabinet size must not be mistaken for its total countertop footprint. Use the exact overall outline, cutout, underside and support requirements together.
If the drainer reaches over an adjacent cabinet, show that cabinet's upper rail, side, clips and proposed drawer travel in section. A shallow-looking surface does not establish that its underside or fixing hardware clears a drawer. The sink and countertop installation documents determine whether the proposed relationship is supported; the conceptual distinction is not permission to cut a cabinet partition.
Teaching example Conceptual plan and section of an integral drainboard sink. The bowl is over the sink base; the shallow drainer extends beside it. Its full outline differs from the bowl and cabinet outlines. The diagram does not authorize installation across a cabinet partition.
Fix the wet side before fixing the cabinet run
Place washed dishes on the proposed drainboard outline and trace where they go after drying. Then draw the normal preparation task on the remaining dry counter. Reversing an approved reversible sink changes the side available for these tasks; it may also change the planned faucet and drain relationships, so it must be settled before holes and cutouts are made.
In one kitchen, the left of the bowl is already reserved for washing and drying, while the right is the only continuous cutting area. The left-drainer arrangement keeps both activities usable. The right-drainer arrangement consumes the cutting area even when no dishes are present. After the sink and neighboring cabinet details are confirmed, the household selects the left-drainer layout and keeps the right-hand drawer base and dry counter. The decision is about permanent zones, not a preference for left-handed washing.
Compare against a removable drying rack honestly
A removable rack on a separate counter can release its footprint after it is emptied and stored. An integral drainer does not release ordinary countertop in the same way. Conversely, a loose rack needs its own water-management arrangement and storage location; removing it in a rendering does not solve those tasks.
If handwashing and drying happen throughout the day, the permanent wet zone may be a useful commitment. If a large dry surface is needed daily and the rack is used only occasionally, preserving ordinary counter may matter more. Include the rack's real stored size and the intended dishes in that comparison.
Order the sink orientation, full top footprint and cabinet section as one arrangement. The shallow part beside the bowl affects what the countertop can do, while its underside affects what the neighboring cabinet can contain. Both must survive the final installation drawing.
Pure White
Cream White
Light Warm Gray
Gray
Navy
Black
Oak Tone
Dark Walnut Tone
Design study These finish studies are design references, not a list of currently orderable colors. Screens and lighting change the appearance; compare a physical sample before choosing.See all finish options →
Match the selected sink to the cabinet interior, front and countertop drawing. Worked examples show why bowl width and nominal cabinet size do not settle the fit.
A sliding board creates a temporary working surface over a basin. Compare what stays available while cutting, rinsing and washing before exchanging fixed counter space for a larger sink.
Choose where dishes arrive, where they wait and how they reach washing. Test the arrangement while cooking continues and the dishwasher is already occupied.
The sample shows the door frame, a separate center panel, the face frame and the cabinet box. Each component has its own place in this Shaker construction.
Shaker construction: door frame, center panel, face frame and cabinet box. The cutaway helps locate these parts; confirm each material in the specifications for the selected cabinet.
01 / Door frame
The Shaker door has rails and stiles around a separate center panel. The frame and center panel are different components; confirm their materials in the specifications for the selected cabinet.
02 / Face frame
The face frame surrounds the opening at the front of the cabinet box and sits behind the doors. The face frame, door frame and cabinet box are separate parts.
03 / Cabinet box
The sample exposes the cabinet sides, interior surfaces and layered edges. The image does not establish the wood species or material specification of a selected cabinet.