Choose a wall-oven position by following the dish from rack to landing
Control-panel height is only part of the decision. Test the rack used, open door, person’s stance, grip and available landing together before fixing the oven cabinet.
Choose the wall oven’s position by testing the full dish transfer, not just whether the controls are easy to see. The user must reach the intended rack, grip the vessel, clear the opening and door, move to a suitable landing and set the item down. A visually balanced oven cabinet can fail that sequence even when the appliance fits its opening correctly.
Locate the working rack rather than guessing from the cabinet front
GE Appliances distinguishes wall-oven cutout, overlap and overall dimensions and directs users to the specific installation instructions. Those measurements establish different parts of the installation. They do not by themselves identify the height of the rack the household will use or the movement needed to remove its usual cookware.
For the selected model and supported cabinet arrangement, locate the relevant rack positions from the appliance information or a suitable demonstration unit. Mark the intended working position relative to the finished floor. Keep the door’s open projection and the actual depth of reach in the trial; a mark representing only the front of the oven leaves out much of the task.
Rehearse with representative cookware before fixing the location
Start with a cold, empty dish of the intended shape in a stable mockup or permitted appliance demonstration. Include its handles and the hand position used with appropriate oven mitts. Check the person’s view into the vessel and whether the grip remains controlled as it moves clear of the rack and past the open door.
Consider the expected loaded weight separately. An empty-pan rehearsal only tests shape and movement; it cannot prove that a full casserole is manageable at that position. If a representative load is assessed, keep it cold, stable and comfortably within the person’s ability, with suitable assistance. Do not use hot food or push lifting limits to validate a cabinet layout.
Reserve the destination before drawing the transfer
Select the actual landing surface and keep it available in the intended meal routine. Include any preparation items, appliances or dishes normally occupying it. The nearest counter may not be usable if it is already assigned to another task. Plan the landing around the cookware and applicable surface-use guidance rather than treating any visible horizontal surface as ready for a hot vessel.
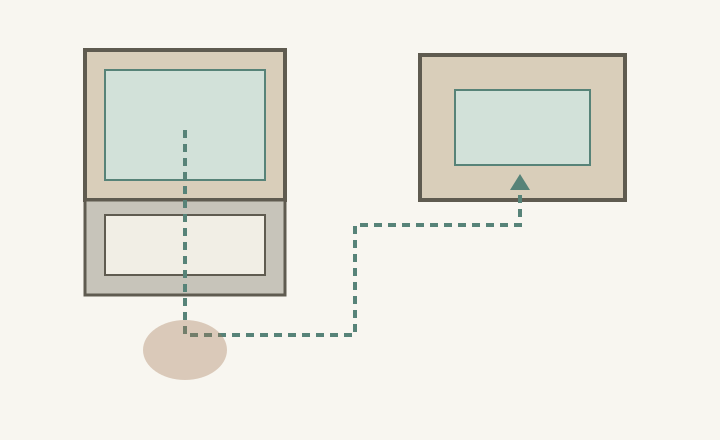
Trace the dish from the oven to that destination with the oven door still open. Show where the person stands, steps back or turns, and where the vessel passes. Do not count the open oven door as the planned landing. Check vertical movement in a side view as well as the route in plan; a short horizontal distance can still require an awkward lift or lowering action.
ABCD
Diagram The dashed line follows the carried item, including movement over the open door; it is not a walking route through the door. The plan cannot establish rack or landing heights, body clearances or a suitable lifting load. Those need the selected appliance and a separate user trial.
A
Begin at the actual rack and cookware position.
B
Retain the open door in the transfer test.
C
Check the retreat and turn with the user present.
D
Reserve a usable landing at the real destination.
A comfortable rack can still have an unusable destination
In a hypothetical layout, the user can grip a roasting dish at the proposed rack position. The planned landing is on an island behind the user, but the meal-preparation setup covers that surface. Reaching a clear spot requires turning farther and moving sideways around another person. The lifting-height trial passed while the full routine failed.
Compare keeping a suitable landing clear, changing the oven’s relationship to the counter or selecting another supported arrangement. Repeat with the same dish and actual intended user. Do not solve the problem only by promising that someone else will always be present to take the load unless that is a deliberate and dependable household arrangement.
Test loading and the other regular users too
Reverse the sequence to place a dish in the oven. Check whether the landing permits a controlled approach while the door is open, and whether the user can see and position the vessel on the intended rack. Evaluate other people who regularly use the oven separately; a position suited to one person’s reach and strength is not automatically suited to everyone.
Record the model, supported installation position, rack used, representative dish, landing and transfer sequence. Keep unresolved load or user-access concerns visible before approving the cabinet. Recheck when the appliance, rack arrangement or island use changes. The useful outcome is a repeatable transfer between oven and counter, with the installation requirements and the person’s actual task both accounted for.
Pure White
Cream White
Light Warm Gray
Gray
Navy
Black
Oak Tone
Dark Walnut Tone
Design study These finish studies are design references, not a list of currently orderable colors. Screens and lighting change the appearance; compare a physical sample before choosing.See all finish options →
The slide-in label does not tell you whether the cooking surface overlaps the counter or how the rear junction finishes. Check the exact design before assuming the existing opening is suitable.
A vertically arranged oven pair needs a task assignment and user trial for both cavities. Lowering the assembly changes both positions; seeing the upper controls does not prove upper-rack access.
The sample shows the door frame, a separate center panel, the face frame and the cabinet box. Each component has its own place in this Shaker construction.
Shaker construction: door frame, center panel, face frame and cabinet box. The cutaway helps locate these parts; confirm each material in the specifications for the selected cabinet.
01 / Door frame
The Shaker door has rails and stiles around a separate center panel. The frame and center panel are different components; confirm their materials in the specifications for the selected cabinet.
02 / Face frame
The face frame surrounds the opening at the front of the cabinet box and sits behind the doors. The face frame, door frame and cabinet box are separate parts.
03 / Cabinet box
The sample exposes the cabinet sides, interior surfaces and layered edges. The image does not establish the wood species or material specification of a selected cabinet.