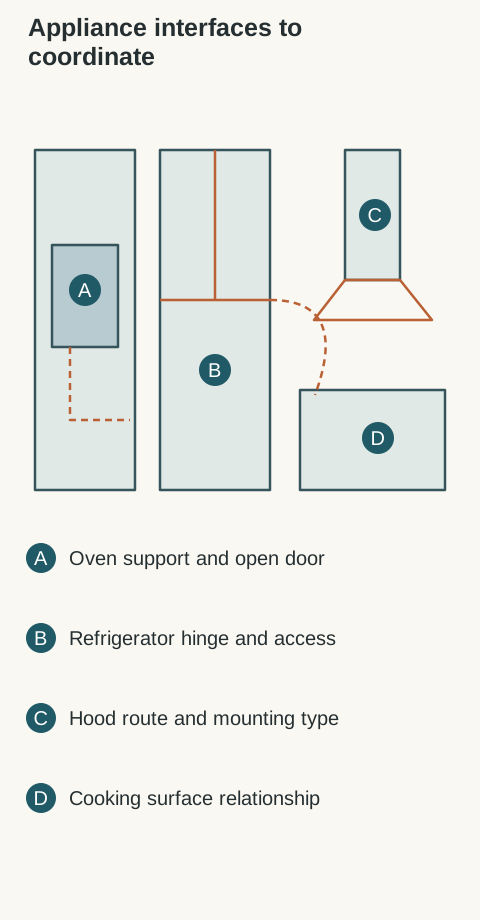
Choose the exact appliance models before approving the cabinets around them. A nominal product width cannot describe the opening, supporting structure, handle projection and service route. Build an appliance schedule with the model, selected installation arrangement and its official instructions. Keep that schedule attached to the cabinet revision that uses it.
Read the installation arrangement, not a category label
For a wall oven, distinguish the body dimensions from the cabinet cutout and the platform that supports the appliance. Show the electrical connection zone and the door when open. A base drawer under an oven can work only within an approved arrangement; its rails and contents cannot occupy required support or connection space.
The GE installation instructions linked from the JTS3000SNSS owner center illustrate why the arrangement matters: they separately address support, openings and installation combinations. Have the installer apply the section for the actual model and configuration. Do not copy a support load or opening from a different oven, even if the visible fronts look alike.
A countertop microwave, an appliance approved for a built-in kit and an over-the-range model are different installations. Record the exact compatible kit where required. Include its face overlap and the internal ventilation route, not merely a rectangle matching the appliance body. Check how a door or drawer opens and where a hot dish can be placed.
GE warns against enclosing a countertop microwave in cabinetry without an appropriate built-in kit. Its general clearance page directs readers to model instructions. A decorative surround is not a substitute for that approval. A closed appliance garage also does not turn a countertop unit into a built-in model. Keep the chosen installation type explicit on the order.
Diagram Conceptual elevation combines separate appliance interfaces for discussion. It is not an approved appliance combination, cutout template or installation detail.
Let the hood and cooking appliance set their own requirements
Match the hood type to the intended mounting condition and cooking equipment. Plan the exhaust route, the hood attachment and access to filters before arranging nearby uppers. A recirculating configuration has its own approved parts and discharge path; a cabinet must not conceal the place where the unit returns air to the room.
The cited GE UVW wall-hood instructions describe installation on a wall without cabinets above. They are not instructions for an undercabinet hood. This is a useful model-specific example of why an attractive hood silhouette cannot establish cabinet placement. Have the responsible installer coordinate the actual hood, cooking appliance, duct route and applicable requirements.
Include the installed depth, handles, hinge location and required air spaces. At a wall or tall end panel, test the door position needed to remove drawers and bins, not just the position needed to reach a bottle. A flush-looking panel can interfere with a hinge or restrict a service movement that is invisible in the front elevation.
Record the route for bringing the refrigerator into the room and removing it later. Water and electrical connections must follow the selected model and remain accessible as required. Keep the shutoff and connection arrangement out of drawer travel. GE's measuring guidance distinguishes overall size, cutout and extra space for doors or ventilation; those are separate checks in the plan.
Resolve the shared interfaces before cabinet approval
Overlay the appliances on a plan, elevation and a section through any tight interface. Show adjacent pulls and the surfaces receiving fasteners. Check that a finished side panel, countertop edge or molding does not cover a ventilation opening or prevent removal of trim. State who provides each support and who confirms its construction.
Compare an approved alternative before modifying a cabinet in the field: a different appliance model, a revised cabinet interior or a changed location may resolve the conflict. Save the model schedule and instruction revision with the approved drawing. If a model changes after ordering, reopen every affected interface instead of assuming nominal width preserves the fit.
The useful result is a cabinet drawing tied to actual appliance instructions and an identified installer scope. A clean front elevation can then follow a fit that has already been checked.
Pure White
Cream White
Light Warm Gray
Gray
Navy
Black
Oak Tone
Dark Walnut Tone
Design study These finish studies are design references, not a list of currently orderable colors. Screens and lighting change the appearance; compare a physical sample before choosing.See all finish options →
Buy a coordinated suite when every included appliance earns its place. Mix brands when a specific everyday task justifies the difference, after comparing the visible fronts and the complete installed purchase.
Compare the offered wood drawers by required length, opening method and complete construction. MOVENTO is not an automatic upgrade for every drawer, and one runner family need not serve every location in the kitchen.
Choose the dispenser package with your everyday glasses, bottles and ice routine. A plain refrigerator front can still conceal a water outlet, while a door dispenser changes access without creating a separate drinks station.
The sample shows the door frame, a separate center panel, the face frame and the cabinet box. Each component has its own place in this Shaker construction.
Shaker construction: door frame, center panel, face frame and cabinet box. The cutaway helps locate these parts; confirm each material in the specifications for the selected cabinet.
01 / Door frame
The Shaker door has rails and stiles around a separate center panel. The frame and center panel are different components; confirm their materials in the specifications for the selected cabinet.
02 / Face frame
The face frame surrounds the opening at the front of the cabinet box and sits behind the doors. The face frame, door frame and cabinet box are separate parts.
03 / Cabinet box
The sample exposes the cabinet sides, interior surfaces and layered edges. The image does not establish the wood species or material specification of a selected cabinet.