A dish-drying cabinet needs a reachable rack and a removable water tray
Moving a dish rack off the counter exchanges worktop area for upper-cabinet space and tray maintenance. Plan the complete draining assembly before ordering the cabinet.
Treat it as a draining cabinet, not a shelf replacement
A cabinet-mounted dish drainer can release counter space, but it commits an upper cabinet to dishes that are still draining. Choose it only when the intended user can place the wet pieces in the rack and remove the water tray without fighting the door, faucet or objects below. Hiding a counter rack behind a door does not create the same assembly.
IKEA's Singapore UTRUSTA example has a removable tray to collect runoff and must be fitted during wall-cabinet assembly, not afterward. This illustrates an assembly requirement, not US availability or compatibility with another cabinet line.
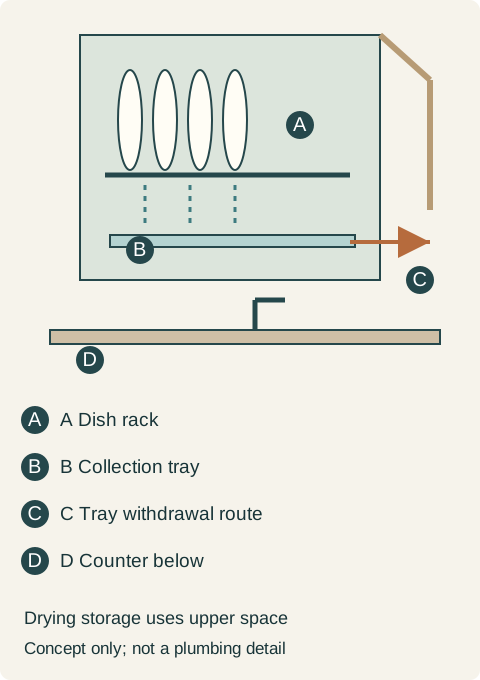
The rack supports the dishes; the collection tray receives the drips. The tray is not a connection to the sink drain. Its contents have to be dealt with according to the product's care instructions, and the tray must remain removable. Positioning the cabinet above a sink does not turn a collected-water system into automatic drainage.
The UTRUSTA assembly drawings show the rack arrangement and a tray withdrawing through the front. The supplier must coordinate that complete assembly with its cabinet construction; the figures are not permission to cut the bottom out of an existing cabinet.
Keep door hinges, cabinet rails and nearby objects out of the tray's actual withdrawal path. Also check access to the back of the rack for cleaning. A tray that can move when empty may be awkward to handle with water in it if the only route requires tipping it around a faucet.
Teaching example Conceptual cabinet section: dishes drain through the rack into a separate collection tray. The tray must have a clear withdrawal route through the open front. The diagram does not show plumbing or automatic drainage.
Choose the cabinet from the dishes you hand-wash
Compare the retained plates, bowls and cups with the actual rack, including the room needed to put the final piece in. Deep bowls and large plates may use the arrangement differently. Avoid counting every slot as one usable place for every dish shape. The upper cabinet also loses whatever dry storage would otherwise occupy that volume; assign those items elsewhere before claiming a net storage gain.
When the counter gain is worth making
In a new kitchen, the dish group fits the chosen rack and the user can load it from the sink position. The open front allows the collection tray to come out without tilting around the faucet, and the former dry-storage group fits an adjacent cabinet. The integrated drainer is selected because it returns the counter rack's footprint to preparation while keeping the maintenance route usable.
For a finished wall cabinet that cannot accept the referenced assembly sequence, the same product is rejected as a retrofit. A countertop rack or another product explicitly suitable for the existing cabinet remains a separate choice. Do not conceal a permanent wet-dish station in ordinary storage and assume that closed doors, cabinet material or proximity to the sink resolve water management.
Pure White
Cream White
Light Warm Gray
Gray
Navy
Black
Oak Tone
Dark Walnut Tone
Design study These finish studies are design references, not a list of currently orderable colors. Screens and lighting change the appearance; compare a physical sample before choosing.See all finish options →
The closest cabinet is useful only if it can be reached and opened while unloading. Map the actual clean-dish destinations with the appliance door and racks in use.
Buy a coordinated suite when every included appliance earns its place. Mix brands when a specific everyday task justifies the difference, after comparing the visible fronts and the complete installed purchase.
The sample shows the door frame, a separate center panel, the face frame and the cabinet box. Each component has its own place in this Shaker construction.
Shaker construction: door frame, center panel, face frame and cabinet box. The cutaway helps locate these parts; confirm each material in the specifications for the selected cabinet.
01 / Door frame
The Shaker door has rails and stiles around a separate center panel. The frame and center panel are different components; confirm their materials in the specifications for the selected cabinet.
02 / Face frame
The face frame surrounds the opening at the front of the cabinet box and sits behind the doors. The face frame, door frame and cabinet box are separate parts.
03 / Cabinet box
The sample exposes the cabinet sides, interior surfaces and layered edges. The image does not establish the wood species or material specification of a selected cabinet.