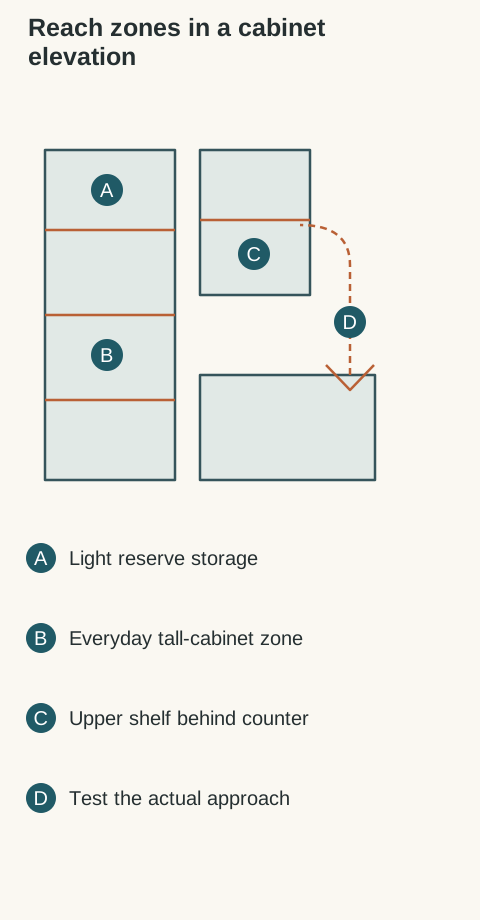
A cabinet can fit the wall and still be awkward every morning. Start with the people who use it and the objects they reach for, then decide how much storage belongs above the counter or near the ceiling. A full-height elevation helps you see attractive lines. A simple reach test tells you whether those lines put the coffee mugs somewhere useful.
Map the user before the shelves
List who cooks, unloads dishes and prepares drinks. Include seated use, a limited shoulder range or a need to grip a shelf edge for balance. Use an empty lightweight object to test comfortable placement from the normal standing or seated position. Avoid stretching over a hot surface or balancing on furniture to prove that a shelf is reachable.
Reach changes when a countertop, appliance or corner sits between the person and the handle. The Access Board explains this distinction in its guidance on operable parts and approaches. Use that guidance within its stated project scope; it does not establish a universal upper-cabinet height for every home. A household comfort test also cannot establish accessibility compliance.
Put frequent-use objects where they can be seen, grasped and returned without a change in posture that the user finds uncomfortable. Place lighter, occasional items higher only if the household has a suitable way to retrieve them. A crowded lower shelf is not solved by assigning a heavy pot to an unreachable upper shelf. Reduce the stored collection or move the pot to a suitable base cabinet.
Check the door handle as well as the shelf. A person may reach the contents when a door is already open but struggle to open a lift-up front or pull a tall door toward them. Evaluate the selected door mechanism through its full motion. Pull-down fittings need compatible cabinet interiors, clear movement space and the manufacturer's installation requirements; do not assume they fit every upper cabinet.
Diagram Conceptual elevation: the counter interrupts the approach to an upper shelf. The marked zones describe a storage plan, not prescribed heights or load limits.
Draw tall cabinets as usable compartments
A tall pantry front can conceal separate zones. Mark shelves, fixed partitions, interior drawers and any space reserved for a vacuum or other tall object. Record the actual object height and the clear opening with the door open. A shelf that adjusts does not guarantee that the hinge, rail or neighboring shelf allows the desired arrangement.
Check where the lower door ends and the upper door begins. That division changes which handle the user operates and which items share a compartment. Show adjacent refrigerator handles, room doors and switches on the elevation. For a utility cabinet, reserve service access rather than packing the compartment tightly around electrical equipment or concealed connections.
Resolve the top and bottom edges
Measure ceiling level and any soffit across the cabinet run. Compare the highest and lowest conditions before deciding on a ceiling-reaching design. Crown, a scribed top filler and an exposed gap solve different conditions. A decorative trim piece should not be assumed to absorb any amount of unevenness. Show the intended finished line and the field-fitting allowance separately.
At the bottom of an upper cabinet, include the actual lighting assembly and its wiring route. Check whether a light rail affects the view of the work surface or the use of a countertop appliance. Keep required appliance ventilation unobstructed. Tall cabinets also need a delivery and positioning plan; a body that can stand in the room may not be able to turn upright there.
Compare alternatives with the same inventory
Compare a shorter upper cabinet with a reachable shelf arrangement against a taller cabinet that adds reserve storage. Then compare an upper-free section with storage moved to a pantry or base drawers. Preserve the same list of objects in each option so that the comparison does not hide items that have lost a home. Open shelving needs its own reach and cleaning assessment.
A pull-down mechanism may help some users, but it also changes the interior, operating effort and maintenance needs. A conventional lower shelf may be simpler for a small collection. Test a sample mechanism if possible and confirm its permitted contents and cabinet fit. Choose the option that supports the household task rather than treating the most elaborate fitting as an automatic upgrade.
Order an elevation with a storage map
The drawing should show installed cabinet positions, door divisions, filler and trim, the finished floor reference and the intended contents. Include the people who need to use the reachable zone. Mark any area whose practical access still needs testing before order approval. A perspective image alone cannot settle those questions.
Review the chosen upper and tall cabinet specifications with the person responsible for measuring and installation. Resolve the mounting system, wall condition and appliance relationships in that scope. Keep storage decisions and structural decisions visible as separate tasks so that changing a shelf plan does not silently change the installation requirements.
A useful purchase decision names what belongs in each reachable compartment and explains how the remaining storage will be accessed. Keep that map with the approved elevation so that door styling does not displace the practical plan.
Pure White
Cream White
Light Warm Gray
Gray
Navy
Black
Oak Tone
Dark Walnut Tone
Design study These finish studies are design references, not a list of currently orderable colors. Screens and lighting change the appearance; compare a physical sample before choosing.See all finish options →
Buy a coordinated suite when every included appliance earns its place. Mix brands when a specific everyday task justifies the difference, after comparing the visible fronts and the complete installed purchase.
Compare the offered wood drawers by required length, opening method and complete construction. MOVENTO is not an automatic upgrade for every drawer, and one runner family need not serve every location in the kitchen.
Choose the dispenser package with your everyday glasses, bottles and ice routine. A plain refrigerator front can still conceal a water outlet, while a door dispenser changes access without creating a separate drinks station.
The sample shows the door frame, a separate center panel, the face frame and the cabinet box. Each component has its own place in this Shaker construction.
Shaker construction: door frame, center panel, face frame and cabinet box. The cutaway helps locate these parts; confirm each material in the specifications for the selected cabinet.
01 / Door frame
The Shaker door has rails and stiles around a separate center panel. The frame and center panel are different components; confirm their materials in the specifications for the selected cabinet.
02 / Face frame
The face frame surrounds the opening at the front of the cabinet box and sits behind the doors. The face frame, door frame and cabinet box are separate parts.
03 / Cabinet box
The sample exposes the cabinet sides, interior surfaces and layered edges. The image does not establish the wood species or material specification of a selected cabinet.