Choose the under-cabinet light position before the light rail
A light rail can hide a fixture while also blocking useful light. Compare the work surface and seated sightline before finalizing the cabinet underside.
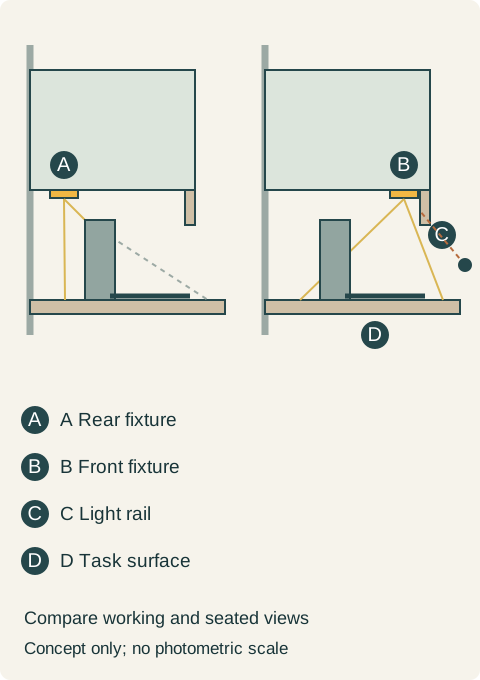
Choose the fixture position with the cabinet underside, light rail and actual work area in view. A decorative rail is not an independent trim decision: its lower edge can hide the light source from someone seated nearby, but it can also interrupt light traveling toward the front of the counter. More brightness does not correct an obstructed path.
Kichler describes rear, direct-wired and front, linked installation arrangements for its under-cabinet fixtures. Both positions are legitimate product configurations; the useful choice depends on the surrounding cabinet and task.
A rear fixture is close to the backsplash. A tall container between it and the cutting board can cast a shadow onto the work. Moving a fixture forward changes that relationship, but may expose the diffuser to a diner looking back toward the kitchen. A glossy countertop can reveal a reflection even when the fixture itself is hidden. These effects depend on the actual surfaces and geometry; a diagram cannot predict their brightness.
Draw the cabinet bottom, fixture body and rail in section. Include the connector or cable space and the route by which the fixture can be serviced. A rail that covers the diffuser edge may also cover a release tab. Continuous trim should not make a replaceable component inaccessible.
Teaching example Conceptual side sections: a rear fixture and a front fixture illuminate different paths. The rail, task area and seated sightline must be considered together; these are not calculated light distributions.
A preparation counter beside a dining area
Consider a counter used for chopping, with tall storage canisters against the backsplash and dining seats opposite. A rear-mounted trial fixture leaves the board in the canisters' shadow. A front-mounted trial clears that obstruction, but its diffuser is visible from the dining chair. The selected assembly puts the light toward the front, behind a rail whose depth is tested with the chosen fixture. The test retains light on the board and conceals the direct source from that chair. If deeper trim blocks the board again, the assembly fails rather than being rescued by a brighter lamp.
This choice establishes a front lighting zone and a serviceable rail detail before the cabinet order. It does not establish a universal setback. The fixture, connection method and manufacturer’s mounting instructions still govern the final construction.
Put the underside detail in the cabinet scope
Specify whether the bottom is flat, recessed or interrupted by adjoining cabinets; where lighting sections stop; and how the rail returns at exposed ends. Show the working and seated viewing positions used in the trial. Finish samples under that light help judge appearance, but cabinet color does not determine the required output. A satisfactory layout lights the task, controls direct views of the source and leaves a practical way to replace the equipment.
Pure White
Cream White
Light Warm Gray
Gray
Navy
Black
Oak Tone
Dark Walnut Tone
Design study These finish studies are design references, not a list of currently orderable colors. Screens and lighting change the appearance; compare a physical sample before choosing.See all finish options →
Buy a coordinated suite when every included appliance earns its place. Mix brands when a specific everyday task justifies the difference, after comparing the visible fronts and the complete installed purchase.
The sample shows the door frame, a separate center panel, the face frame and the cabinet box. Each component has its own place in this Shaker construction.
Shaker construction: door frame, center panel, face frame and cabinet box. The cutaway helps locate these parts; confirm each material in the specifications for the selected cabinet.
01 / Door frame
The Shaker door has rails and stiles around a separate center panel. The frame and center panel are different components; confirm their materials in the specifications for the selected cabinet.
02 / Face frame
The face frame surrounds the opening at the front of the cabinet box and sits behind the doors. The face frame, door frame and cabinet box are separate parts.
03 / Cabinet box
The sample exposes the cabinet sides, interior surfaces and layered edges. The image does not establish the wood species or material specification of a selected cabinet.