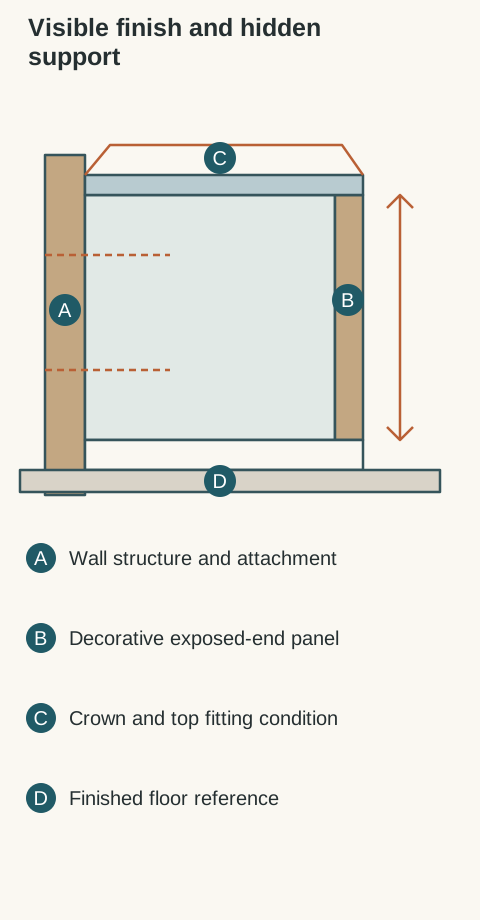
A cabinet quote can appear complete while omitting the pieces that make a run fit the room. End panels, fillers, toe kicks and crown finish visible edges; wall attachments and supporting construction carry loads. List these jobs separately so an attractive panel is not mistaken for a structural solution.
Identify every visible end and gap
Mark exposed cabinet sides, appliance openings, wall ends and the back of an island on the plan. Decide which surfaces need a finished panel and which factory-finished sides can remain visible. Check whether a panel covers the cabinet side or changes the overall run width. Use its actual construction, not a thin line in a rendering.
At a wall, allow the selected cabinet and door system the clearance it needs to open. A scribed filler adapts an edge to field conditions; a decorative end panel dresses an exposed face. These roles are different. Show what the installer will trim and what must arrive at the ordered size, including the finished edge that remains after cutting.
Treat trim as a measured assembly
Build the intended crown, light rail and toe-kick profile from the actual part drawings. Check the total projection, joints at corners and returns at exposed ends. A profile may fit above a cabinet and still collide with a soffit, room casing or neighboring tall unit. Keep the finished ceiling line and the cabinet top line distinct.
The lower trim should preserve access to adjustable components or service areas where the design requires it. Coordinate vents and appliance fronts rather than continuing a decorative toe kick across them automatically. Confirm how cut ends are finished. Do not assume a general touch-up product will match every material or cover an exposed unfinished edge satisfactorily.
Diagram Conceptual section separates the wall support zone, cabinet body, applied panel, trim and floor. It supplies no fastener schedule, load rating or flooring installation sequence.
Resolve what supports the cabinet
Identify the wall construction, attachment zones and any openings or utilities behind the run before the installer selects a fastening method. A decorative skin is not a wall stud or a backing member. Adjacent cabinets joined together also do not automatically resolve a weak attachment to the building.
KraftMaid publishes installation guidance for its own construction. Obtain equivalent instructions for the actual selected cabinets and have the installer assess the wall and fasteners within that scope. Do not copy a screw schedule or load claim from another brand. Where framing or backing must change, make that preparation a defined construction task rather than a field assumption.
Show the existing floor, planned finished floor and cabinet bearing surface. Discuss the installation sequence with both cabinet and flooring installers. Some flooring systems have restrictions around fixed cabinetry, so use the selected flooring instructions rather than a universal rule about which trade always goes first.
Check floor build-up at the dishwasher and other appliances that slide under a counter. A later floor layer can reduce the removal opening even when the appliance fitted during installation. Record the final floor reference for heights, toe kicks and tall-unit clearances. Resolve transitions to adjacent rooms and any unfinished areas that might become visible during service.
Make a parts and responsibility map
On the drawing, identify each panel, filler, trim length, return and attachment requirement by its function and finish. Include who supplies it, who fits it and whether its size is field-cut or factory-set. Check the order for matching edges and the chosen door style rather than accepting a single line called miscellaneous trim.
Compare simplifications before removing necessary fitting allowances: a plainer crown, fewer decorative returns or a factory-finished side may reduce complexity. Keep opening clearance and support requirements intact. When the wall or floor condition differs from the measured record, pause the affected installation decision and revise the detail before an irreversible cut.
A complete plan identifies both the visible parts and the construction supporting them. Order against that plan so installation does not depend on improvising a missing finish piece or an unverified wall attachment.
Pure White
Cream White
Light Warm Gray
Gray
Navy
Black
Oak Tone
Dark Walnut Tone
Design study These finish studies are design references, not a list of currently orderable colors. Screens and lighting change the appearance; compare a physical sample before choosing.See all finish options →
Buy a coordinated suite when every included appliance earns its place. Mix brands when a specific everyday task justifies the difference, after comparing the visible fronts and the complete installed purchase.
Compare the offered wood drawers by required length, opening method and complete construction. MOVENTO is not an automatic upgrade for every drawer, and one runner family need not serve every location in the kitchen.
Choose the dispenser package with your everyday glasses, bottles and ice routine. A plain refrigerator front can still conceal a water outlet, while a door dispenser changes access without creating a separate drinks station.
The sample shows the door frame, a separate center panel, the face frame and the cabinet box. Each component has its own place in this Shaker construction.
Shaker construction: door frame, center panel, face frame and cabinet box. The cutaway helps locate these parts; confirm each material in the specifications for the selected cabinet.
01 / Door frame
The Shaker door has rails and stiles around a separate center panel. The frame and center panel are different components; confirm their materials in the specifications for the selected cabinet.
02 / Face frame
The face frame surrounds the opening at the front of the cabinet box and sits behind the doors. The face frame, door frame and cabinet box are separate parts.
03 / Cabinet box
The sample exposes the cabinet sides, interior surfaces and layered edges. The image does not establish the wood species or material specification of a selected cabinet.