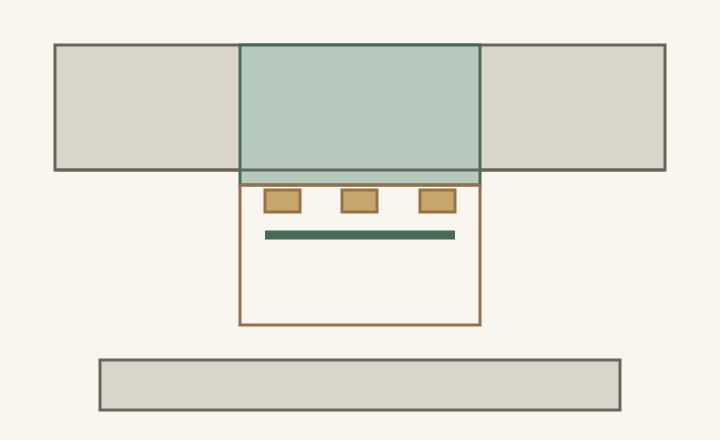
Measure the range’s projecting controls and handle into the aisle
A cabinet-front aisle dimension can miss the range’s closest projections. Separate the closed controls and handle from the open oven door, then check the actual cooking and passing tasks.
Check the aisle beside a range from the parts that actually project into it, not only from neighboring cabinet fronts. Controls, the closed oven door and its handle may occupy different planes, while opening the oven creates another state entirely. Record those states separately. A generous-looking gap between cabinet boxes can conceal a more constrained working position at the appliance.
Use matching physical references for every depth
Locate the range as the selected installation instructions require, using the actual rear conditions. Then identify the cabinet door plane, counter edge, appliance face, control projections and handle. Obtain dimensions for the complete selected arrangement; do not compare a body-only depth with a cabinet measurement that includes fronts. Note what a listed overall depth includes before drawing its boundary.
GE’s appliance measuring guidance treats door-opening space as an additional check beyond basic height, width and depth, and directs readers to model specifications and installation instructions. That distinction supports separate closed and open states here. It does not establish a universal range projection or aisle requirement.
Show the controls and handle in plan, then identify their heights in an elevation or section. They may overlap on a plan while meeting the person or adjacent furniture at different levels. A knob projecting less than the handle can still matter to a hand reaching past it. A single outer rectangle is useful for overall occupation but cannot explain every local interaction.
Include the opposing finished edge and its handles or other relevant projections. Measure the local relationship from the same references on both sides. Do not subtract an appliance’s entire depth from an aisle already measured between finished fronts; that double-counts the part located behind the starting boundary. The sketch should make clear which additional projection changes the available region.
ABCD
Diagram Projected components are superimposed to compare states and can be at different heights. The brown outline represents an illustrative open-door state; it is not simultaneous solid cabinetry or a clearance standard.
A
The cabinet front alone does not define the range edge.
B
Check actual control projections and their height.
C
Include the closed handle in the everyday aisle.
D
Review the open-door state separately.
Test cooking access and passing as different activities
Represent the cook at the controls with a suitable cold mockup and identify the space used by their body and hands. Then check the intended passing route beside that occupied position. A path that exists when nobody is cooking may not remain practical during use. Keep circulation from depending on a passer brushing controls or squeezing past the cook.
Review oven loading with the door in its required open position, including the person’s stance and the route to the intended landing surface. This is a different check from walking past the closed handle. Do not use a successful closed-door passage to approve unloading, or count the open door’s footprint as if it describes the entire person-and-dish task.
Find the difference hidden by aligned fronts
In a hypothetical kitchen, the range opening fits neatly between cabinets and the counter fronts align across the room. The layout is judged using those lines. Adding the selected range’s handle reveals that the everyday passage is locally narrower at the cooking position; adding the open door reveals another conflict with access to an opposite drawer. The cabinet spacing itself has not changed.
Compare a range with a documented different front arrangement, a revised opposite cabinet or another supported layout. Do not push the appliance backward merely to recover aisle space without verifying the required installation, rear services and surrounding relationships. Nor should removing or substituting operating controls be treated as a cabinet-layout adjustment.
Record which operating state controls the decision
Keep separate findings for the closed aisle, occupied cooking position and open-oven task. Describe a conflict by the specific part, height and activity involved. This lets a designer distinguish an everyday handle obstruction from an occasional door-and-drawer overlap, instead of responding to an unexplained statement that the kitchen feels tight.
Save the selected range documentation and the finished-front sketch with these findings. Recheck when handles, island depth or the appliance change. The final plan should satisfy the applicable installation requirements and the intended household tasks; these geometric checks supplement that review rather than setting a universal safe aisle dimension.
Pure White
Cream White
Light Warm Gray
Gray
Navy
Black
Oak Tone
Dark Walnut Tone
Design study These finish studies are design references, not a list of currently orderable colors. Screens and lighting change the appearance; compare a physical sample before choosing.See all finish options →
The basin, disposal, filter and their access requirements share the same cabinet. Resolve that complete arrangement first, then assign storage to the remaining usable regions.
A replacement’s face can cover an old opening without proving that its body, support or connections work. Compare the selected complete installation against the cabinetry you intend to retain.
The sample shows the door frame, a separate center panel, the face frame and the cabinet box. Each component has its own place in this Shaker construction.
Shaker construction: door frame, center panel, face frame and cabinet box. The cutaway helps locate these parts; confirm each material in the specifications for the selected cabinet.
01 / Door frame
The Shaker door has rails and stiles around a separate center panel. The frame and center panel are different components; confirm their materials in the specifications for the selected cabinet.
02 / Face frame
The face frame surrounds the opening at the front of the cabinet box and sits behind the doors. The face frame, door frame and cabinet box are separate parts.
03 / Cabinet box
The sample exposes the cabinet sides, interior surfaces and layered edges. The image does not establish the wood species or material specification of a selected cabinet.