Allocate the sink cabinet to equipment before choosing organizers
The basin, disposal, filter and their access requirements share the same cabinet. Resolve that complete arrangement first, then assign storage to the remaining usable regions.
Choose under-sink organizers after the sink, disposal, filter and connection arrangement has been coordinated. These items compete for a shared volume, and their occupied space is not limited to the shapes visible when everything is closed. First reserve equipment, verified connections and necessary access. Then decide which remaining regions can support storage that the household can actually retrieve.
Start with the complete equipment list
Record the exact sink and its installed underside, including the basin shape and drain location. Add the selected disposal and any filtration equipment, including separate tanks or heads when applicable. Use the actual products rather than generic symbols of a basin and small cylinder. A change to the sink can reposition the equipment below it even when the cabinet width stays the same.
Have the responsible installer confirm how those components and their services fit together. The furniture drawing should retain that confirmed arrangement, including relevant connections, shutoffs and access points. This is a space-allocation task, not a drain-routing or electrical-installation procedure. Do not solve an organizer conflict by casually relocating a connection or altering the equipment configuration on paper.
Reserve the maintenance movement, not just the installed body
For each maintained component, identify what remains fixed and what must move. A filter head may stay in place while a cartridge needs room for its prescribed release and withdrawal. An organizer that avoids the installed cartridge can still occupy the area needed when it is replaced. The same drawing should show both the installed state and the relevant maintenance state.
Aquasana’s cited replacement instructions describe turning and withdrawing its cartridge downward from the system head. This specific example explains why body fit alone is insufficient. Other filters can use different arrangements, so derive the movement and access from the selected instructions rather than copying this direction universally.
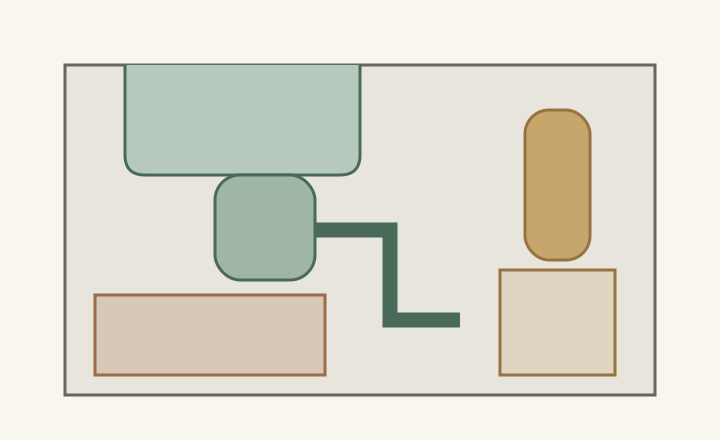
Diagram Equipment shapes and the connecting line are schematic, not an installation design. The gold region below the filter illustrates a task reservation; its size is not a required clearance. The brown region is only a storage candidate.
A
The selected basin sets the starting geometry.
B
Include the actual equipment below the sink.
C
Keep the applicable maintenance movement available.
D
Assign storage only after the complete arrangement is checked.
Treat remaining space as separate usable regions
Inspect the remaining regions around the coordinated equipment rather than adding all empty areas into a single capacity claim. A pocket behind a disposal may be physically empty but difficult to enter. A region below a filter may be temporarily clear during ordinary use but reserved for maintenance. Those spaces should not receive the same storage promise as a clear front corner.
Separate removable bins from fixed shelves and pullout hardware. Moving a small bin for an occasional task may be an accepted routine; removing a permanently mounted organizer is a different commitment. Name the objects that must move, where they can be put and how the access is restored. Avoid describing both arrangements simply as accessible.
Check equipment changes before retaining the old organizer
In a hypothetical replacement project, the household selects a deeper basin and keeps an existing pullout organizer in the drawing. The revised installed arrangement places the disposal lower, while the chosen filter needs its own removal region on the side. The organizer clears each item in separate product sketches but conflicts when the complete installation and moving parts are overlaid.
Resolve the combined arrangement with the installer and cabinet designer before committing to the organizer. Options might include a different supported equipment arrangement or a smaller storage feature in a genuinely available region. Cutting away part of a bin does not necessarily remove its frame or slide conflict, and moving the filter is not automatically possible just because another corner looks empty.
Check access again with the intended contents in place
Place representations of the actual stored items in the proposed organizer. Include their handles, caps and the height of anything that moves with a pullout. Follow the normal retrieval path without pressing against equipment or connections. Then review the agreed maintenance sequence with storage present, because a layout checked only with empty baskets can hide the obstruction that matters in use.
Keep an equipment drawing, the confirmed installation arrangement and the final storage assignment together. Recheck after changing the basin, disposal, filter or organizer. The resulting capacity may be smaller than the empty cabinet suggests, but it will describe storage that coexists with the equipment and preserves the tasks needed to keep that equipment usable.
Pure White
Cream White
Light Warm Gray
Gray
Navy
Black
Oak Tone
Dark Walnut Tone
Design study These finish studies are design references, not a list of currently orderable colors. Screens and lighting change the appearance; compare a physical sample before choosing.See all finish options →
Compare locations by the vessels leaving the drawer, their intended destination and the people using that area. A matching appliance stack is only part of the decision.
A cabinet-front aisle dimension can miss the range’s closest projections. Separate the closed controls and handle from the open oven door, then check the actual cooking and passing tasks.
The sample shows the door frame, a separate center panel, the face frame and the cabinet box. Each component has its own place in this Shaker construction.
Shaker construction: door frame, center panel, face frame and cabinet box. The cutaway helps locate these parts; confirm each material in the specifications for the selected cabinet.
01 / Door frame
The Shaker door has rails and stiles around a separate center panel. The frame and center panel are different components; confirm their materials in the specifications for the selected cabinet.
02 / Face frame
The face frame surrounds the opening at the front of the cabinet box and sits behind the doors. The face frame, door frame and cabinet box are separate parts.
03 / Cabinet box
The sample exposes the cabinet sides, interior surfaces and layered edges. The image does not establish the wood species or material specification of a selected cabinet.