Verify opening, trim and services separately when replacing an appliance
A replacement’s face can cover an old opening without proving that its body, support or connections work. Compare the selected complete installation against the cabinetry you intend to retain.
When replacing an appliance while retaining its cabinets, separate the physical installation opening from the front trim that makes it look finished. Then check support and services independently. A new face that covers the old opening may still belong to an appliance that cannot be installed in it as proposed. The decision concerns the complete selected replacement, including any specifically approved accessories.
Establish what the installed appliance is hiding
Record the existing appliance identity, visible front and surrounding cabinet arrangement. Distinguish what you can measure directly from the cutout, support and connection conditions concealed behind it. Keep those concealed conditions unresolved until the appropriate inspection establishes them. Do not pull a built-in appliance out casually to obtain a measurement; coordinate access and handling with the responsible professional.
GE’s replacement worksheet explicitly separates measurements of the current wall oven from measurements of its cabinet cutout. It also notes that existing trim may be present. This is a useful example of why the visible face cannot be used as the opening measurement.
Compare the selected replacement with the actual opening
Obtain the replacement’s installation instructions and the requirements for its exact accessories and installation arrangement. Compare the specified cutout with the verified existing opening using consistent references. Identify any allowed range, necessary surrounding space and required mounting or support relationship from those documents. A shared nominal size narrows the search; it does not complete this comparison.
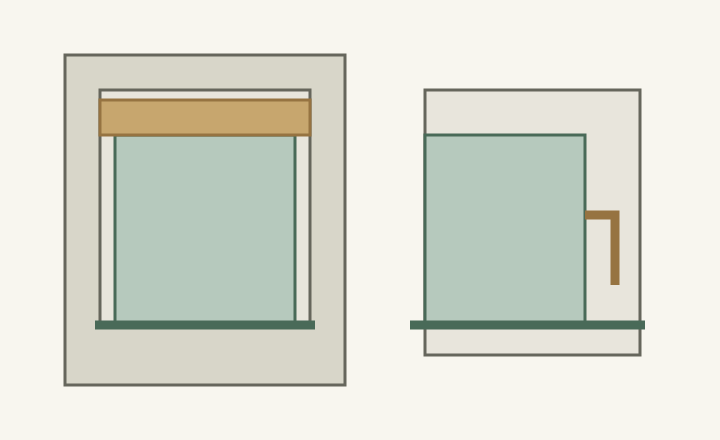
Keep body fit and front coverage as separate results. A trim piece may conceal an exposed edge without enlarging the opening or providing structural support. Conversely, an appliance body can fit while its finished face leaves old marks visible or conflicts with adjacent fronts. Each condition needs its own resolution rather than a general statement that the new unit fits.
ABCD
Diagram The gold front band illustrates visual coverage only; it does not certify support or installation compatibility. The side connection symbol is not wiring detail. All geometry is hypothetical and has no product dimensions.
A
Compare the actual opening with the required cutout.
B
Treat visible coverage as a separate decision.
C
Verify the specified support and mounting arrangement.
D
Reserve the real connection and service conditions.
Verify the parts that a front elevation cannot approve
Have the appropriate professionals confirm the retained cabinet’s suitability for the selected appliance and the required support and mounting arrangement. If a revision is needed, document the actual accepted detail. Do not assume that an old shelf or trim rail is suitable just because it supported the previous product, or propose an improvised spacer as a substitute for the specified installation.
Check electrical, water, gas or ventilation requirements as applicable, along with connection locations and access. A matching type of appliance does not establish that existing services satisfy the new model. Include the space occupied by the connections so the body is not shown sitting where those parts must be. The cabinet comparison records the verified result without prescribing trade work.
Do not let a tidy trim solution conceal an unresolved installation
In a hypothetical wall-oven replacement, the new front and a proposed trim band cover the old opening neatly. The drawing is treated as complete because no unfinished edge remains visible. Yet the retained support height does not establish the replacement’s specified mounting relationship, and the rear connection occupies part of the depth shown as available. The attractive elevation has answered only the coverage question.
Compare a supported adaptation with another compatible candidate or a clearly revised cabinet scope. Keep each unresolved condition visible until it has an actual solution. The correct response is not automatically a larger trim kit: covering more of the cabinet cannot resolve insufficient physical depth or an unverified support arrangement behind that cover.
Recheck use after confirming installation
Locate the new front at its verified installed position and test the required door movement, neighboring fronts and the user’s loading task. The handle or open door may differ from the old appliance even when the cutout is compatible. Include the agreed removal and service method so retaining the cabinets does not depend on an unexplained future dismantling process.
Keep the existing-condition record, selected model documents, opening comparison, trim decision and confirmed support and services together. Label hidden conditions as pending until checked. The final choice should explain how the replacement is installed and used within the retained kitchen, rather than relying on the old appliance’s size label or the new front’s ability to hide a gap.
Pure White
Cream White
Light Warm Gray
Gray
Navy
Black
Oak Tone
Dark Walnut Tone
Design study These finish studies are design references, not a list of currently orderable colors. Screens and lighting change the appearance; compare a physical sample before choosing.See all finish options →
A cabinet-front aisle dimension can miss the range’s closest projections. Separate the closed controls and handle from the open oven door, then check the actual cooking and passing tasks.
The basin, disposal, filter and their access requirements share the same cabinet. Resolve that complete arrangement first, then assign storage to the remaining usable regions.
The sample shows the door frame, a separate center panel, the face frame and the cabinet box. Each component has its own place in this Shaker construction.
Shaker construction: door frame, center panel, face frame and cabinet box. The cutaway helps locate these parts; confirm each material in the specifications for the selected cabinet.
01 / Door frame
The Shaker door has rails and stiles around a separate center panel. The frame and center panel are different components; confirm their materials in the specifications for the selected cabinet.
02 / Face frame
The face frame surrounds the opening at the front of the cabinet box and sits behind the doors. The face frame, door frame and cabinet box are separate parts.
03 / Cabinet box
The sample exposes the cabinet sides, interior surfaces and layered edges. The image does not establish the wood species or material specification of a selected cabinet.