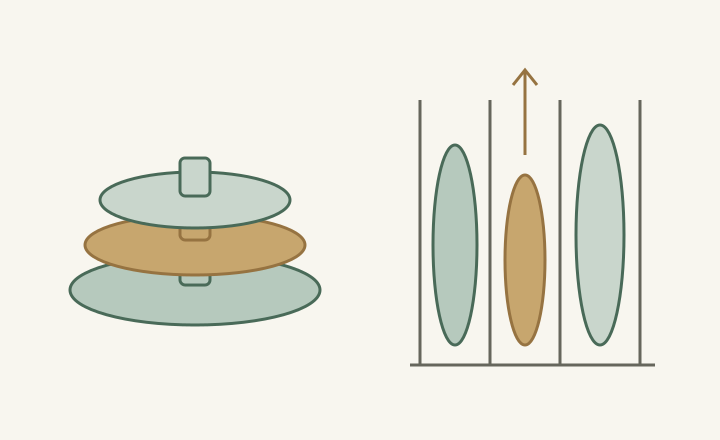
Store pot lids so the right one can leave without dismantling the cookware stack
Give lids recognizable positions and usable grips. Compare separate slots, shallow storage and lids kept with pots by the actual retrieval and return sequence.
Give each regularly used pot lid a place where it can be identified and removed without lifting an entire nested cookware stack. This may mean separate slots, a shallow area or leaving a lid with an independently accessible pot. The right choice depends on the collection and routine. Simply putting all lids together does not solve the problem if the needed one remains hidden beneath the others.
Identify the lid before designing its slot
Pair each lid with the cookware it actually belongs to. Check the real fit rather than assuming that similar diameter means interchangeability. Record the features that help the household recognize it, such as handle shape or its assigned position. If a lid serves several confirmed pieces, give it a shared location that makes sense for those pieces instead of duplicating its storage assignment.
Separate frequent lids from occasional ones and note which tend to be used together. A rarely used oversized lid may justify a different home, leaving clear access to the daily set. This is a priority decision, not a reason to discard anything. Keep the full inventory visible so an attractive organizer does not quietly leave an awkward lid without a workable place.
Measure the knob and grip as well as the rim
Represent the complete lid shape, including domed height, knob or handle and any projecting rim. For upright storage, check the width needed by that shape within the proposed support and the height needed to withdraw it. For flat storage, check the stacked height and access to lower pieces. A lid’s diameter alone does not describe either arrangement.
Try the actual hand position. A narrow slot may admit the lid while hiding the knob between neighboring lids. Pulling it out by an exposed edge can be awkward if that is not the intended grip. Leave the user able to identify and control the piece before lifting it; do not count a slot as usable solely because the lid can be pushed into it.
ABC
Diagram The upright lines represent a storage concept, not a specific rack or support design. The drawing compares access order and does not prove a capacity gain or suitability for every lid.
A
Lower lids in a pile may require moving others.
B
Separate positions can preserve identification and grip.
C
Check the complete withdrawal path above the slot.
Compare arrangements by what must move first
A separate upright position can allow a chosen lid to leave without moving its neighbors, provided the actual support and removal path work. A shallow flat area can keep a small collection visible without requiring tall withdrawal space. Keeping a lid on its pot can be convenient when that pot itself remains accessible. Compare these specific conditions rather than treating one orientation as universally better.
If considering a door-mounted holder, include the loaded holder in the door’s closing and opening paths and verify its supported installation and capacity. It occupies space inside the cabinet that might already belong to a pot or pullout. Moving lids to the door does not create free volume; it reallocates volume and changes the access sequence.
Expose the lid hidden by efficient nesting
In a hypothetical cabinet, pots nest neatly and their lids are slipped inside the stack. The frequently used saucepan is easy to take out, but its lid sits under another nested pot. Preparing a simple meal requires unloading unrelated cookware, then finding temporary places for it. The storage is compact, yet the lid prevents the intended quick access to the saucepan.
Try a separate place for that daily lid and test whether the remaining cookware arrangement still works. It may be unnecessary to move every lid or purchase a large organizer. Alternatively, compare a shallow lid drawer against the storage it would replace. The useful change removes the repeated obstruction without leaving the occasional pieces or other daily tools unassigned.
Make the assigned place survive the cleanup routine
After the cookware is prepared for storage according to its care instructions, rehearse returning lids in the order they normally become available. Check that an empty position remains recognizable when its matching pot is elsewhere. A system that works only when every piece returns together may be repeatedly rearranged after washing and gradually lose the access advantage it was meant to provide.
Keep a simple position record for the household if the pieces look similar, and revise it when cookware changes. Confirm each selected support and the full stored load independently of this layout trial. The goal is a lid that can be found, grasped and returned with an understandable place, while the cookware around it remains usable.
Pure White
Cream White
Light Warm Gray
Gray
Navy
Black
Oak Tone
Dark Walnut Tone
Design study These finish studies are design references, not a list of currently orderable colors. Screens and lighting change the appearance; compare a physical sample before choosing.See all finish options →
Bowl diameters can fit while handles cross or block a neighboring pan. Lay out the complete shapes, then test independent lifting and the return after washing.
Check the complete pot, lid knob and side grips through the opening and into the user’s hands. A tall interior can hide a lower front obstruction that prevents straightforward removal.
The sample shows the door frame, a separate center panel, the face frame and the cabinet box. Each component has its own place in this Shaker construction.
Shaker construction: door frame, center panel, face frame and cabinet box. The cutaway helps locate these parts; confirm each material in the specifications for the selected cabinet.
01 / Door frame
The Shaker door has rails and stiles around a separate center panel. The frame and center panel are different components; confirm their materials in the specifications for the selected cabinet.
02 / Face frame
The face frame surrounds the opening at the front of the cabinet box and sits behind the doors. The face frame, door frame and cabinet box are separate parts.
03 / Cabinet box
The sample exposes the cabinet sides, interior surfaces and layered edges. The image does not establish the wood species or material specification of a selected cabinet.