

Construction & materials
Open-pore or filled-pore wood cabinets: choose the clear-finished surface
Visible wood grain can remain beneath a smooth finish. Decide whether the cabinet should retain pore relief or use a filled, leveled surface, then select sheen separately.
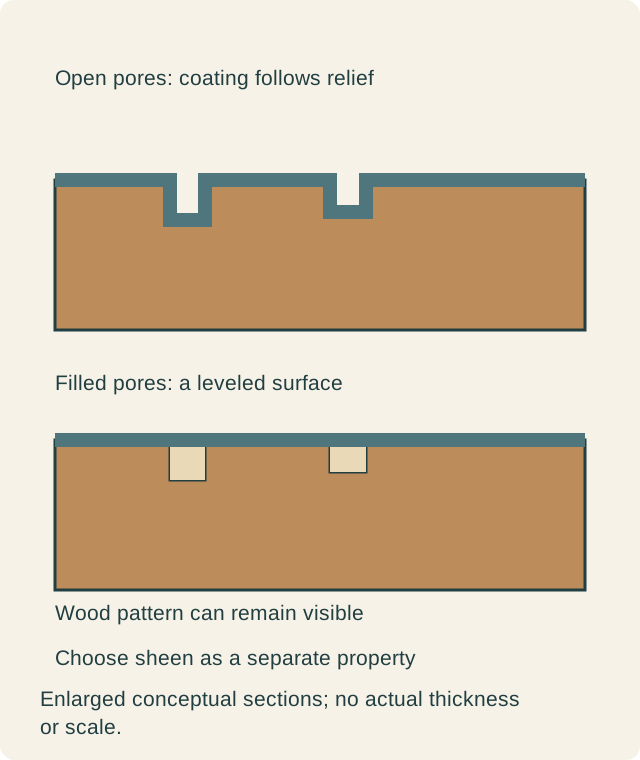
A clear-finished wood cabinet can show its grain while feeling relatively smooth, or retain shallow depressions that follow the grain. Decide which surface you want before approving the finish. Clear grain filling is one way to pursue the smoother result; leaving pore relief visible creates another appearance. Neither choice is settled by a stain color or by selecting matte instead of gloss. Ask to compare finished samples that make the surface profile visible.
Grain pattern and pore relief are separate observations
The grain pattern is the wood drawing you see across the face. Pore relief is the change in surface height that can interrupt reflected light or be felt with a permitted touch. A filled surface need not look painted, and a visible wood pattern does not prove that the coating follows open pores. Keep those observations separate when describing a sample to the cabinet maker.
Aqua Coat describes its Clear Wood Grain Filler as filling wood pores for smooth clear finishes, and lists cabinets among its uses. This is an example of an added filling stage.
Reading note: Aqua Coat: Clear Wood Grain Filler, description and cabinet applications.
The same manufacturer recommends a final finish over its filler. A filled demonstration board without its intended topcoat is therefore not the completed finish being discussed here.
Reading note: Aqua Coat: Directions for Clear Grain/Pore Filler.
Sheen cannot specify the surface underneath it
Matte and gloss describe the selected reflective appearance, while pore filling concerns the shape beneath that appearance. A glossy sample may retain small grain depressions; a low-sheen sample may have a leveled face. If you want a quiet reflection and a smooth touch, state both requirements. Asking only for matte can leave the tactile result unmade.
Compare the options under ordinary light that travels across the sample. Then look more directly at it, where the wood pattern becomes easier to assess without the reflection dominating. You are answering different questions at these positions. An intentionally close inspection can explain the surface, but the final selection should also look right from the kitchen’s normal work and seating positions.
Preserve the wood you selected
Suppose the attraction of a veneered island is its sweeping grain. Do not assume a smooth surface must sacrifice that drawing. Request the intended transparent finish on representative veneer, including any color treatment. The useful comparison shows whether that particular completed filling sequence retains the detail you like, rather than whether a can is labeled clear.
The opposite preference is also reasonable. An owner may want the surface to read as visibly textured wood when daylight passes across it. A level, polished-looking sample may feel too formal for that design. Leaving a deliberate amount of pore relief can be the accepted result, provided the sample still represents a complete protected finish rather than an unfinished workshop stage. Do not select roughness by withholding a necessary coating step.
Review a complete front, including its borders
Pore filling on the broad field does not describe every corner, edge and profile. Ask the maker to show the offered front family with its intended edge treatment. A slab front and a frame-and-panel door have different visible transitions. An edge may deliberately retain a different appearance; the question is whether that relationship suits the design and is represented in the sample.
Look at the joint between the moving front and a neighboring exposed end. The surface does not need to be identical everywhere, but an unintended contrast can become conspicuous around an island corner. Identify which pieces receive the filled sequence and which retain another accepted finish. A matched stain name will not explain a change from a level reflection to strongly visible pore relief.
A hypothetical dining-side island chooses a smoother field
Imagine an island with wood doors facing a dining table. The owner likes a restrained color and wants the grain to be visible, but dislikes the broken reflection on an open-pore sample beneath the planned pendant lights. A completed filled-pore sample in the intended sheen keeps the drawing readable and has a calmer reflected field. The owner selects it for that door and end-panel group.
The decision does not establish a cleaning or scratch-resistance ranking. It resolves a specific appearance under the lighting in which the island will be seen. The maker supplies the same approved sequence on the companion end, so the transition at the corner does not become an accidental finish change. The hypothetical owner accepts normal wood variation instead of demanding a printed-looking identical pattern.
Another household might prefer the first sample precisely because its reflected light describes the grain. That is a different, equally clear design brief. It would be inconsistent to approve open relief for its character and later reject every visible pore as incomplete finishing. The physical sample should define the intention before that intention is repeated across the room.
A clearer surface still needs the right care instructions
Do not infer stain immunity, resistance to every cleaner or an invisible repair from the presence of filler. The supplied topcoat and complete construction still govern the care proposal. Ask for the instructions applicable to the identified finished cabinet. The buyer should not need to work out whether a generic wood polish is compatible with a hidden intermediate layer.
For an existing mark, distinguish dirt or residue from a pore deliberately present in the accepted sample. Avoid adding polish, filler or extra coating simply to make a dark line disappear. A local addition can create a different reflection from the surrounding front. Let the responsible finisher assess whether the concern involves the coating, the wood or something sitting on the surface.
Keep the comparison complete if production changes
Retain the finished sample, wood construction, color sequence, filling choice and final sheen together. If a shop proposes a different filler or removes that stage, compare a completed alternative on representative material. An explanation that the substitute is also clear does not establish the same surface. Equally, do not reject a documented alternative solely because its process name differs when its completed result and required performance have been properly reviewed.
For a later replacement, the record explains whether visible depressions were intentional and how the original face was completed. Match the new part against the installed group as well as the old sample. The useful promise is a defined finish to evaluate, rather than a claim that smooth wood never changes or that future repair work will always disappear.
Sources & further reading
- Aqua Coat: Clear Wood Grain Filler, description and cabinet applications
- Aqua Coat: Directions for Clear Grain/Pore Filler