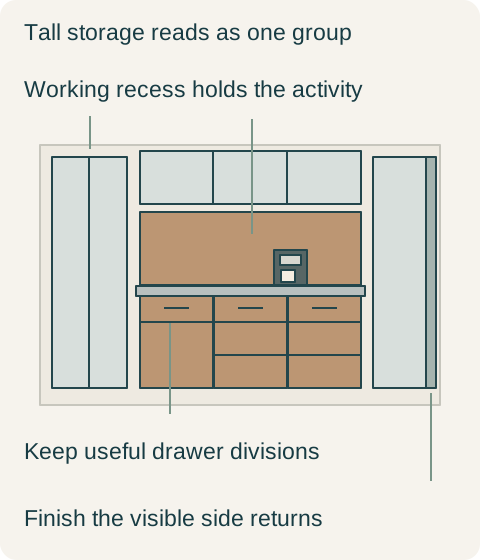
A modern slab kitchen works best when the cabinet wall has an understandable order. Begin with the large groups, the breaks between them and the things that must remain visible in daily use. Then choose the surface. Buying a flat door in an appealing finish cannot rescue a wall divided into unrelated strips, an awkward appliance opening or a counter that has nowhere to put the objects the household actually uses.
Read the wall as a set of useful volumes
Stand at the entrance or dining position and describe what the kitchen should show: a storage wall, a working recess, a wood island, perhaps an exposed cooking appliance. These are useful visual groups. They do not require every cabinet to be the same width or every appliance to disappear. A clearly grouped arrangement can accept differences within it without making every difference the main event.
Dura Supreme’s Ultra Modern guide uses slab fronts, restrained geometry and reduced ornament as a design vocabulary. That is the manufacturer’s style interpretation, not a requirement that every modern kitchen use a particular cabinet construction or glossy finish.
Draw the outer boundaries of the tall group and the counter group first. Add real door and drawer divisions inside those outlines. If the tall unit next to the working area extends higher, decide whether it is a separate tower or part of a continuous wall. A thin leftover strip at its side should be accounted for as a fitted part, not disguised as a design feature after the order arrives.
Teaching example Hypothetical room-composition study. Grouping and joint lines illustrate the article’s choice; this is not a measured plan or an appliance installation drawing.
Align what matters without sacrificing the drawers
Horizontal lines become especially noticeable when the fronts have no decorative frame. Decide which line deserves continuity: the counter, the top drawer row or the upper cabinet base. It is rarely useful to demand that every joint line continue across a refrigerator, dishwasher and drawer bank. Their openings serve different purposes. The more successful drawing identifies a few dominant alignments and allows necessary secondary divisions to remain secondary.
Do not replace a useful drawer arrangement with a false pattern simply to make the elevation perfectly regular. Open the proposed cabinets mentally from the main work position: which front brings out cutlery, which reveals pans, and which is an appliance? If a decorative division suggests an opening that does not exist, decide whether that visual fiction is worth having. On a very plain wall, a misleading seam can become more noticeable than the irregularity it was meant to conceal.
Give the everyday objects a place in the composition
A photograph with an empty counter is a poor model for a household that leaves a coffee machine, bread bin and dish rack in use. Show those objects on the room view before committing to an uninterrupted backsplash or a very small working recess. Keeping an appliance in an accessible place can be more consistent with a simple kitchen than hiding it behind fronts that must remain open whenever someone uses it.
The same applies to handles. A visible pull introduces a repeated mark, but it also identifies where a front opens. Select its shape and position as part of the wall drawing, including tall doors and appliances. If a handleless system is preferred, compare the actual opening action and the visible channels it creates. Removing a projecting pull does not remove every line, and the absence of handles should not be mistaken for the absence of a hardware decision.
A wood working recess inside a quieter storage wall
Consider a hypothetical apartment where the kitchen is seen directly from the dining table. The first proposal alternates wood and pale doors throughout the tall bank and gives each drawer stack a different horizontal division. The owners like both finishes, but from the table they see a patchwork of parts rather than an identifiable kitchen wall. The coffee machine also sits in front of the proposed decorative backsplash.
They keep the useful storage arrangement and revise its expression. The tall doors become a single pale group. Wood is concentrated around the working recess and its lower fronts; the island remains pale so that it does not introduce another competing wood block. The principal top drawer line continues through compatible base units, while the appliance opening keeps its necessary division. The coffee machine gets an open, usable position within the recess.
They choose this version because the kitchen has a recognizable center from the dining table and the working objects belong inside it. The rejected alternative was not defective or insufficiently modern; it simply spread attention more evenly than the household wanted. The selected order includes the recess returns and visible end treatment, so the wood group has a complete outline when viewed at an angle.
Choose the surface after the grouping survives a plain drawing
View the proposed wall without rendered grain, stone veining or dramatic lighting. If the arrangement only looks coherent when those effects hide its joints, revisit the grouping. Then add the chosen surface and observe how its pattern runs across the intended area. A strong directional material may support a long group, while a large isolated pattern on every front can make that group read as separate pieces.
Keep the actual surface construction, edge treatment and maintenance requirements in the purchase comparison. A modern appearance does not establish any of those properties. Spend on the parts that complete the visible volumes, such as the dining-facing end and the recess returns, before adding a costly accent that cannot be seen from the main room. The final elevation should explain both how the kitchen looks closed and how the household uses it open.
Pure White
Cream White
Light Warm Gray
Gray
Navy
Black
Oak Tone
Dark Walnut Tone
Design study These finish studies are design references, not a list of currently orderable colors. Screens and lighting change the appearance; compare a physical sample before choosing.See all finish options →
Choose antiqued mirror for the reflected scene and concealed storage you want. Compare the full door group, its patterned surface and the view when it opens before replacing transparent glass.
The sample shows the door frame, a separate center panel, the face frame and the cabinet box. Each component has its own place in this Shaker construction.
Shaker construction: door frame, center panel, face frame and cabinet box. The cutaway helps locate these parts; confirm each material in the specifications for the selected cabinet.
01 / Door frame
The Shaker door has rails and stiles around a separate center panel. The frame and center panel are different components; confirm their materials in the specifications for the selected cabinet.
02 / Face frame
The face frame surrounds the opening at the front of the cabinet box and sits behind the doors. The face frame, door frame and cabinet box are separate parts.
03 / Cabinet box
The sample exposes the cabinet sides, interior surfaces and layered edges. The image does not establish the wood species or material specification of a selected cabinet.