Dura Supreme's door catalog lists flat-panel, raised-panel and slab categories separately from overlay choices. That is a useful distinction: a Shaker-like frame is an appearance, while inset or overlay describes how a door sits at the cabinet. A similar-looking front may use different materials or fabrication methods. Use the selected product's drawing for those details rather than inferring them from the category name.
Begin with a full-size door sample if available. A small finish chip cannot show the relationship between the frame and the center panel, the corner detail or the edge that your hand touches. Compare the sample with the largest and smallest fronts in the proposed kitchen. The same profile can feel restrained on a tall door and crowded on a shallow drawer.
Compare the visible shapes
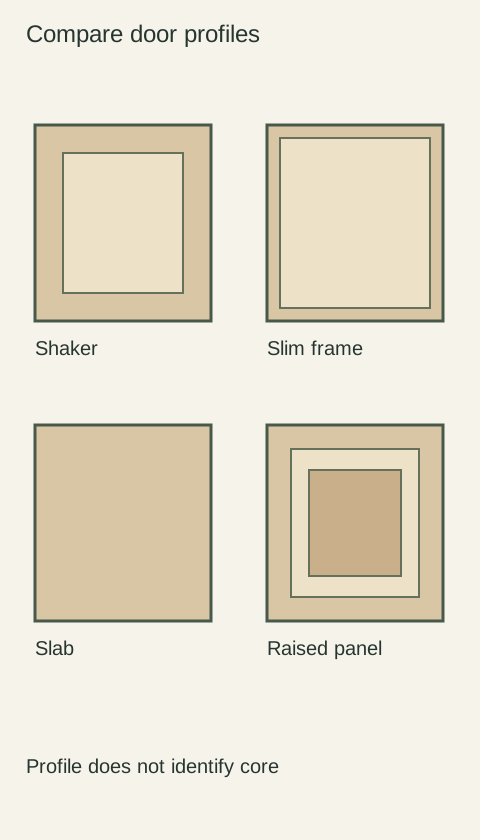
A conventional Shaker-style door has a framed appearance around a recessed, relatively plain center. Slim Shaker narrows the visible frame, though the label does not promise a standard frame width. Slab presents a continuous face without a surrounding recessed-panel frame. A raised-panel front adds a shaped center and changes the shadows across the door.
These sketches describe profiles, not how a particular door is assembled. A routed panel may imitate a framed look, and a slab can have a veneered or decorative surface over a separate core. Request the actual section or material schedule if joint appearance, repairability or edge treatment affects your choice.
Diagram Illustrative diagram; not a product specification.
Look at drawer fronts and exposed ends
Ask to see the complete door-and-drawer combination, including narrow fronts. A catalog may pair a framed door with a plain drawer front. That can be intentional; it still needs to appear on the approved selection. Check whether the profile continues across a bank of drawers or changes between shallow and deeper fronts.
Exposed ends, fillers and appliance panels affect the finished composition too. Decide whether an end should be a plain matching panel or a door-style decorative panel. A photograph that shows only front elevations will not answer that question. Mark the visible ends on the plan so an unwanted plain side does not appear at an open walkway.
Test the hand and cleaning route
Run your hand along the sample edge and across its inside corners. Consider where cooking residue might settle and whether your normal cloth reaches the recess. A flat face offers a simpler wiping route, but its edges and pull locations still need attention. A detailed door adds surfaces to clean; that may be a reasonable trade if the shape is central to the room.
Place the proposed knob or pull on the sample using a removable paper template. Check that the foot of the hardware sits on a suitable flat area and that your fingers can grip it. Do not drill a display sample. A narrow frame can limit a mounting location even when the handle looks good in an online image.
Make the room comparison fair
Compare candidate doors with the same surrounding floor and countertop samples and in the lighting you expect to use. Keep the hardware proposal visible. Changing the color, door profile and hardware together makes it difficult to know which change you prefer. Start with the profile, then refine finish and handles.
In an illustrative kitchen with plain slab upper fronts and framed lower fronts, draw the junction at a tall cabinet before approving the mix. The issue is whether the edges and proportions meet deliberately. You do not need to declare that one style belongs to a particular decade or that another can never become dated.
Put the whole combination on the order
Record the manufacturer's door name, material, finish, edge treatment, overlay or inset choice, drawer-front arrangement and exposed-end treatment. Keep a photograph of the approved sample label. If a slim style requires different hardware placement or a matching decorative panel, include that decision on the drawing. A clear selection lets you compare the delivered parts with what you chose, rather than with a broad word such as “modern.”
Review the whole elevation before the favorite close-up
Print or sketch the selected profile across the actual cabinet arrangement. Include a tall door, narrow drawer fronts and the visible side at the end of the run.
Look for places where a frame disappears, a pull crosses a profile or an applied panel changes the rhythm. A mixed arrangement can work, but the transition should be intentional.
If the sample is shown in a different door size or material, identify that difference. Approve the actual door-and-drawer combination rather than assuming the close-up represents every front in the order.
Finish references
Pure White
Cream White
Light Warm Gray
Gray
Navy
Black
Oak Tone
Dark Walnut Tone
Design study Design references only. The finish studies do not establish actual material, color matching or availability. Compare the selected physical sample.See all finish options →
Compare the actual countertop products, heat-source routine and fabrication proposal. A fired porcelain slab and resin-bound quartz are different materials, but neither label replaces a complete kitchen specification.
Compare a complete tile-and-grout installation with a specified slab surface. The choice changes the wall’s repeated joints, material transitions, care and finished edges.
Granite is a broad commercial name; quartz surfacing is a manufactured product. Choose with the selected slabs, care requirements and complete fabrication in view.
The sample shows the door frame, a separate center panel, the face frame and the cabinet box. Each component has its own place in this Shaker construction.
Shaker construction: door frame, center panel, face frame and cabinet box. The cutaway helps locate these parts; confirm each material in the specifications for the selected cabinet.
01 / Door frame
The Shaker door has rails and stiles around a separate center panel. The frame and center panel are different components; confirm their materials in the specifications for the selected cabinet.
02 / Face frame
The face frame surrounds the opening at the front of the cabinet box and sits behind the doors. The face frame, door frame and cabinet box are separate parts.
03 / Cabinet box
The sample exposes the cabinet sides, interior surfaces and layered edges. The image does not establish the wood species or material specification of a selected cabinet.