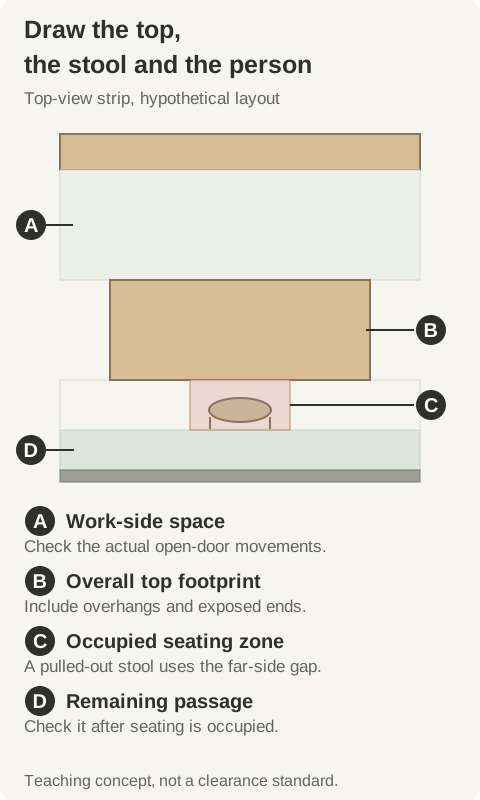
Choose an island when the room can support its complete footprint, the work happening beside it and the paths around it. Choose a peninsula when attaching a cabinet run at one end better serves the room, while preserving a workable entrance. Start with the cabinet jobs and open-door movements before choosing a photograph. An island that adds storage but blocks the dishwasher is not a storage improvement at that moment. A peninsula that looks compact can still cut across the route from the kitchen to the dining table.
Give the new cabinet run a job
Write down what the island or peninsula is meant to do: preparation, dish storage, waste sorting, seating or space for an appliance. Decide which is essential and which can go elsewhere. Place frequently used drawers toward the person doing the work. Consider dishes near the cleanup route and small tools near the preparation position, but check who opens each drawer and where that person stands. Decorative back panels on the seating side do not create usable cabinet access. A door or drawer facing a stool needs room for both activities.
KraftMaid’s kitchen-layout guide connects cabinet arrangements with appliance positions, work areas and circulation. Its layouts include a peninsula as part of a G-shaped arrangement and the possibility of an island within a suitable L-shaped room. Those are starting configurations, not a promise that an island fits any open floor area. Compare your measured room with the proposed cabinet, countertop and appliance drawings before deciding which arrangement is worth pricing.
A cabinet list can show the bases while leaving out the space occupied by end panels, projecting handles, countertop overhangs and seating. Mark the outer countertop outline on the floor plan. Then show the room-side panels and any doors on the back. A peninsula also needs its connection to the existing run resolved: a blind pocket or filler at that joint can change how much useful cabinet space remains. Ask for the completed assembly dimensions rather than adding nominal cabinet widths and calling the result the finished length.
Measure the movements that use the room
Record the finished room boundaries and fixed cabinet or countertop edges. Mark windows, room doors, openings to other areas and any projections along the route you are measuring. State the measurement endpoints.
Use the exact appliance models or their current planning drawings. Draw the dishwasher, oven and refrigerator in their required open positions, including handle projections and the place where a person loads or unloads them.
Mark each island cabinet front and its direction of opening. Add the person standing at a fully open drawer, not just the drawer itself. Check the route to the sink, cooking area and room exit.
If seating is proposed, include the chosen stool pulled out and occupied. Check the passage behind it and the way a seated person gets up. Keep this separate from the closed, tucked-in stool footprint.
Diagram Check the overall top and occupied furniture, not only the base cabinets. The simplified strip illustrates the worked example; it is not a clearance recommendation, construction plan or complete island layout.
Compare the entrance and the working side
An island can be approached around its ends, but those end paths are part of the space it consumes. Test the shortest route with an appliance door open. A peninsula gives up passage at its attached end and can help define the kitchen boundary. Its free end must not turn the only entrance into a squeeze point, particularly when a dishwasher or drawer opens toward it. Walk through the proposed pattern on a measured plan rather than assuming that an open-plan room automatically has enough circulation space.
If the room cannot support seating and the storage you want, decide which matters more before reducing random gaps. A preparation island without stools may suit the task better than a larger multiuse block. A peninsula may provide a useful cabinet run where an island would add too many crossings, but it may also trap the cook behind an open appliance. Compare complete layouts with the same essential storage assignments. Do not compare a fully equipped island with an empty peninsula and call that a cabinet price comparison.
Include the visible sides and the service details
Ask how the exposed back and ends are finished, where toe-kick returns occur, and whether any back doors are functional or decorative. Identify which panels and supports are separate order items. Countertop size, overhang and support need their own confirmation for the selected material and design; a picture cannot establish them. If a sink, cooktop, appliance or electrical feature is proposed, have the relevant designer and trades check its services and installation requirements. Do that before the cabinet arrangement is approved, rather than treating those connections as details that will somehow fit later.
Test the plan before ordering the cabinets
Use removable floor markings to show the completed top outline, the open fronts and the seating zone in the measured room. A cardboard outline of a door can help make a conflict visible without moving an appliance. Have another person stand where they normally cook or clear dishes. Check whether the arrangement still works when someone crosses the room. This is a planning exercise, not approval of utilities, supports or required clearances. Record the conflict and send the layout back for revision instead of trimming a cabinet on site.
Ask for a quote for the complete run
List the cabinet functions and which direction each opens. Name seating as included or omitted rather than leaving it implied by the picture.
Record the overall finished countertop footprint separately from the cabinet-box footprint. Include exposed panels, fillers, returns and specified supports.
Keep the appliance models and open-door checks with the cabinet plan. Mark any service positions that still need professional confirmation.
Compare the island and peninsula proposals with the same storage brief, and separate cabinetry from countertop, delivery and installation scope.
Save your measured plan, the cabinet assignments and the remaining questions on the project-notes page. Copy or download the notes before a design discussion; the notes page does not submit an inquiry or upload photographs.
Compare the island finish in the whole room
A contrasting island can be considered alongside a matching one, but use physical samples with the existing floor, wall cabinets and intended countertop. The finish studies below show design directions only. Settle the footprint and storage configuration before treating the color choice as the final cabinet selection.
Pure White
Cream White
Light Warm Gray
Gray
Navy
Black
Oak Tone
Dark Walnut Tone
Design study These finish studies are design references, not a list of currently orderable colors. Screens and lighting change the appearance; compare a physical sample before choosing.See all finish options →
Buy a coordinated suite when every included appliance earns its place. Mix brands when a specific everyday task justifies the difference, after comparing the visible fronts and the complete installed purchase.
Compare the offered wood drawers by required length, opening method and complete construction. MOVENTO is not an automatic upgrade for every drawer, and one runner family need not serve every location in the kitchen.
Choose the dispenser package with your everyday glasses, bottles and ice routine. A plain refrigerator front can still conceal a water outlet, while a door dispenser changes access without creating a separate drinks station.
The sample shows the door frame, a separate center panel, the face frame and the cabinet box. Each component has its own place in this Shaker construction.
Shaker construction: door frame, center panel, face frame and cabinet box. The cutaway helps locate these parts; confirm each material in the specifications for the selected cabinet.
01 / Door frame
The Shaker door has rails and stiles around a separate center panel. The frame and center panel are different components; confirm their materials in the specifications for the selected cabinet.
02 / Face frame
The face frame surrounds the opening at the front of the cabinet box and sits behind the doors. The face frame, door frame and cabinet box are separate parts.
03 / Cabinet box
The sample exposes the cabinet sides, interior surfaces and layered edges. The image does not establish the wood species or material specification of a selected cabinet.