Plan a refrigerator surround that can be reassessed when the appliance changes
Document the fixed opening and any deliberately adaptable parts, then test real alternative installation envelopes. Extra space improves options only when the controlling constraints also work.
Plan for replacement by separating the fixed limits of the kitchen from surrounding pieces that are deliberately designed to be changed. Verify the current refrigerator completely, then assess selected alternatives against those same limits. This can reveal useful flexibility, but it cannot guarantee that an unknown future model will fit or that the appliance being selected will remain available.
Identify what actually fixes the opening
Record the finished floor, underside of the fixed cabinet above, side boundaries and rear conditions. Distinguish those limits from applied trim or other surrounding components. Do not assume a strip is removable because it looks decorative. Its construction, attachment and relationship to cabinet support must be understood before treating it as an adjustment zone.
If adaptability is a project goal, agree during design which specific parts may be replaced and how that change would preserve the required support and finish. Keep the responsible cabinet designer’s detail with the project. An unspecified promise to “remove some trim later” is not an adaptation plan, especially when the proposed change would affect an overhead cabinet or an adjoining front.
Test documented alternatives rather than a size label
Whirlpool’s measuring guidance calls for checking opening width and height as well as depth when changing refrigerators. That broader check matters even when the replacement has a similar category or nominal width. Use the selected alternatives’ exact documentation rather than treating a product-family label as an interchangeable installation specification.
For each candidate, record the complete required installation envelope: actual appliance outline, applicable surrounding spaces, rear connections, panel or handle arrangement and opening movement. Compare the candidates with the same physical reference points. A body that fits the closed rectangle may still require a front position or door movement that the surrounding kitchen cannot support.
Separate a real adjustment opportunity from a fixed conflict
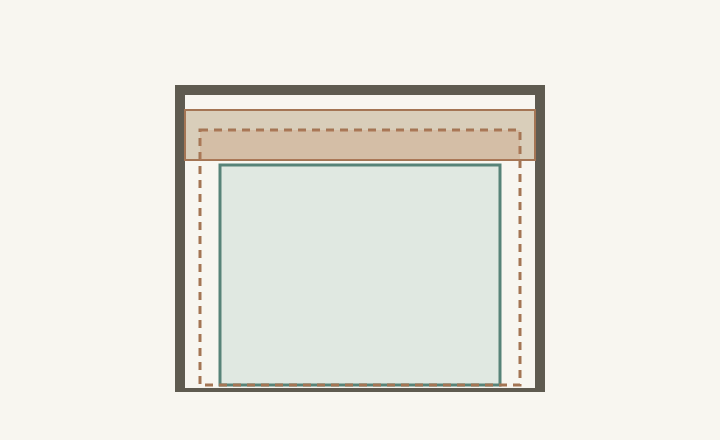
In a hypothetical surround, the current installation envelope fits below a finishing band. An alternative’s required envelope extends into that band but remains below the fixed cabinet structure. This could be an adaptation opportunity only if the band was designed to be changed and the complete revised installation can be verified. The diagram’s spare rectangle is not permission to remove the part.
ABCD
Diagram The dashed alternative intersects the band while remaining inside the outer frame. Shapes represent hypothetical installation reservations, not appliance bodies or prescribed gaps. Whether the band can be changed requires the actual construction design; depth, ventilation, services and door movement are not established by this elevation.
A
This boundary belongs to the fixed surround.
B
The proposed alternative conflicts with the band.
C
The current reservation fits beneath the band.
D
The alternative still needs the complete installation review.
If the alternative instead reaches the fixed cabinet above, the same trim strategy would not solve the conflict. Likewise, extra height does nothing for insufficient width or a blocked door path. Describe the controlling limitation specifically. A general statement that the opening has “extra room” can conceal which kind of room is present and which is missing.
Decide what flexibility is worth in the current kitchen
A larger reserved area or a different overhead arrangement can change storage and appearance now. Compare that present cost with the particular alternatives it enables. Keep the current appliance’s required installation conditions intact; adaptability is not a reason to omit a specified surrounding element or leave an unverified gap around the installed unit.
For a panel-ready design, assess the custom fronts as well as the appliance opening. A future unit with a similar outside size may not use the same panel dimensions, mounting details or hinge movement. Record whether the planning assumption includes making new fronts, rather than describing existing panels as reusable without product confirmation.
Keep a record that survives the first appliance choice
Save the as-designed opening references, fixed boundaries, authorized adaptable details, current model documents and the alternatives actually checked. Label those alternatives as examples evaluated at that time, not guaranteed future supply. Record the checks that remain outside the current comparison, including service access and the internal route needed to remove and replace the unit.
When replacement becomes real, remeasure the completed kitchen and verify the newly selected appliance before ordering changes to the surround. Flooring, trim or neighboring handles may have changed since the original drawing. The useful outcome is a clear set of constraints and a known way to reassess them, allowing the next decision to start from evidence instead of an old nominal size.
Pure White
Cream White
Light Warm Gray
Gray
Navy
Black
Oak Tone
Dark Walnut Tone
Design study These finish studies are design references, not a list of currently orderable colors. Screens and lighting change the appearance; compare a physical sample before choosing.See all finish options →
A neat closed reveal does not establish opening clearance. Use the selected appliance’s hinge information with the actual panel profile, neighboring fronts and handles.
A concealed connection needs an access plan that works with the appliance, cabinet fronts and normal contents in place. Seeing a point on an empty-room drawing is only the beginning.
The sample shows the door frame, a separate center panel, the face frame and the cabinet box. Each component has its own place in this Shaker construction.
Shaker construction: door frame, center panel, face frame and cabinet box. The cutaway helps locate these parts; confirm each material in the specifications for the selected cabinet.
01 / Door frame
The Shaker door has rails and stiles around a separate center panel. The frame and center panel are different components; confirm their materials in the specifications for the selected cabinet.
02 / Face frame
The face frame surrounds the opening at the front of the cabinet box and sits behind the doors. The face frame, door frame and cabinet box are separate parts.
03 / Cabinet box
The sample exposes the cabinet sides, interior surfaces and layered edges. The image does not establish the wood species or material specification of a selected cabinet.