Keep refrigerator water service points reachable after the cabinets are finished
A concealed connection needs an access plan that works with the appliance, cabinet fronts and normal contents in place. Seeing a point on an empty-room drawing is only the beginning.
Plan refrigerator water access before fixing the surrounding cabinets and finish panels. Identify what must be reached, for which task and with which parts of the kitchen in place. A note that a connection is “behind the refrigerator” or “inside the next cabinet” does not explain whether the relevant person can find and reach it after the installation is complete.
Separate the access tasks before choosing a concealed location
Distinguish the household water shut-off, the appliance connection and any filter or service point specified for the selected model. Their purposes and access procedures are not interchangeable. A convenient filter opening does not demonstrate access to the supply valve, and a visible valve does not establish enough working room for a technician to inspect a separate connection.
Sub-Zero’s water-supply guidance calls for an easily accessible shut-off valve and directs home supply work to a plumber and product details to the installation guide. Use the selected appliance’s requirements to coordinate the location; this example does not establish a universal valve position for other models.
Trace access in the finished, normally occupied kitchen
Draw the intended route from the room to each point with the refrigerator at its installed position, fronts attached and ordinary cabinet contents present. Identify which door opens, where the person stands and what lies between the opening and the target. The test is not complete if it only works before an end panel or drawer box is installed.
Separate an unobstructed sightline from a usable reach and working position. An opening may expose the target but leave no suitable approach for the required task. Ask the responsible plumber or appliance installer to verify the planned access against the actual work and product information. Do not infer adequacy from a photograph of a hand near the point.
ABCD
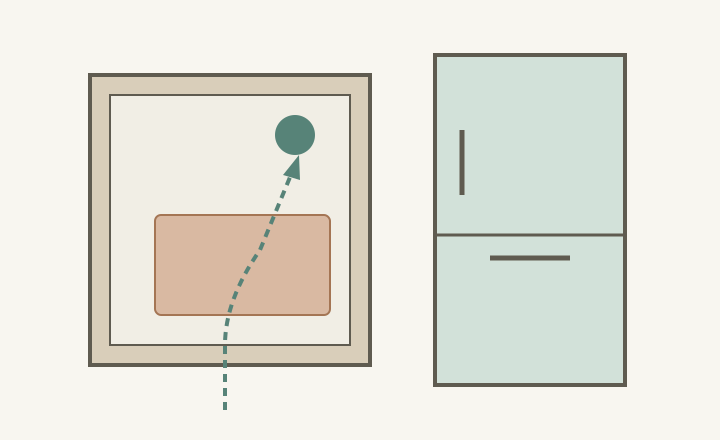
Diagram The point is visible in the open cabinet, but the illustrated route crosses the stored container. This is a layout concept, not a valve location, plumbing route or required working clearance. The real task and applicable product instructions determine access.
A
Identify the actual point and its task.
B
Normal stored contents can interrupt the approach.
C
Follow the complete route from the room.
D
Keep the refrigerator in its installed position during the planning check.
Test the normal contents rather than an empty cabinet
In a hypothetical layout, a supply point is placed in the adjoining cabinet and can be seen when that cabinet is empty. The intended storage is a large appliance behind a loaded pullout. Once both are drawn, reaching the point requires removing the pullout assembly. The location label sounded accessible, but the ordinary storage arrangement defeats the proposed route.
Resolve the conflict during coordination: revise the storage assignment, select an appropriate access arrangement or have the responsible professional reassess the service location within the applicable requirements. Do not treat repeated unloading of unrelated heavy contents or dismantling fixed cabinetry as a hidden default. Record what the agreed access method actually requires.
A decorative panel is not automatically an access panel
If a surrounding panel is intended to provide access, specify that function in its actual construction and attachment detail. Confirm who may remove it and whether the required task can be performed after removal. Do not call a permanently fixed end panel “removable” merely because screws might exist somewhere behind adjacent cabinets.
Coordinate the connection route with cabinet partitions, drawer movement and the appliance’s installed and service positions using the applicable instructions. The cabinet plan should reserve the agreed route without inventing tubing lengths, bend allowances or connection methods. Avoid solving a front-alignment problem by forcing the appliance against an unverified rear connection arrangement.
Verify and record the completed access arrangement
Before the surrounding work is closed, confirm the planned locations with the responsible trades and keep a labeled reference photo or drawing. After the cabinets and appliance are in place, verify the intended access method again with normal storage considered. This is a layout and access review; connection work and the relevant functional checks remain with the responsible qualified professional.
Give the household a clear identification of the supply shut-off and the agreed way to reach it, together with the appliance information. Keep the access zone available when changing storage later. If reaching the point would require moving a heavy appliance or altering cabinetry, have that unresolved arrangement assessed rather than improvising a move or dismantling parts to make the original drawing appear successful.
Pure White
Cream White
Light Warm Gray
Gray
Navy
Black
Oak Tone
Dark Walnut Tone
Design study These finish studies are design references, not a list of currently orderable colors. Screens and lighting change the appearance; compare a physical sample before choosing.See all finish options →
Document the fixed opening and any deliberately adaptable parts, then test real alternative installation envelopes. Extra space improves options only when the controlling constraints also work.
The slide-in label does not tell you whether the cooking surface overlaps the counter or how the rear junction finishes. Check the exact design before assuming the existing opening is suitable.
The sample shows the door frame, a separate center panel, the face frame and the cabinet box. Each component has its own place in this Shaker construction.
Shaker construction: door frame, center panel, face frame and cabinet box. The cutaway helps locate these parts; confirm each material in the specifications for the selected cabinet.
01 / Door frame
The Shaker door has rails and stiles around a separate center panel. The frame and center panel are different components; confirm their materials in the specifications for the selected cabinet.
02 / Face frame
The face frame surrounds the opening at the front of the cabinet box and sits behind the doors. The face frame, door frame and cabinet box are separate parts.
03 / Cabinet box
The sample exposes the cabinet sides, interior surfaces and layered edges. The image does not establish the wood species or material specification of a selected cabinet.