Check wine-rack removal as well as everyday bottle access
A wine refrigerator can work for daily serving while its racks remain difficult to remove. Verify the selected rack, door position and hand access before fixing a wall or island-end location.
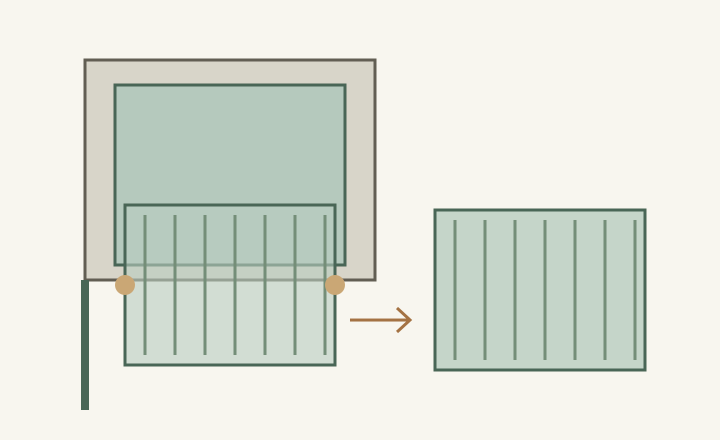
A wine refrigerator beside a wall or island end needs more than a door-opening check. Confirm that its racks can extend for normal use and, where the manufacturer permits, be removed and reinstalled for cleaning or rearrangement. These are different tasks. A front bottle coming out easily does not show that the entire empty rack can leave its tracks in the completed kitchen.
Define the task that the opening must support
Start with the exact refrigerator, door arrangement and rack system. Identify the manufacturer’s normal bottle-loading instructions separately from rack removal. Some parts that look like shelves may have different attachments or procedures, so do not apply a demonstration from another product simply because its opening width looks similar. Keep the relevant instructions with the cabinet plan.
The cited U-Line guide describes emptying the rack, extending it to its stop and operating releases on opposite sides before withdrawing it. That example makes hand access and complete removal separate planning checks. It does not establish the mechanism or required door position for every wine refrigerator.
Show the closed appliance, the rack extended for use and the empty rack completely clear of the appliance. Add the actual open door, handle and neighboring finished surfaces to the views needed to explain those states. The rack’s stored depth is not the same as the forward region occupied while it is being withdrawn.
Reserve room for the person to reach the instructed controls and support the released rack. A narrow slot between a side panel and an open door may leave a visible route for the rack but no practical position for a hand. Use the actual product’s procedure to identify those positions; do not add a universal side allowance or assume that opening the door farther always solves the problem.
ABC
Diagram The arrow compares stages; it is not a sideways carrying route. Markers indicate tasks to investigate, not the location of real release hardware. Door position and rack geometry are illustrative.
A
Extension does not establish complete removal.
B
Check access required by the selected release method.
C
An empty removed rack needs support and a destination.
Test the maintenance task that a serving demonstration misses
In a hypothetical island-end location, the door opens and a bottle at the front is easy to retrieve. The layout appears successful. During a later cleaning check, the end return leaves the user unable to reach a release while supporting the empty rack. The fault concerns the complete removal task, even though daily serving and the appliance’s body fit both passed.
Compare an approved alternate door arrangement, another position or a different rack mechanism using the full task. Do not promise that a hinge change is available until the selected model supports it. Moving an entire installed refrigerator whenever a rack needs cleaning should not be an unexamined substitute for a usable ordinary maintenance arrangement.
Use an empty-rack demonstration to settle uncertainty
Where a suitable demonstration is available, have the permitted procedure shown on the correct, properly installed appliance with the rack empty. Include reinstallation, because aligning and engaging the rack may require access that the outward movement alone did not reveal. Follow the product instructions and the demonstrator’s authorized process; do not improvise removal or force the mechanism to prove that the furniture can stay.
Represent the proposed wall, end panel and nearby handle positions during the check without interfering with the appliance. Record which surface limits the operation and at what stage. Photographs of the fully open arrangement can support the drawing, but a photograph of the rack already removed cannot establish how it passed the obstruction.
Keep the temporary destination in the room plan
Choose a stable place for the emptied bottles and removed rack during the permitted task. Check the user’s route between that place and the appliance. A counter that will normally be occupied should not silently become the only available destination, especially if reaching it requires stepping across the open door or leaning around the rack.
Keep separate results for bottle access, rack extension, release access and reinstallation. After a change to door handing, panel depth or island-end details, repeat the affected check. Approve the location when the intended care task works with the finished surroundings, not merely when a single bottle can be served.
Pure White
Cream White
Light Warm Gray
Gray
Navy
Black
Oak Tone
Dark Walnut Tone
Design study These finish studies are design references, not a list of currently orderable colors. Screens and lighting change the appearance; compare a physical sample before choosing.See all finish options →
The machine’s cavity is only part of the plan. Confirm the selected water, drain and power arrangement, then reserve connections, access and any required removal route before promising adjacent storage.
Choose the cabinet position after following water, beans and waste through the selected machine’s real access procedure. A comfortable cup height can still leave routine care awkward.
The sample shows the door frame, a separate center panel, the face frame and the cabinet box. Each component has its own place in this Shaker construction.
Shaker construction: door frame, center panel, face frame and cabinet box. The cutaway helps locate these parts; confirm each material in the specifications for the selected cabinet.
01 / Door frame
The Shaker door has rails and stiles around a separate center panel. The frame and center panel are different components; confirm their materials in the specifications for the selected cabinet.
02 / Face frame
The face frame surrounds the opening at the front of the cabinet box and sits behind the doors. The face frame, door frame and cabinet box are separate parts.
03 / Cabinet box
The sample exposes the cabinet sides, interior surfaces and layered edges. The image does not establish the wood species or material specification of a selected cabinet.