Undercounter ice makers: cabinet fit and service access
The machine’s cavity is only part of the plan. Confirm the selected water, drain and power arrangement, then reserve connections, access and any required removal route before promising adjacent storage.
Plan an undercounter ice maker around its complete installation arrangement before allocating nearby drawers or shelves. A cavity that fits the appliance does not establish a workable water supply, drain, electrical connection or service method. Resolve those requirements for the exact configuration, then count the storage that remains. The neighboring cabinet may be part of the installation even though the machine itself occupies another opening.
Confirm the drainage configuration before fixing the location
Record the exact model and applicable drain option with the proposed location. Identify where the drainage destination actually is, including its relationship to the appliance connection, rather than marking only a nearby sink on the plan. Have the responsible installer confirm the complete arrangement using the selected product instructions and applicable local requirements.
Sub-Zero’s cited designer ice-maker guidance makes the drain destination’s position relative to the appliance connection central to choosing between its gravity and pump versions. This is a product-specific example of why an available water supply alone cannot approve the ice-maker location.
Show the confirmed supply, drain and power connection locations in the views needed to understand them. Give each its actual destination and route reservation. A line disappearing behind a cabinet is not a complete route. The cabinet drawing should preserve an installation that has been verified by the responsible trades, rather than deciding pipe slopes, electrical arrangements or drainage details independently.
Include connection components and the space needed to reach them, not just a thin line between endpoints. Where any part enters the neighboring cabinet, show it against the proposed shelves, drawer boxes and stored contents. An appliance schedule can correctly name the machine while the furniture plan still assigns the same space to an incompatible storage feature.
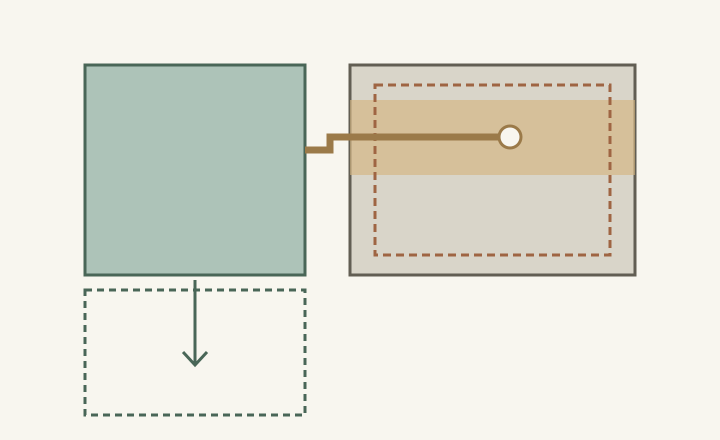
ABCD
Diagram The hypothetical route symbol and shaded region reserve an already confirmed installation; they are not a plumbing layout, slope, drain connection or service-clearance specification. The dashed neighboring drawer overlaps that reservation.
A
The appliance opening is only one part of the plan.
B
Connections and access can reserve neighboring space.
C
The proposed drawer must be reconciled with that reservation.
D
Any required equipment-removal area is a separate check.
Find the installation gap before cabinetry is committed
In a hypothetical bar cabinet, an ice maker fits neatly beside a sink and a water source is nearby. The plan is marked ready without checking the selected drainage configuration. Later, the installer finds that the proposed route does not satisfy that configuration, and the alternative arrangement needs space already assigned to a full-depth drawer. Body fit and supply proximity did not settle the layout.
Resolve the drain arrangement and cabinet consequences together. A supported alternative may change the model, location or storage assignment. Do not assume a pump can overcome any route, or that adding one is a simple furniture decision. Keep unresolved utility conditions visible until the responsible installer confirms the actual solution; do not fill the remaining cabinet with organizers first.
Separate everyday access from professional service
Identify the product’s ordinary cleaning, refill or filter tasks where applicable, and determine which parts the household is instructed to reach. Separately ask how relevant connections and service components are accessed by the appropriate professional. A shutoff or connection described as adjacent is not necessarily accessible after a fixed organizer or loaded drawer is installed in front of it.
If equipment withdrawal forms part of the service method, have the installer confirm the exit path and connection handling. Include finished flooring, toe kicks and nearby obstructions. Do not plan on a homeowner pulling a connected machine forward casually. The cabinet design should retain the agreed method without forcing dismantling of unrelated fixed furniture whenever that method is needed.
Assign the remaining storage after the service plan is complete
Place the intended contents in the confirmed remaining regions and check ordinary retrieval without disturbing connections or blocking the designated access. Separate removable contents from permanent shelves or hardware: moving a small container is different from taking out a fixed drawer assembly. Record the actual access sequence rather than summarizing both arrangements as accessible.
Keep the equipment identity, drain configuration, connection map, access method and final storage assignment together. Recheck after any change to the machine, route or adjacent cabinet. The useful result is a location whose utilities and service remain workable, with storage capacity based on the completed installation rather than the empty cavity.
Pure White
Cream White
Light Warm Gray
Gray
Navy
Black
Oak Tone
Dark Walnut Tone
Design study These finish studies are design references, not a list of currently orderable colors. Screens and lighting change the appearance; compare a physical sample before choosing.See all finish options →
A flush front does not establish a working installation. Confirm enclosure permission, keep the required ventilation opening effective and test the door with the actual bottles and neighboring fronts.
A wine refrigerator can work for daily serving while its racks remain difficult to remove. Verify the selected rack, door position and hand access before fixing a wall or island-end location.
The sample shows the door frame, a separate center panel, the face frame and the cabinet box. Each component has its own place in this Shaker construction.
Shaker construction: door frame, center panel, face frame and cabinet box. The cutaway helps locate these parts; confirm each material in the specifications for the selected cabinet.
01 / Door frame
The Shaker door has rails and stiles around a separate center panel. The frame and center panel are different components; confirm their materials in the specifications for the selected cabinet.
02 / Face frame
The face frame surrounds the opening at the front of the cabinet box and sits behind the doors. The face frame, door frame and cabinet box are separate parts.
03 / Cabinet box
The sample exposes the cabinet sides, interior surfaces and layered edges. The image does not establish the wood species or material specification of a selected cabinet.