Plan a built-in coffee machine for refilling and emptying, not just dispensing
Choose the cabinet position after following water, beans and waste through the selected machine’s real access procedure. A comfortable cup height can still leave routine care awkward.
Set the position of a built-in coffee machine by its complete refill and cleanup routine. Dispensing into a cup is only part of that routine. The person using it must also reach the specified water arrangement, replenish beans and handle the applicable grounds container and drip tray. A location can look comfortable at the spout while making those recurring tasks unnecessarily difficult.
Identify what actually comes out of the machine
Use the exact model instructions to list removable containers and the access needed for each. Record whether the appliance has a manual water reservoir, an approved connected-water arrangement or another specified system. Keep the user’s tasks separate from installation and professional servicing. Do not assume that a water connection eliminates every container-handling task, or that all built-in machines open the same way.
Miele’s cited bean-container guidance distinguishes appliance generations and describes access through the machine door. Its separate support page addresses removing and reinserting the drip tray and grounds container. These examples justify checking individual components rather than treating the front as a single access opening.
Check container handling at the proposed mounting height
Represent the machine at the intended height and follow the authorized removal motion with an appropriate demonstration or lightweight substitute. Can the user see the container opening, keep control of it and place it on a nearby stable surface? A convenient control panel does not answer these questions. Include the reach needed to return a filled container without tilting it through an awkward angle.
Test the real route with the front in its required position. A nearby wall, tall-cabinet handle or return panel may restrict access even where the dispensing area remains clear. Conversely, a door that clears the neighboring furniture may still stand between the person and the sink. The relevant result is a workable sequence, not simply a successful swing on an empty drawing.
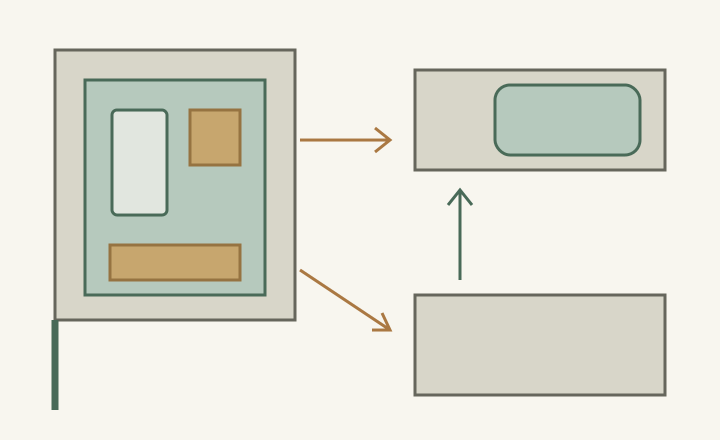
ABC
Diagram The diagram is a task map, not a product interior, hinge arrangement or plumbing plan. Arrows identify destinations to coordinate; actual removal and cleaning methods come from the selected instructions.
A
Identify the applicable water, bean and waste tasks.
B
Check the route to the sink when needed.
C
Keep a stable temporary surface available.
Follow clean supplies and used contents to different destinations
Trace water refilling where applicable, beans from their storage location, used grounds to the intended waste destination and tray contents to the appropriate emptying point. Follow the machine instructions for handling, cooling and cleaning. The furniture decision is whether those prescribed tasks can happen without balancing components on unrelated appliances or carrying them across a crowded preparation area.
Allow somewhere to set a lid or component while another part is handled. This temporary work surface should remain available during the task; a decorative shelf filled with cups is not automatically usable. Decide where clean parts wait before reinstallation so the routine does not depend on clearing the entire coffee display every time.
Find a refill problem before aligning the appliance stack
In a hypothetical tall-cabinet composition, the machine is placed high to align its face with another appliance. The user can see the screen and put a cup under the spout, but cannot comfortably guide the selected removable water container back into position when filled. Raising the cup shelf would not fix that task, because the difficult movement occurs inside the machine.
Compare a lower permitted mounting position or a different supported water arrangement while preserving bean and waste access. A connected option must be an actual supported configuration with its installation requirements resolved; it is not a promise that the household will never open the machine. Recheck neighboring cabinet fronts after any position change.
Approve the routine with the intended user
Run through replenishing, emptying and returning parts with the person who will normally do them. Use the product’s permitted procedure and an appropriate cold demonstration, without hot liquids or improvised disassembly. Record where that person stands, what is held and which surface receives it. The slowest or most awkward step often identifies the needed cabinet change more clearly than the overall appliance height.
Keep the chosen model, mounting position, access states and component destinations together. Revisit them when the machine or surrounding hardware changes. The useful outcome is a coffee station whose ordinary care can be completed with the finished furniture in place, alongside the everyday cup-making task.
Pure White
Cream White
Light Warm Gray
Gray
Navy
Black
Oak Tone
Dark Walnut Tone
Design study These finish studies are design references, not a list of currently orderable colors. Screens and lighting change the appearance; compare a physical sample before choosing.See all finish options →
A wine refrigerator can work for daily serving while its racks remain difficult to remove. Verify the selected rack, door position and hand access before fixing a wall or island-end location.
Manual filling and connected water create different household tasks and installation reservations. Confirm the exact version, including its remaining maintenance access, before assigning surrounding storage.
The sample shows the door frame, a separate center panel, the face frame and the cabinet box. Each component has its own place in this Shaker construction.
Shaker construction: door frame, center panel, face frame and cabinet box. The cutaway helps locate these parts; confirm each material in the specifications for the selected cabinet.
01 / Door frame
The Shaker door has rails and stiles around a separate center panel. The frame and center panel are different components; confirm their materials in the specifications for the selected cabinet.
02 / Face frame
The face frame surrounds the opening at the front of the cabinet box and sits behind the doors. The face frame, door frame and cabinet box are separate parts.
03 / Cabinet box
The sample exposes the cabinet sides, interior surfaces and layered edges. The image does not establish the wood species or material specification of a selected cabinet.