Whole pantry pullout or independently moving trays?
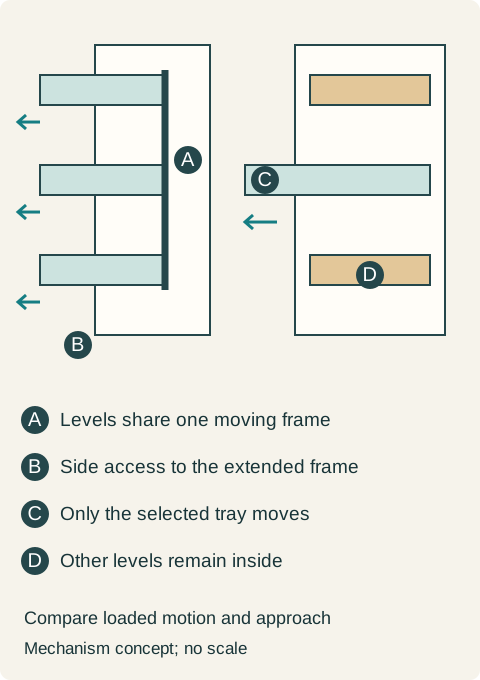
A tall pullout brings several storage levels forward together. Independent trays move only the selected level. Compare the loaded movement and side access, not just the amount visible in an empty display.
Choose a whole pantry pullout when bringing several levels forward together provides useful access and the room permits the intended approach beside it. Choose independent trays when selecting one level at a time better matches the inventory and the outer-door arrangement works. These are different moving systems, even when the closed cabinet fronts look equally simple.
What moves when one jar is wanted?
Kesseböhmer describes DISPENSA as a larder whose adjustable trays move forward together, allowing access from both sides. The example establishes that shared-frame arrangement; it does not give another cabinet the same compatibility or load rating.
With a whole pullout, taking one item still moves the shared loaded assembly. With independent inner trays, the user opens the outer door and extends the chosen level while the others remain inside. More than one opening step is not necessarily worse if the household prefers moving a smaller selected group.
Try the intended loaded system, not just an empty showroom frame. The user should be able to initiate, guide and close the motion comfortably under the manufacturer's stated conditions. A load rating does not state the force this person will experience at the handle. Do not infer that every tall pullout is heavy to operate, or that every assisted one is easy for every user.
Side visibility needs room beside the frame
A shared pullout can present its contents to the sides. Draw where a person stands to use those views with the frame fully extended. A neighboring wall, tall appliance or another open front may leave only one useful side. The benefit in a photograph may rely on space that the proposed location does not have.
Arrange packages for the sides that actually remain accessible. If a rear item can only be removed from the blocked side, seeing its label from the front does not complete the task. Check both grocery loading and ordinary retrieval; replenishing a full group may need a different approach from taking a jar.
Teaching example Conceptual side views: the left assembly carries multiple trays forward on a shared frame; on the right only one inner tray extends after its outer door is opened. Arrows distinguish shared movement from selective movement. Tray quantities and spacing are illustrative, not a product configuration.
Compare complete inventories within the selected mechanism
The shared frame, tray sides and supports occupy part of the cabinet. Use the actual usable tray dimensions and allowed arrangement. Separately check tall packages and how they clear the level above. Adjustable trays do not mean every spacing or loading combination is permitted.
For independent trays, include hinges, the open outer door and its required position. They also consume access and space. Keep the same packages in the comparison, and show where any group excluded by a proposed tray goes. Neither option should win because its difficult inventory silently disappears.
A wall-end location favors selective access
At a proposed pantry position beside a return wall, the fully extended shared frame exposes one side but leaves the planned rear packages dependent on the blocked side. Reorienting them crowds the tall cartons that must remain. An alternative with a compatible hinged front and independently extending trays permits retrieval from the front; the tall cartons occupy a separately checked compartment. That complete arrangement is selected for this location.
The same shared-frame option could work well in a more open position with an inventory arranged for its accessible sides. Retain the option when the loaded trial supports it, rather than treating the most visible storage as automatically the easiest storage.
Specify the frame or tray system, complete cabinet fit, front operation and assigned contents together. This avoids ordering a door-front pantry and discovering later that the intended movement belongs to a different cabinet construction.
Pure White
Cream White
Light Warm Gray
Gray
Navy
Black
Oak Tone
Dark Walnut Tone
Design study These finish studies are design references, not a list of currently orderable colors. Screens and lighting change the appearance; compare a physical sample before choosing.See all finish options →
Shelves and inner drawers solve different access problems. Compare the same inventory at its actual height, including the outer door, usable interior and restocking routine.
A filler can preserve room for a door and its handle to move. Define the opening needed by the cabinet contents, then test the actual front, hinge and wall relationship.
The sample shows the door frame, a separate center panel, the face frame and the cabinet box. Each component has its own place in this Shaker construction.
Shaker construction: door frame, center panel, face frame and cabinet box. The cutaway helps locate these parts; confirm each material in the specifications for the selected cabinet.
01 / Door frame
The Shaker door has rails and stiles around a separate center panel. The frame and center panel are different components; confirm their materials in the specifications for the selected cabinet.
02 / Face frame
The face frame surrounds the opening at the front of the cabinet box and sits behind the doors. The face frame, door frame and cabinet box are separate parts.
03 / Cabinet box
The sample exposes the cabinet sides, interior surfaces and layered edges. The image does not establish the wood species or material specification of a selected cabinet.