Give an end-wall filler a verified opening job before reducing it
A filler can preserve room for a door and its handle to move. Define the opening needed by the cabinet contents, then test the actual front, hinge and wall relationship.
Treat an end-wall filler as a planned separation with a job to perform, not simply a strip left over after fitting cabinets. Before narrowing it, identify the door travel needed for the cabinet’s assigned contents and check the moving front and handle against the finished wall. A closed door that fits neatly beside the wall does not establish useful access once opened.
Define what the door must allow the user to do
Specify the task behind the front: removing dishes from a shelf, lifting a large item or extending an internal drawer. These tasks may require different door positions with the selected construction. Use the cabinet and hinge information to determine the required working state. There is no reason to select a generic opening target without checking what needs to pass through it.
IKEA’s US installation guide identifies fillers between cabinets and walls as serving both appearance and room for full door and drawer opening. That supports checking their function; it does not supply a universal filler width for a different cabinet, hinge or handle.
Record the difference between opening the door enough to see inside and opening it enough for the intended contents to move. An internal drawer may still be obstructed by the front or hardware even after the shelf area is visible. The useful end position comes from the selected arrangement and task, not the impression that the door is mostly open.
Include the handle and the finished wall outline
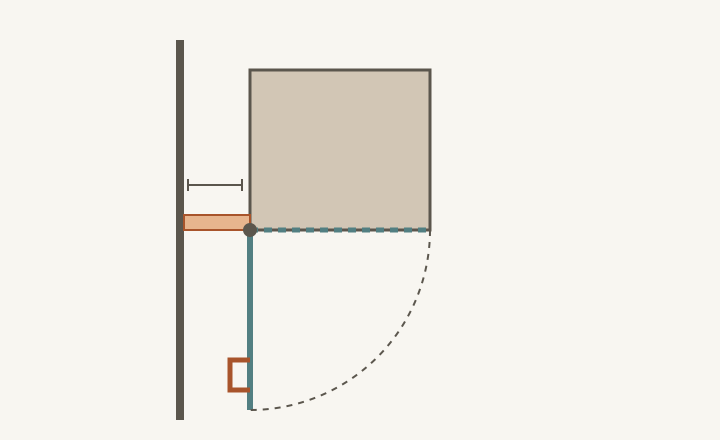
Draw the door in its closed and required open positions, including thickness, overlay and the actual handle. Use the selected hinge’s motion information or an appropriate verified sample; a simple pivot sketch is not a substitute for the path of a real concealed hinge. Follow all parts through the movement, not only the outer corner of the door.
ABCD
Diagram The simple pivot illustrates why the handle and front need separate outlines. It does not model a selected hinge or establish the required opening angle, filler width or installation detail.
A
The wall-to-cabinet separation has an access purpose.
B
The cabinet position is part of the complete run.
C
The front occupies a changing position during opening.
D
The handle projects beyond the front itself.
Use the finished wall surface at the relevant height, including retained trim or other projections. Check the part of the wall reached by the moving hardware. A clear gap beside the cabinet box at the back does not automatically describe the space available to a handle farther forward. Keep the measured wall condition separate from an assumed straight line in a presentation drawing.
Test the internal-drawer task, not just the outer door
In a hypothetical end cabinet, the front can open enough to reveal the contents, so the proposed filler initially appears sufficient. The selected inner drawer, however, needs the door farther out of its way. Continuing the door movement brings the handle toward a projecting part of the end wall. The earlier visual-access check did not verify the drawer task.
Compare a verified increase in separation, an approved change in front or handle arrangement, or a different internal assignment. Do not assume a hinge swap or opposite handing is available without checking the actual system. After any change, repeat the entire door and internal-drawer sequence with the wall retained. Avoid forcing the front against the obstruction to demonstrate access.
Account for the width elsewhere in the cabinet run
Any change in separation must remain within the measured run. If a wider filler requires a different neighboring module, test that module with its assigned contents too. The added operating space is useful only when the revised layout remains complete. Do not quietly take the width from an appliance opening or a panel whose own function still needs to be preserved.
Likewise, a narrower filler should be justified by the verified configuration, not just a desire for a larger cabinet label. A different handle may alter the moving outline while leaving the door’s required position or an internal obstruction unchanged. Resolve the controlling condition before treating a cosmetic change as a functional improvement.
Save the reason for the final separation
Keep the finished wall outline, cabinet position, selected front and hinge, handle geometry and required access state together. Note the task that passed and any cabinet assignments changed to make it work. Recheck when those parts change. The final filler is defensible when it preserves the intended operation within the actual run, rather than merely completing the appearance of a closed elevation.
Pure White
Cream White
Light Warm Gray
Gray
Navy
Black
Oak Tone
Dark Walnut Tone
Design study These finish studies are design references, not a list of currently orderable colors. Screens and lighting change the appearance; compare a physical sample before choosing.See all finish options →
A balanced corner front can hide awkward access. Compare how each proposed opening exposes the assigned contents and where its open panels leave the user’s hands and transfer path.
A side panel consumes space outside a clear opening, but may already be included in an outside allocation. Label those boundaries before judging the adjacent cabinet’s usable storage.
The sample shows the door frame, a separate center panel, the face frame and the cabinet box. Each component has its own place in this Shaker construction.
Shaker construction: door frame, center panel, face frame and cabinet box. The cutaway helps locate these parts; confirm each material in the specifications for the selected cabinet.
01 / Door frame
The Shaker door has rails and stiles around a separate center panel. The frame and center panel are different components; confirm their materials in the specifications for the selected cabinet.
02 / Face frame
The face frame surrounds the opening at the front of the cabinet box and sits behind the doors. The face frame, door frame and cabinet box are separate parts.
03 / Cabinet box
The sample exposes the cabinet sides, interior surfaces and layered edges. The image does not establish the wood species or material specification of a selected cabinet.