Warm dim or tunable white: choose how cabinet lighting behaves before choosing the switch
A dimmer does not always preserve the same white light. Compare linked warm-dimming, separate white-color control and fixed-white dimming through the kitchen tasks you actually use.
Choose warm-dim cabinet lighting when you want the light to become warmer as it gets dimmer and are comfortable with those changes being linked. Choose a supported tunable-white system when you want to set white-light color and output separately. If you like the same white appearance all evening and only need less light, a suitable fixed-white dimming system may be the simpler purchase. These choices should be settled before cabinet lighting and controls are ordered together.
The control behavior matters more than the slider picture
The Department of Energy distinguishes warm-dim products, which link reduced output to a warmer appearance, from white-tunable systems with independent color and intensity controls. The distinction is about which adjustments the system permits, not how many sliders appear on a wall.
A product described only as dimmable does not tell you which behavior you will get. Likewise, a control with a color button does not prove the proposed cabinet fixtures, driver and control can work together. Request the function of the complete proposed combination. A demonstration of another light in the showroom is useful for understanding the idea, but it does not approve the package being quoted.
There is no need to buy every adjustment because it is available. Some owners want one familiar action at the end of dinner. Others want to reduce glare from the kitchen while keeping a particular white appearance beside adjacent room lights. Those are different requests. Decide which one describes the household before comparing control panels.
Describe cooking and evening use separately
During food preparation, identify the work surface that needs light. After cooking, identify what stays illuminated: perhaps a counter used for making drinks, a display cabinet seen from the dining table, or both. Do not assume that one lighting scene can serve every purpose simply because all the fixtures are attached to cabinets.
Now say which qualities should change between those scenes. Lower output might be enough. A warmer appearance might be welcome, or it might make the cabinet lighting look different from the adjoining room in a way the owner dislikes. The question is not whether warm light is universally better. It is whether the particular transition is wanted in this room.
Include occasional tasks in the demonstration. A person who returns to the counter to read a package should be able to restore useful task lighting without having to remember an unfamiliar sequence. That does not require a specific app or automation. It requires a clear, usable way to reach the intended state.
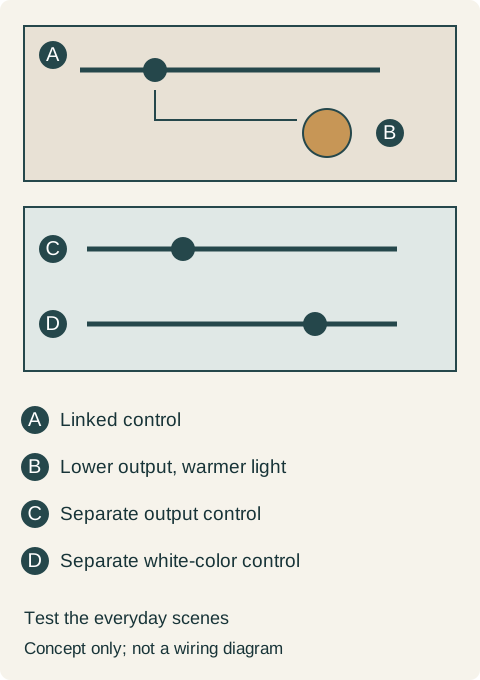
Teaching example Control concepts, not wiring: the upper arrangement links a reduction in output with a warmer appearance; the lower arrangement separates output and white-color choices. Slider positions and colors do not represent measured brightness, a temperature scale or a particular product.
A kitchen where linked dimming is the wrong purchase
In a hypothetical open kitchen, the owners approve the cabinet finish beside their existing dining-room lights. They want the cabinet lighting reduced during dinner, while keeping a similar white appearance. A warm-dim demonstration becomes attractively mellow on its own, but its color changes as output drops. That behavior does not satisfy the request they actually made.
They compare a compatible white-tunable proposal and a fixed-white dimming proposal using the selected cabinet sample and surrounding lights. The tunable system can separate the adjustments, but they do not need regular color changes. In this example, the fixed-white proposal gives an acceptable appearance and usable range in the actual trial. They choose it, retaining a straightforward control rather than paying for an adjustment they will not use.
Another household might want a more flexible white-light choice because the kitchen is used differently throughout the evening. That household could select the tunable system after testing its controls. Neither outcome follows from the finish color alone. The example is a purchasing decision, not a claim about a particular fixture or a guarantee that all fixed-white lights retain an identical appearance at every level.
Evaluate the low setting, not just full output
A bright showroom demonstration is not the whole test. View the proposed arrangement at the normal task setting, the intended evening setting and while moving between them. Watch the surface being lit as well as the visible light source. An attractive fixture can still leave the work surface unpleasant, or show a distracting reflection from a seated position.
Check what happens when the selected system is turned off and back on. Does it return to the setting the household expects? Can a guest operate it without being handed a phone? If several cabinet runs are controlled as a group, confirm which ones respond together. Record the actual behavior observed; do not assume memory, grouping or smooth low-level adjustment from the word smart on the box.
Keep light placement and color control separate during review. If a light rail blocks the useful beam, changing the white setting will not move the obstruction. If the fixture is directly visible from a chair, a control choice should not replace an appropriate physical layout. Resolve those issues with the cabinet section and selected lighting arrangement.
Order a complete package without concealing it inside the furniture
Have the lighting provider identify the fixtures, power supplies, controls and compatible connection components for the chosen behavior. Coordinate their locations with the cabinet designer and installer. This is a specification exercise, not a wiring instruction: the actual product requirements determine installation and electrical work.
Show how components requiring access can be reached after the cabinets are installed. A beautiful continuous panel should not leave an agreed serviceable part trapped behind a finished surface. Likewise, a later change from a simple control to a different control system may need more than replacing the visible switch. Review the whole package before accepting that substitution.
Keep the accepted scene descriptions with the cabinet lighting schedule: what is lit, which groups change together, whether output and white appearance are linked, and how the owner returns to task lighting. That record is more useful than a photograph of a glowing cabinet. It gives the buyer and installer the same functional result to deliver, while leaving the manufacturer’s installation details with the selected equipment.
Pure White
Cream White
Light Warm Gray
Gray
Navy
Black
Oak Tone
Dark Walnut Tone
Design study These finish studies are design references, not a list of currently orderable colors. Screens and lighting change the appearance; compare a physical sample before choosing.See all finish options →
A light rail can hide a fixture while also blocking useful light. Compare the work surface and seated sightline before finalizing the cabinet underside.
A cabinet color that looks warm online can read differently next to your floor. Compare an identified physical sample in the positions and lighting where the cabinets will live.
The sample shows the door frame, a separate center panel, the face frame and the cabinet box. Each component has its own place in this Shaker construction.
Shaker construction: door frame, center panel, face frame and cabinet box. The cutaway helps locate these parts; confirm each material in the specifications for the selected cabinet.
01 / Door frame
The Shaker door has rails and stiles around a separate center panel. The frame and center panel are different components; confirm their materials in the specifications for the selected cabinet.
02 / Face frame
The face frame surrounds the opening at the front of the cabinet box and sits behind the doors. The face frame, door frame and cabinet box are separate parts.
03 / Cabinet box
The sample exposes the cabinet sides, interior surfaces and layered edges. The image does not establish the wood species or material specification of a selected cabinet.