A window above a vanity changes the usual assumption that a mirror and lights will sit directly over the basin. It also introduces a sill, trim and operating parts that must work around the selected faucet and top. The location can be useful, but choose the assembly by testing these relationships. A cabinet that fits below the sill is only the beginning of the decision.
Record the opening as a working element
Measure the finished sill, trim and any projecting hardware from the same floor and wall references used for the cabinet. Identify whether the window opens and how it moves. Include the actual crank, handle or sash path rather than drawing the glass alone. A screen or removable interior accessory may also need its own access.
Observe how the window is cleaned and operated today. Placing a basin underneath can change the reach to a latch or the place available to stand. If the remodel changes the window, use the proposed product information and keep that work separate from the cabinet order. The current opening cannot be assumed to describe an unselected replacement.
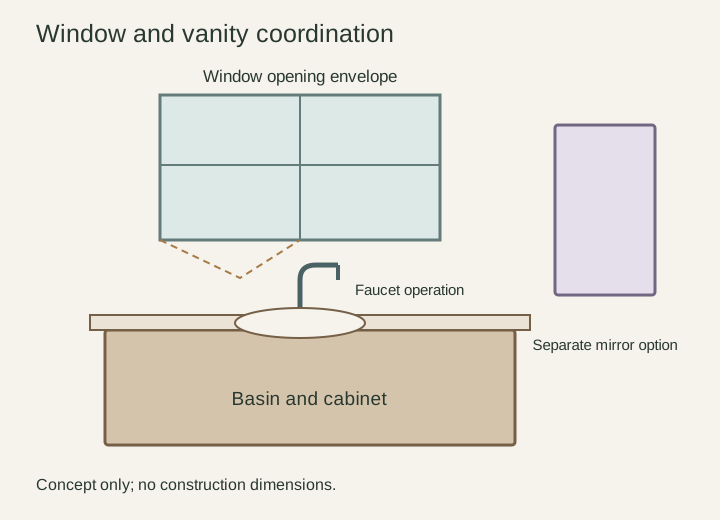
Diagram The window envelope and faucet are separate moving or projecting elements. The mirror at the side is an option to evaluate, not a prescribed location. This diagram supplies no construction dimensions.
Compare vertical fit and operating movement
In a hypothetical elevation, the finished vanity top is 34 inches above the floor and the underside of the sill is 40 inches above the same floor. The vertical separation is 6 inches. That subtraction does not establish that a faucet fits: the selected faucet's height, handle movement and the window's opening path still need to be checked. These are illustrative dimensions, not recommended heights or clearances.
Place the basin and faucet in both elevation and plan. A faucet can clear the sill vertically while its handle conflicts with trim behind it. A window may open without touching the spout but remain inconvenient to operate over the basin. Use a light mockup to reveal the reach and movement, then confirm the actual product relationships with the project team.
Give the mirror its own location decision
List which activities need a mirror at the basin and which could happen at a separate dry position. A side-wall mirror, a nearby grooming area or another selected arrangement may suit some routines. Test the viewing angle with the intended users rather than assuming they will comfortably turn while washing. Keep any movable mirror's complete movement in the plan.
Do not solve the mirror question by drawing an unspecified object in front of the window. That could affect operation, cleaning or the appearance from outside. If a particular mirror system is being considered, obtain its mounting and use information. The cabinet selection should be paired with an actual viewing arrangement before the household gives up a conventional mirror position.
Evaluate the surface beside the basin
Window trim and a sill can divide the space where soap, toiletries or a backsplash might otherwise go. Identify a stable location for everyday items and test whether they must be moved whenever the window is used. Avoid treating a decorative sill as automatically suitable for permanent storage. Its depth and the household's cleaning routine matter.
Review privacy and light with the room as it will be used. Check the view at relevant times and with any proposed covering, without assuming that daylight alone provides the desired grooming light or privacy. Coordinate lighting and window treatments as their own selections. Their operation should remain practical after the faucet, basin and usual counter items are in place.
Approve the complete window-side routine
Try washing, viewing the selected mirror, reaching the window control and cleaning the sill in the proposed arrangement. If the window task forces an awkward reach, compare another faucet position, a different assembly or another wall for the vanity. Do not preserve the under-window location merely because it looked balanced in an inspiration photograph.
Keep a drawing that identifies sill and trim, selected faucet and basin, mirror location and the window's operating envelope. Name which finishes and components remain to be confirmed. The cabinet can then be ordered as part of a coordinated room decision, with the top and window work separately scoped rather than silently presumed to be included.
Pure White
Cream White
Light Warm Gray
Gray
Navy
Black
Oak Tone
Dark Walnut Tone
Design study These finish studies are design references, not a list of currently orderable colors. Screens and lighting change the appearance; compare a physical sample before choosing.See all finish options →
Compare the vanity front with the end of the return wall, then test approach, storage access and the side detail before choosing a recessed or projecting position.
The sample shows the door frame, a separate center panel, the face frame and the cabinet box. Each component has its own place in this Shaker construction.
Shaker construction: door frame, center panel, face frame and cabinet box. The cutaway helps locate these parts; confirm each material in the specifications for the selected cabinet.
01 / Door frame
The Shaker door has rails and stiles around a separate center panel. The frame and center panel are different components; confirm their materials in the specifications for the selected cabinet.
02 / Face frame
The face frame surrounds the opening at the front of the cabinet box and sits behind the doors. The face frame, door frame and cabinet box are separate parts.
03 / Cabinet box
The sample exposes the cabinet sides, interior surfaces and layered edges. The image does not establish the wood species or material specification of a selected cabinet.