Will the new vanity line up? Drain centers, sink locations and countertop edges
Put existing plumbing and the proposed vanity on the same reference lines. A worked double-vanity example shows how a top overhang changes basin-center coordinates.
Put the cabinet, vanity top and existing plumbing on the same drawing before choosing a replacement. Measure pipe centers from a fixed finished wall and the finished floor, then locate the proposed cabinet and sink centers from those same references. A centered sink on a wider top does not have the same coordinate measured from the cabinet edge. The goal is to check the whole assembly, not to make the front look centered while the pipes meet a drawer behind it.
Record what comes out of the wall, not just the old sink
Photograph the existing vanity with its doors open. Identify the wall drain, hot and cold supply connections, shutoff valves and the places where pipes enter from the floor if present. Record each pipe center’s horizontal distance from the same finished side wall, its height above the finished floor and how far the relevant parts project into the cabinet area. Keep access to the valves visible in the record.
Do not infer the wall drain position from the sink’s visible drain opening. Between the bowl and the wall there may be a tailpiece, trap and other fittings, and the outlet on a selected bowl may not be at its visual center. A plumber should check the actual connection arrangement. Your initial measurement records where the existing components are; it does not approve a connection or a new rough-in height.
The cited Kohler vanity guide specifically asks users to coordinate supply and drain positions with the lavatory roughing-in information and the vanity’s basin or cutout location. That principle explains why the cabinet picture and a plumbing photograph need to be reviewed together.
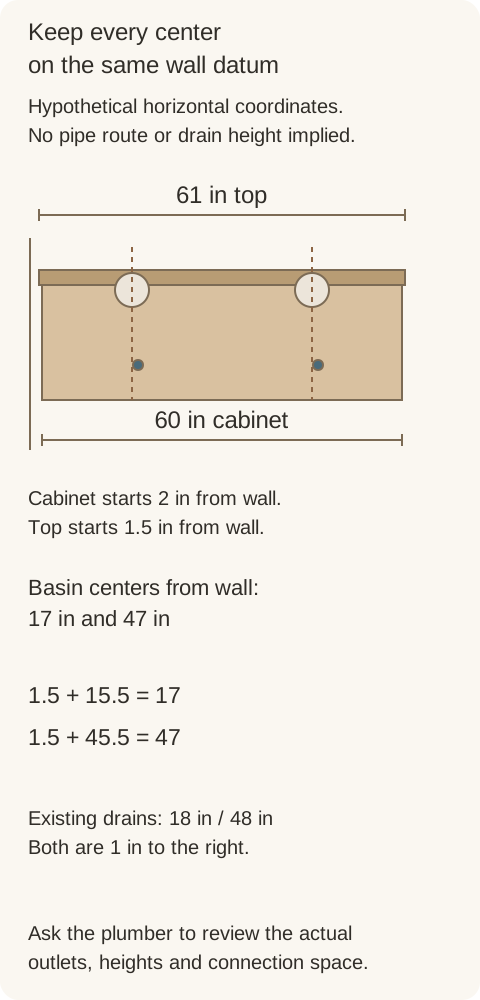
Mark the finished wall as the horizontal datum and show where the cabinet begins. On a separate line, show where the top begins. A separate top may project beyond a cabinet at an exposed end; a wall-bound installation may need a different edge arrangement. Confirm the actual top drawing rather than applying a standard overhang. Fillers, side splashes and walls can all change the available end condition.
Next, copy each basin center from the top drawing using the edge that drawing names. If a dimension is to the cutout center, do not silently relabel it as the drain outlet center. Locate the cabinet’s partitions and drawer boxes on the same plan. A symmetrical front can conceal a basin or connection that occupies space the proposed interior expects to use.
Convert the top dimensions into room coordinates
Diagram The same wall datum is used throughout the hypothetical example. A separate top edge changes the addition used to locate a basin; drain markers identify existing positions without prescribing pipe routes.
Use a section for the vertical and rear clearances
Horizontal centers alone are not enough. A section should distinguish finished-floor level, the top surface, the underside of the basin and the cabinet’s rails or drawer boxes. Put the measured existing pipe heights on that section. If the floor finish will change, tell the reviewer which measurements use the old surface; do not let that difference disappear between the photo and the new drawing.
For a wall-hung cabinet, record the proposed installed position, not just its overall height. For a freestanding vanity, include the actual furniture body and top configuration. A vessel basin adds another geometry above the top; an undermount bowl occupies volume below it. None of these descriptions supplies a universal drain height. Use the actual model information for the cabinet, basin and faucet.
A drain center is a point; the assembly occupies a volume
Overlay the basin and plumbing arrangement on the interior drawing. Check a drawer’s closing path and a door bay’s service access, not only whether a drain point lands in an open area. The trap and its connections may extend forward or sideways. A fixed partition, drawer runner or top rail may occupy that same area even when the visible sink looks correctly centered.
Ask which rear openings and cutouts are provided by the cabinet design and whether any additional change is approved. Do not order on the assumption that a drawer can simply be notched later. If a different interior layout would avoid the conflict, compare it before changing the plumbing. If the selected layout requires a plumbing change, have the plumber describe that scope before the purchase is finalized.
Confirm the top, basin and faucet as a set
For a preconfigured top, check its outside dimensions, basin positions, faucet holes and edge treatment against the cabinet and room. For a separately fabricated top, confirm the selected basin and current template with the fabricator. The cited Kohler Camber sheet explicitly requires its supplied or current cutout template; its notice is model-specific, not a template for other sinks.
The faucet has its own center, reach and operating space. A faucet-hole center and a basin center are related layout information, not interchangeable dimensions. Have the selected faucet reviewed with the bowl, top and wall or backsplash. A picture of a matching set is useful for appearance, but the written product list determines what is actually included in an order.
Bring a drawing that each person can check
Provide an open-cabinet plumbing photo and measurements to pipe centers from a named finished wall and finished floor. Identify any planned finish change.
Attach the actual cabinet interior, top, basin and faucet information. Mark which edge each horizontal center dimension starts from.
Convert the proposed centers to room coordinates and compare them with the existing plumbing. Ask the plumber to review connection volumes, heights and access.
Confirm the top edge arrangement, approved cabinet openings, any plumbing changes and who verifies final field dimensions. Keep the checked drawing with the written item list and quote.
If the top or cabinet changes, redo the coordinate check instead of carrying over the old center marks. A note such as “measured from the finished left wall” takes little room on the drawing and prevents several different edge references from being treated as the same one. Save unresolved measurements with your project notes before making the selections final.
Finish references for the cabinet discussion
Pure White
Cream White
Light Warm Gray
Gray
Navy
Black
Oak Tone
Dark Walnut Tone
Design study These finish studies are design references, not a list of currently orderable colors. Screens and lighting change the appearance; compare a physical sample before choosing.See all finish options →
Combine a dressing mirror with storage when the same location works for both looking and retrieving. Keep them separate when one person needs the mirror while another opens the cabinet, or when the stored contents need a different cabinet form.
Buy voice operation for a task the household wants to perform, with its account and service requirements understood. Keep local lighting control when that already serves the bathroom; a connected mirror is not automatically a better mirror, light or storage solution.
Choose which storage should require a key before choosing the lock. Compare a locked mirror door with a separate interior box, including shared shelf access, lost storage and who should hold each key.
The sample shows the door frame, a separate center panel, the face frame and the cabinet box. Each component has its own place in this Shaker construction.
Shaker construction: door frame, center panel, face frame and cabinet box. The cutaway helps locate these parts; confirm each material in the specifications for the selected cabinet.
01 / Door frame
The Shaker door has rails and stiles around a separate center panel. The frame and center panel are different components; confirm their materials in the specifications for the selected cabinet.
02 / Face frame
The face frame surrounds the opening at the front of the cabinet box and sits behind the doors. The face frame, door frame and cabinet box are separate parts.
03 / Cabinet box
The sample exposes the cabinet sides, interior surfaces and layered edges. The image does not establish the wood species or material specification of a selected cabinet.