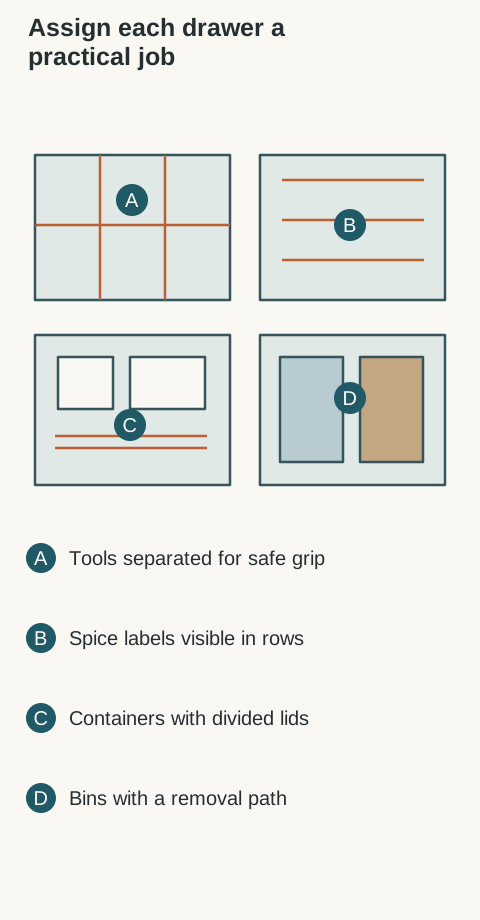
The busiest storage is often the least visible in a kitchen rendering. A shallow tool drawer, spice arrangement, container drawer and waste pullout can make preparation smoother or interrupt it repeatedly. Plan these around actual contents and movement before buying a collection of inserts.
Start at the preparation surface
Lay out the utensils used during a typical meal. Separate preparation tools from serving utensils and occasional equipment. Measure long handles and bulky heads, then check the drawer with its organizer installed. A compartment should let a hand grasp the tool instead of requiring it to be lifted by its sharp or working end.
Blum's US organization guide gives examples for spices, knives, plates and containers. These show possible organizing approaches, not included equipment or usaKT compatibility. Confirm the exact insert dimensions and intended use with the actual drawer. Keep knives in suitable protective storage rather than loose among utensils.
Choose an arrangement that fits the jars you actually use: tilted rows in a drawer, a shallow shelf or a compatible pullout. Check tall refill jars separately. A neat row of matching jars in a photograph can conceal the extra packages that will need another location. Include those packages in the inventory.
Test how the user reads labels and lifts a jar. A narrow pullout may offer side access but need room beside the person preparing food. A drawer arrangement occupies useful base-cabinet space but may make the collection easier to survey. Follow food and spice package storage directions and keep required cooking-appliance clearances intact.
Diagram Conceptual drawer plan: tool divisions, spice rows, container/lid storage and removable waste bins have different fit requirements. No accessory sizes or bin capacities are implied.
Give containers and lids a complete system
Match each reusable container with its lid, remove unmatched pieces and arrange the collection in the way it will be stored. Nested containers save footprint but require a comfortable lifting sequence. A deep stack becomes less useful when the frequently used size sits at the bottom. Separate everyday sizes from occasional bulk containers.
Stand lids in a compatible divider or store matched sets if that works better for the household. Measure the height of the actual lid arrangement when the drawer is closed. A lid leaning above the side of an open drawer can hit the cabinet as it closes. Leave enough space to remove the organizer for cleaning according to its instructions.
Design trash storage for disposal and removal
Decide which waste streams the household actually separates, then select bins with lids and handles included in the fit check. Draw the path for lifting a full bag and removing each bin for washing. A large opening at the front does not guarantee that a rear bin clears the counter or plumbing above it.
Blum's sink-cabinet application shows waste and cleaning storage designed around the bowl. This is an example of a coordinated assembly, not permission to put any bin system under any sink. Check the real bowl, trap, valves, disposal if present and drawer motion. Never assume a pipe can move or a drawer can be cut to rescue an unverified fit.
Act out chopping vegetables, disposing of scraps, adding seasoning and packing leftovers. Look for a waste drawer that blocks the cook or a utensil drawer that requires closing the dishwasher. Keep access to service connections clear and leave a working route around open fronts. A location can fit each object and still fail this sequence.
Compare an ordinary drawer with removable dividers against a dedicated insert or narrow pullout using the same contents. Specify the interior configuration, bins and accessories that the price actually includes. Record missing parts separately. Approve the arrangement only after the contents, opening sequence and cleaning access agree.
The purchase outcome should name the drawer contents and the compatible accessories, including anything bought separately. A well-planned ordinary drawer can be more useful than a specialized fitting selected before the inventory.
Pure White
Cream White
Light Warm Gray
Gray
Navy
Black
Oak Tone
Dark Walnut Tone
Design study These finish studies are design references, not a list of currently orderable colors. Screens and lighting change the appearance; compare a physical sample before choosing.See all finish options →
Buy a coordinated suite when every included appliance earns its place. Mix brands when a specific everyday task justifies the difference, after comparing the visible fronts and the complete installed purchase.
Compare the offered wood drawers by required length, opening method and complete construction. MOVENTO is not an automatic upgrade for every drawer, and one runner family need not serve every location in the kitchen.
Choose the dispenser package with your everyday glasses, bottles and ice routine. A plain refrigerator front can still conceal a water outlet, while a door dispenser changes access without creating a separate drinks station.
The sample shows the door frame, a separate center panel, the face frame and the cabinet box. Each component has its own place in this Shaker construction.
Shaker construction: door frame, center panel, face frame and cabinet box. The cutaway helps locate these parts; confirm each material in the specifications for the selected cabinet.
01 / Door frame
The Shaker door has rails and stiles around a separate center panel. The frame and center panel are different components; confirm their materials in the specifications for the selected cabinet.
02 / Face frame
The face frame surrounds the opening at the front of the cabinet box and sits behind the doors. The face frame, door frame and cabinet box are separate parts.
03 / Cabinet box
The sample exposes the cabinet sides, interior surfaces and layered edges. The image does not establish the wood species or material specification of a selected cabinet.