Unfinished cabinets or a completed shop finish: price the work left to do
An unfinished cabinet purchase includes a separate finishing project. Compare the completed result, handling route and usable date before treating a lower cabinet invoice as savings.
Buy unfinished cabinets when you deliberately want to commission the remaining finish and can organize the work before the cabinets enter normal use. Choose a completed shop finish when the offered result meets the design and you prefer the finishing work included before delivery. Neither route is inherently better. The comparison must end at the same usable cabinet, with the same accepted color, surfaces and completed operations.
A custom color does not automatically require bare cabinets
Scherr’s offers unfinished cabinets and doors for owner or third-party finishing, alongside primed, clear-finished and painted options. Its program also includes custom paint colors. That manufacturer example shows why buying unfinished is not the only route to a selected color.
Before choosing a route, define the appearance you actually need: color, sheen, wood visibility and acceptable surface texture. A room paint color name alone does not identify the cabinet coating system or its completed appearance. Compare an accepted finished sample for each proposal. If the supplied finish already meets that brief, taking on a separate finishing operation should have a specific benefit rather than being an assumed requirement.
Unfinished and unassembled describe different work
A cabinet can arrive ready to assemble with its intended finish already applied. Another can arrive assembled but still require finishing. Ask both questions separately. Assembly time cannot stand in for the work needed to prepare and finish bare surfaces, and an assembled box is not automatically ready for kitchen use. The purchase description should identify the condition in which each group of parts arrives.
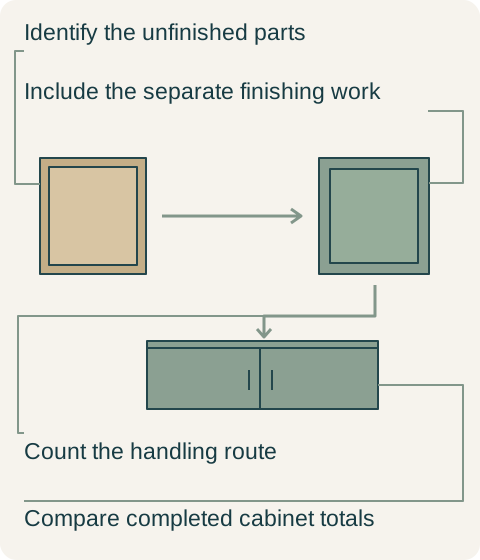
Teaching example Original hypothetical purchase route: unfinished fronts, a separately managed finish stage and the completed cabinet. Colors and process symbols are illustrative, not coating instructions or a factory production diagram.
Map the finish scope by component: doors, drawer fronts, visible box surfaces, end panels, trim and any interior faces included in the design. Distinguish surfaces already supplied with their final treatment from those that remain unfinished. Do not coat an already finished interior just because the visible fronts arrive bare, or assume that all interior surfaces are finished because one sample box is. The actual product package decides that scope.
Follow the parts through the finishing operation
Agree where the work will happen and how the parts reach that location. A professional finisher may receive loose components before assembly, while another proposal may involve assembled cabinets or work after installation. Each route changes access, handling and coordination. Have the cabinet supplier, finisher and installer align their sequence instead of asking the homeowner to improvise it after the shipment arrives.
Include a place for parts awaiting work and for the finished pieces awaiting the next approved step. Ask the finisher to identify coating-specific handling and return-to-use conditions. Dry-looking surfaces are not a scheduling standard. If the plan depends on immediately stacking freshly finished doors or installing hardware on them, that operation needs to agree with the actual finish instructions. A quick arrival of bare cabinets is not the same event as a usable completed kitchen.
Preserve part identities during any removal and return. A finisher should not receive an anonymous stack of differently sized fronts that later has to be guessed back into place. Record the required faces and edges, approved appearance and any holes or hardware preparation that must be preserved. This coordination belongs to the chosen finishing scope; it should not appear as an unexpected task during final installation.
A lower bare-cabinet price can produce a higher completed total
Use a hypothetical comparison, with all amounts invented for teaching and stated in US dollars. The unfinished package is $4,800, the agreed professional finishing work is $1,600, and additional transport between supplier, finisher and site is $300. Its completed pre-installation total is $6,700. A comparable shop-finished package delivered to the same site is $6,400. Installation is identical and excluded from both totals.
In this hypothetical project, both completed samples meet the same custom-color brief, and both proposals include the same exposed parts. The buyer chooses the $6,400 shop-finished package. It costs $300 less at the comparable stage and removes the separately managed finishing transfer. The buyer declines the lower unfinished invoice because it does not represent the lower completed cost in this case. No universal finishing premium or savings percentage is implied.
An unfinished route could still be worthwhile if the independently commissioned finish achieves a desired result the completed offering does not provide, or if a documented full comparison favors that route. Price that actual difference openly. Do not call a different surface texture an exact equivalent merely to make the numbers line up, and do not value an owner’s substantial finishing work at nothing without acknowledging that personal choice.
Approve the completed appearance before dividing responsibility
The supplier needs to know which parts are intentionally delivered unfinished. The finisher needs to accept those parts and the specified coating route. The installer needs a clear release condition for receiving and fitting the completed pieces. A single project coordinator should keep the same sample identity and component list across that handoff. Otherwise each party can complete its own narrow task while an exposed end or rear edge remains outside the agreed work.
At the final review, inspect the relevant faces, edges and transitions against the accepted sample, then confirm normal door and drawer operation after installation. Keep the actual finish identification and care instructions with the cabinet record. Choose the route whose finished outcome and remaining responsibilities you are prepared to buy; the word unfinished should describe a planned stage, not an unpriced gap in the kitchen.
Pure White
Cream White
Light Warm Gray
Gray
Navy
Black
Oak Tone
Dark Walnut Tone
Design study These finish studies are design references, not a list of currently orderable colors. Screens and lighting change the appearance; compare a physical sample before choosing.See all finish options →
Compare appearance requirements and structural performance separately. A Premium aesthetic specification does not, by itself, purchase a higher structural duty level.
The sample shows the door frame, a separate center panel, the face frame and the cabinet box. Each component has its own place in this Shaker construction.
Shaker construction: door frame, center panel, face frame and cabinet box. The cutaway helps locate these parts; confirm each material in the specifications for the selected cabinet.
01 / Door frame
The Shaker door has rails and stiles around a separate center panel. The frame and center panel are different components; confirm their materials in the specifications for the selected cabinet.
02 / Face frame
The face frame surrounds the opening at the front of the cabinet box and sits behind the doors. The face frame, door frame and cabinet box are separate parts.
03 / Cabinet box
The sample exposes the cabinet sides, interior surfaces and layered edges. The image does not establish the wood species or material specification of a selected cabinet.