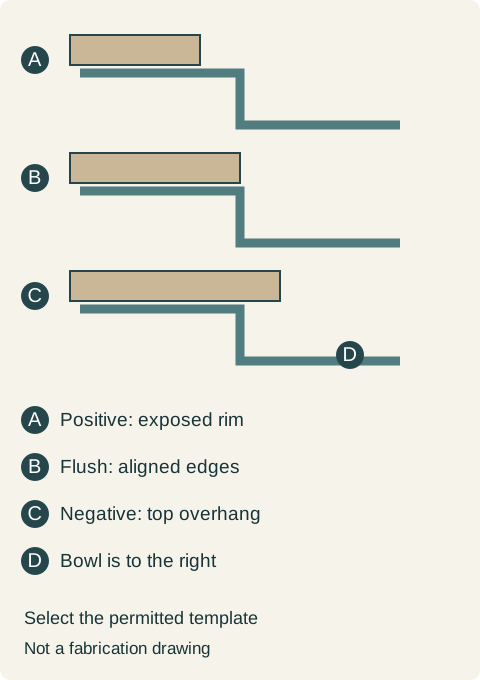
Positive, negative or flush sink reveal: decide before the countertop is cut
The exposed rim changes cleaning access, the visible opening and sometimes the operation of workstation accessories. Choose the edge relationship with the actual sink.
The sink can fit the base cabinet and still be cut into the countertop in a way you dislike. Reveal describes the relationship between the countertop opening and the inner edge of an undermount sink. Decide it before fabrication, while the sink, its accessories and the countertop drawing can still be considered together.
Read the edge relationship in section
Elkay distinguishes positive, negative and no-reveal undermount arrangements. Positive exposes a strip of rim; negative projects the countertop inward; no reveal aligns the edges.
From above, those differences can look small. In use, they determine what you can see and reach around the bowl. An exposed strip needs wiping along its surface and joint. An overhanging edge hides more of the rim, but its underside still needs access for cleaning. Flush alignment removes the visible step in plan; it does not remove the joint or the need for a properly specified installation.
Ask to see the proposed detail from the side as well as from above. A dark sealant line, a polished countertop edge and the sink rim can merge in a photograph. A section drawing makes clear which material extends over the other. Keep the actual reveal term on the approval, rather than relying on a request for a clean-looking edge.
Workstation accessories can settle the choice
For its KWU110-32 workstation sink, Kraus recommends positive or flush reveal and advises against negative reveal because it would cover the accessory ledge.
That limitation matters more than a general preference for hiding the rim. A cutting board or drying rack needs the ledge and the intended travel path. A countertop opening that conceals them can defeat the function for which the sink was selected. Do not assume a detail accepted for a plain bowl works for a workstation bowl, even if the nominal width is similar.
In a hypothetical remodel, the household chooses the workstation sink specifically to move preparation off the adjoining counter. Its first drawing shows a negative reveal copied from another kitchen. The drawing is returned for a permitted positive or flush detail, and the selected accessories are checked in that arrangement before cutting. If the household insists on the original edge appearance, it must reconsider the sink rather than conceal the ledge and hope the accessories still work.
Teaching example Section concepts, with the bowl to the right: a positive reveal exposes rim, a flush reveal aligns the edges, and a negative reveal puts countertop over the bowl edge. No mounting, sealing or fabrication dimensions are supplied.
The visible opening is not the outside sink size
In a hypothetical example, imagine a simplified straight-sided bowl opening 30 inches wide. If a countertop projects 0.25 inch inward on both sides, the visible opening becomes 30 − 0.5 = 29.5 inches. Exposing 0.25 inch of rim on both sides would instead give a 30.5-inch countertop opening in this simplified geometry. These are teaching dimensions, not an allowed reveal for a real sink.
The calculation shows why a single width can mean different things. Outside sink dimensions, bowl opening, countertop cutout and cabinet interior width describe different boundaries. A wider visible cutout does not enlarge the sink body or establish that its mounting arrangement fits. Actual corners, ledges and material requirements also prevent that simple arithmetic from becoming a fabrication template.
Approve the complete perimeter, not one attractive corner
Review the front, back and side edges, including corner transitions. Identify the actual sink model and the manufacturer's permitted template, then have the fabricator resolve the chosen countertop material's requirements. The faucet and sink support remain separate parts of the design. This article's reveal choice does not approve either one.
Include the cleaning reach and the accessory removal motion in the sample review. A board may slide while empty but be awkward to lift from a crowded counter. A rim can be easy to wipe on the front yet difficult to reach behind the faucet. Those observations are more useful before fabrication than a later argument about which reveal is fashionable.
Keep the approved detail with the countertop order. If the sink model changes, reopen the cutout and accessory review rather than carrying forward the previous dimensions. The useful result is an edge that suits the actual sink and daily routine, with its appearance agreed before an irreversible cut.
Pure White
Cream White
Light Warm Gray
Gray
Navy
Black
Oak Tone
Dark Walnut Tone
Design study These finish studies are design references, not a list of currently orderable colors. Screens and lighting change the appearance; compare a physical sample before choosing.See all finish options →
A sliding board creates a temporary working surface over a basin. Compare what stays available while cutting, rinsing and washing before exchanging fixed counter space for a larger sink.
Match the selected sink to the cabinet interior, front and countertop drawing. Worked examples show why bowl width and nominal cabinet size do not settle the fit.
Compare the largest cookware, tasks that need separate bowls and the drain arrangement below. A lower divider changes how a pan crosses the middle; it does not remove the divider.
The sample shows the door frame, a separate center panel, the face frame and the cabinet box. Each component has its own place in this Shaker construction.
Shaker construction: door frame, center panel, face frame and cabinet box. The cutaway helps locate these parts; confirm each material in the specifications for the selected cabinet.
01 / Door frame
The Shaker door has rails and stiles around a separate center panel. The frame and center panel are different components; confirm their materials in the specifications for the selected cabinet.
02 / Face frame
The face frame surrounds the opening at the front of the cabinet box and sits behind the doors. The face frame, door frame and cabinet box are separate parts.
03 / Cabinet box
The sample exposes the cabinet sides, interior surfaces and layered edges. The image does not establish the wood species or material specification of a selected cabinet.