Invisible induction changes the countertop purchase as well as the cabinet
An under-countertop cooking system can preserve an uninterrupted surface, but it must be selected with the actual slab, finish, controls and cabinet space. A familiar induction label does not make any existing top compatible.
Under-countertop induction is a coordinated surface-and-appliance purchase. It can keep a conventional cooktop opening out of the visible countertop, but the chosen slab becomes part of the cooking arrangement. Select the exact appliance, surface, finish and cabinet configuration together. A general statement that a material is porcelain or induction-compatible does not approve the whole combination.
An uninterrupted surface still contains a cooking zone
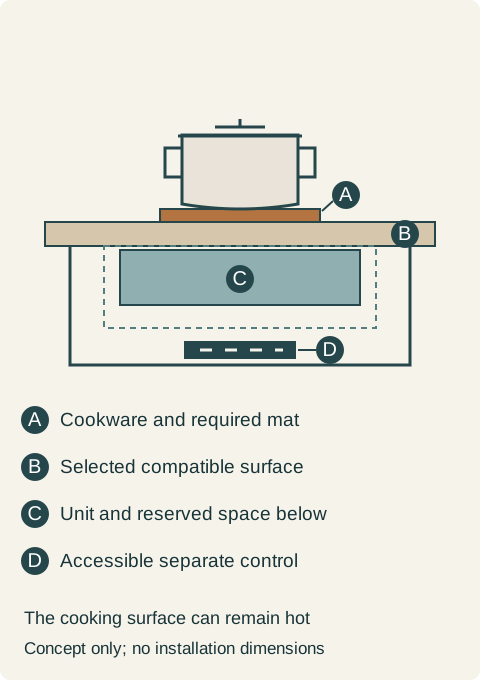
The unit sits beneath the countertop and works through it with suitable cookware above. The zones remain in fixed locations even though there is no conventional glass cooktop outlining them. The result is visual continuity, not permission to cook anywhere on the slab or to ignore what occupies the cabinet underneath.
Neolith's cited design guide for an Invisacook arrangement makes the InvisaMat mandatory during cooking and identifies finish choices it recommends and does not recommend. Its illustrated control is separate from the cooking surface. These are conditions for that documented arrangement; the European publication is not an installation specification for every unit sold in the United States.
Use that example to ask a concrete buying question: does the proposed surface, including its finish and construction, belong to the approved configuration offered for this project? A color sample alone cannot answer. A different finish in the same design may require another decision, and a visually similar slab from another range is not an automatic substitution.
The mat and controls belong in the appearance comparison
A photograph with no cookware can conceal the accessories used while cooking. View the selected system with its required mat and the household's permitted pans in place. Compare that working appearance with a visible induction cooktop, rather than comparing a bare invisible system with a fully loaded conventional one.
The controls need an identifiable and reachable home. If they go on the cabinet front, their placement is part of the elevation. If the supported arrangement locates them in a drawer, include the drawer's use and movement in the cooking routine. A control hidden so well that it is inconvenient to reach does not improve the working kitchen.
Confirm how the actual cooking zones are identified. The household should be able to place permitted cookware accurately without treating a large decorative vein as a reliable burner marker. A sample demonstration should use the proposed marking approach and controls, not temporary labels that will disappear at installation.
Teaching example Conceptual stack: cookware sits on the specified mat above the selected surface; the induction unit and its required space are below. The separate control remains accessible on the front. Not a product section; dimensions, support and electrical details are omitted.
Invisible above does not mean empty below
Reserve the installed unit, its attachment, the required ventilation and access in the cabinet section. Then design the storage that remains. A drawer that fits the outside cabinet dimensions may still enter the equipment space. Do not price the same uninterrupted deep drawer that existed before the cooking system was added unless the complete arrangement supports it.
The controller connection and electrical supply also need to be coordinated with the cabinet. Their routes should not rely on an organizer staying empty or on a drawer being removed for normal operation. Have the responsible trades resolve the selected system's installation; this comparison provides no generic fan gap, opening size or wiring method.
Review service access before fixing decorative panels. The future replacement question is which component can be removed, by what documented route, without assuming that an expensive installed slab can simply be lifted every time. A concealed unit is still equipment that must be accessible as its manufacturer requires.
Plan the change from cooking back to preparation
The linked Invisacook Europe user manual warns that the cooking area and surrounding countertop can become hot and must cool before the described contact and cleaning tasks. The surface's ordinary appearance is not an indication that it is ready for use as a preparation or serving area immediately after cooking.
Keep a separate usable landing and prep area during the meal. If the plan depends on chopping where a hot pan was just removed, visual continuity has not solved the simultaneous work requirement. Judge the system by what the household can do before, during and after cooking, including where required accessories go when no longer in use.
A conventional induction cooktop also requires its own operating precautions. The comparison here is not a promise that one surface stays cold. It is whether the household understands and values the invisible system's particular surface, accessories and return-to-prep routine.
A purchase that changes the finish and preserves a prep area
Consider a household attracted to a continuous patterned island and a highly polished finish. In the documented Neolith example, Décor Polished is not among the recommended finishes. The household compares the appearance of Silk, which the same guide recommends, with the original polished sample; it prefers the continuous composition enough to accept the different sheen.
The proposed purchase retains the under-surface system subject to current approval for the actual local configuration. It includes the required mat, a visible front-mounted control and a separate preparation area that remains usable while the cooking zone cools. Storage below is quoted only after the equipment and access are reserved. The choice is a changed material-and-cabinet package, not an invisible appliance added beneath the original finish without consequences.
Someone unwilling to change the preferred surface or accommodate the operating routine may instead choose a visible cooktop with its own approved installation. Compare both completed packages, including surface fabrication, controls, permitted cookware and usable storage. Confirm the actual warranty responsibilities of the surface and appliance suppliers separately; a coordinated drawing is not a promise that either company covers every component.
Pure White
Cream White
Light Warm Gray
Gray
Navy
Black
Oak Tone
Dark Walnut Tone
Design study These finish studies are design references, not a list of currently orderable colors. Screens and lighting change the appearance; compare a physical sample before choosing.See all finish options →
A flush installation changes the countertop profile around the appliance. Compare the supported material, recess and replacement scope before choosing a level-looking surface.
A drawer front fitting under the counter does not establish usable storage. Verify the supported installation, reserve the required underside space and check the highest stored item through the drawer’s movement.
Moving cooking to the island exchanges one working zone for another. Compare preparation, pan handling, storage and ventilation in both complete layouts before changing the cabinet order.
The sample shows the door frame, a separate center panel, the face frame and the cabinet box. Each component has its own place in this Shaker construction.
Shaker construction: door frame, center panel, face frame and cabinet box. The cutaway helps locate these parts; confirm each material in the specifications for the selected cabinet.
01 / Door frame
The Shaker door has rails and stiles around a separate center panel. The frame and center panel are different components; confirm their materials in the specifications for the selected cabinet.
02 / Face frame
The face frame surrounds the opening at the front of the cabinet box and sits behind the doors. The face frame, door frame and cabinet box are separate parts.
03 / Cabinet box
The sample exposes the cabinet sides, interior surfaces and layered edges. The image does not establish the wood species or material specification of a selected cabinet.