Plan drawers beneath a cooktop from the underside and the loaded contents
A drawer front fitting under the counter does not establish usable storage. Verify the supported installation, reserve the required underside space and check the highest stored item through the drawer’s movement.
Assign drawer storage beneath a cooktop only after confirming that the selected appliance and cabinet arrangement support it. The visible drawer front says little about the cooktop body, connections and other space needed behind it. Draw the underside in section, preserve the requirements of that model and test the drawer with its intended contents rather than with an empty box.
Establish the model’s under-counter conditions first
GE Appliances’ under-cooktop drawer guidance refers readers to model installation instructions for vertical clearance and also restricts stored contents. Its electric-cooktop guidance explicitly notes that clearance varies by model. Use that as a reason to obtain the selected instructions, not as a universal drawer allowance for every cooktop technology or installation.
Identify the appliance body below the counter, the specified connection zones and any required separation, barrier or ventilation provision. Include only details required or permitted for that configuration, as confirmed with the responsible installer. Do not assume an empty-looking cavity can be converted into storage, or that a separator can be improvised without changing the installation conditions.
Build the section from actual reference surfaces
Use the finished countertop, its underside and the cabinet’s internal structure as distinct reference surfaces. Place the cooktop from its installation drawing, then show the space that must remain available. Locate the proposed drawer floor, sides and hardware beneath that arrangement. Measuring only from the drawer front to the counter skips the components controlling its real internal height.
Keep any required airflow path or connection access visible in the cabinet detail. A shortened drawer may create space in one area but still obstruct another. Have the completed section reviewed against the product instructions before selecting a drawer box; the drawing should explain the allowed storage envelope without inventing a universal distance beneath the appliance.
Check the highest part of the contents, not just the box sides
List the actual utensils and organizers intended for the upper drawer. Measure their occupied shape in the way they will be stored, including handles, dividers and any parts standing above the box. Check the collection through the full drawer movement, not just when the front is closed. A tall item may reach into a reserved zone even when the drawer itself remains below it.
ABCD
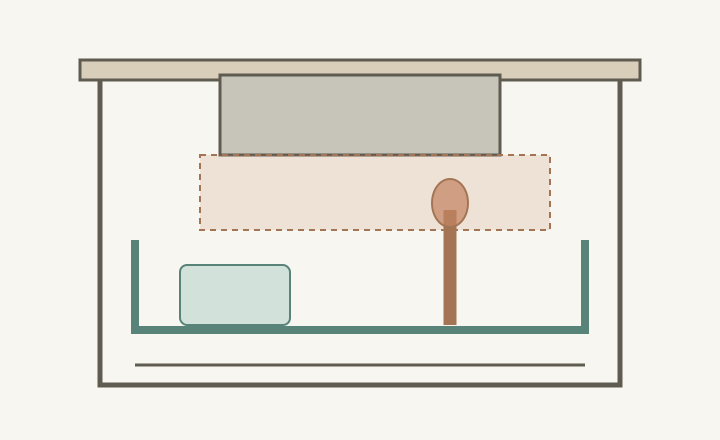
Diagram The drawer box stays below the dashed reservation, while the tall item enters it. The reservation is hypothetical and does not define a required gap, barrier or airflow design. The selected cooktop and actual cabinet details determine what space must remain clear.
A
The cooktop body occupies space below the counter.
B
Preserve the applicable installation reservation.
C
Loaded contents can exceed the drawer-box profile.
D
The lower item illustrates a different occupied shape, not automatic permission to store it.
In a hypothetical layout, a shallow organizer keeps loose tools within the verified storage envelope. A later upright holder raises the same tools into the area reserved below the cooktop. The nominal drawer size has not changed, but the storage arrangement has. Preserve the tested organization or reassess the changed contents rather than assuming the original box approval covers every future use.
Check permitted contents and the whole drawer stack
Confirm the product’s restrictions on what may be stored below it before assigning the drawer. GE’s cited guidance excludes combustible contents; the selected model’s applicable instructions remain the reference for the project. Do not treat liners, packaging or any organizer as acceptable merely because their dimensions fit the remaining space.
Compare the useful storage left after all requirements are included. A shallow upper drawer, a non-storage front area or a different supported cabinet arrangement may change the lower drawers as well. Inventory what would move and where it would go. Calling the upper space a utensil drawer has little value if the household’s actual permitted collection cannot be used there.
Keep the installation reservation visible in the storage plan
Review the section with the cabinet designer and appliance installer before fabrication. Keep the approved drawer dimensions, intended contents and required clear areas together. Check the finished assembly before use, including drawer travel and the maintained installation provisions. A neat front elevation should not hide a conflict that only appears inside the cabinet.
Reassess after changing the cooktop, drawer insert or storage orientation. A different appliance underside or a taller organizer can invalidate the previous result without changing the cabinet’s outside appearance. The useful decision is that this specific installation and this specific storage arrangement work together, with the required space preserved during normal use.
Pure White
Cream White
Light Warm Gray
Gray
Navy
Black
Oak Tone
Dark Walnut Tone
Design study These finish studies are design references, not a list of currently orderable colors. Screens and lighting change the appearance; compare a physical sample before choosing.See all finish options →
An outer front can cover a gap without confirming the required opening, support or attachment. Match the exact appliance and accessory configuration to the cabinet detail behind it.
Reserve equipment, the agreed route and access before counting cabinet capacity. The remaining volume matters only if real contents can enter, sit and be retrieved without occupying those reservations.
The sample shows the door frame, a separate center panel, the face frame and the cabinet box. Each component has its own place in this Shaker construction.
Shaker construction: door frame, center panel, face frame and cabinet box. The cutaway helps locate these parts; confirm each material in the specifications for the selected cabinet.
01 / Door frame
The Shaker door has rails and stiles around a separate center panel. The frame and center panel are different components; confirm their materials in the specifications for the selected cabinet.
02 / Face frame
The face frame surrounds the opening at the front of the cabinet box and sits behind the doors. The face frame, door frame and cabinet box are separate parts.
03 / Cabinet box
The sample exposes the cabinet sides, interior surfaces and layered edges. The image does not establish the wood species or material specification of a selected cabinet.