Plan compactor access for the full bag, not just daily loading
A compactor can open for small items yet be awkward to empty. Check the complete drawer position, any required side opening, bag handling and the route away from the kitchen cabinet.
Place a trash compactor where its ordinary loading and complete emptying tasks both fit the finished kitchen. Sliding the drawer open enough to drop something inside is not the same as removing a filled bag. Confirm the selected model’s bag-removal method before placing an island end, return cabinet or other fixed obstruction beside the opening.
Write separate checks for loading and emptying
For daily loading, identify how the selected drawer opens and where the person stands with the item. Include any control or pedal used in the actual model’s procedure. Do not infer the operating method from a similar-looking front. A convenient location near food preparation still needs enough room for the drawer and the user without blocking the adjacent task.
For emptying, follow the appliance’s own instructions and list the space each part of the task needs. KitchenAid’s cited guidance includes fully opening the drawer and tilting its side before lifting the bag. That is why a check of forward travel alone can miss another required movement on the covered arrangement.
Draw the task against the finished cabinet surroundings
Show the full required drawer extension, adjacent handles, countertop overhangs and the nearest fixed side obstruction. If the selected appliance’s removal method needs lateral access, show that reservation as well. A plan view locates overlaps, while a side or front view establishes whether the actual moving part and obstruction occupy the same height.
Include a position from which the user can reach the bag and complete its removal. A free patch in front of the appliance is not automatically useful if the person must lean across the open drawer from the wrong side. Keep the geometry tied to the real method instead of treating every empty area around the cabinet as interchangeable access.
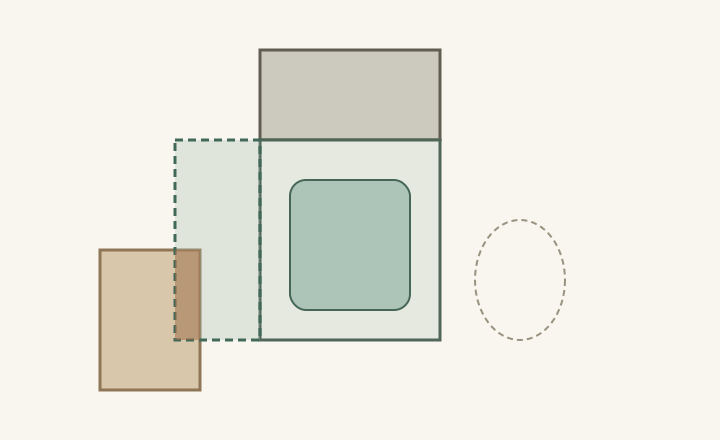
ABCD
Diagram The hypothetical shaded side reservation overlaps a fixed obstacle even though forward drawer travel is clear. It is not a real hinge path, bag-removal instruction or prescribed clearance; confirm the selected appliance’s movement and height.
A
The appliance drawer extends into the room.
B
Some removal tasks need space beside the drawer.
C
The side reservation overlaps a fixed obstruction.
D
The user also needs a workable position.
Use a full removal trial to expose the hidden conflict
In a hypothetical kitchen, the compactor faces a clear aisle beside a projecting island end. Small daily items load without difficulty. When the drawer reaches the position required for emptying, the island end obstructs the side movement specified for the selected appliance. The daily loading test passed, but the full-bag task was never accommodated.
Compare moving the appliance, revising the adjacent fixed boundary or choosing a different supported arrangement. Do not assume that pulling the installed machine forward for every bag change is an acceptable solution. Nor should the user have to force a restricted side panel or invent a different removal procedure to compensate for the cabinet layout.
Evaluate handling without turning the trial into a strength test
Use an empty bag or other light, manageable representation to examine reach and the route away from an appropriately installed display or mock-up. There is no need to fill a compactor with dense waste to establish whether the cabinet blocks the task. Keep operation and actual bag handling within the selected product’s instructions and the user’s manageable ability.
Trace where the removed bag goes next and whether an open cabinet, stool or nearby door occupies that route. The destination should not require an awkward turn while trapped between the extended drawer and a fixed obstacle. A clear route is especially valuable when the user needs both hands; avoid planning on moving everyday obstructions while already holding the bag.
Keep the chosen arrangement usable after move-in
Identify routine care access from the actual manual separately from daily loading and bag removal. Some tasks may require a different drawer or component position. Have the installer confirm the appliance’s installation, securing and service conditions without turning this storage plan into mechanical repair instructions. Decorative side panels and toe kicks must respect that agreed arrangement.
Retain the exact model, full-open outline, bag-removal method and tested user position with the cabinet plan. Recheck when a neighboring island end, handle or furniture position changes. The useful location is the one that allows the entire recurring task to finish, rather than merely making the compactor easy to feed.
Pure White
Cream White
Light Warm Gray
Gray
Navy
Black
Oak Tone
Dark Walnut Tone
Design study These finish studies are design references, not a list of currently orderable colors. Screens and lighting change the appearance; compare a physical sample before choosing.See all finish options →
Compare the cabinet arrangement and the daily dish load together. A narrower appliance can leave an unusable strip, while the countertop above an undercounter machine may remain exactly the same.
A flush front does not establish a working installation. Confirm enclosure permission, keep the required ventilation opening effective and test the door with the actual bottles and neighboring fronts.
The sample shows the door frame, a separate center panel, the face frame and the cabinet box. Each component has its own place in this Shaker construction.
Shaker construction: door frame, center panel, face frame and cabinet box. The cutaway helps locate these parts; confirm each material in the specifications for the selected cabinet.
01 / Door frame
The Shaker door has rails and stiles around a separate center panel. The frame and center panel are different components; confirm their materials in the specifications for the selected cabinet.
02 / Face frame
The face frame surrounds the opening at the front of the cabinet box and sits behind the doors. The face frame, door frame and cabinet box are separate parts.
03 / Cabinet box
The sample exposes the cabinet sides, interior surfaces and layered edges. The image does not establish the wood species or material specification of a selected cabinet.