A transitional kitchen: decide what stays traditional
Use transitional design to connect a new kitchen with an existing home. Assign traditional detail to specific places instead of buying an unrelated mix of favorites.
A transitional kitchen needs a clear relationship between the existing house and the new cabinetry. Decide which traditional features will carry the room’s character and which parts should become simpler. That is more useful than selecting a Shaker door and assuming the rest of the kitchen will automatically feel transitional. A combination works when the differences have a purpose that can be seen from the adjoining rooms.
Start with the parts of the house that will remain
Walk from the dining room into the kitchen and list the elements you are keeping: a doorway casing, a paneled wall, a mantel, a dining table or a visible built-in. Distinguish actual retained features from pictures you merely like. The new kitchen has to live beside the first group; the second is optional. This often reveals that the room already has enough traditional character without repeating it on every cabinet surface.
MasterBrand’s Casual design description combines a modern base with traditional detailing and allows personal furnishings to participate. It offers a useful example of mixed design language; it does not establish a universal definition or required formula for every transitional kitchen.
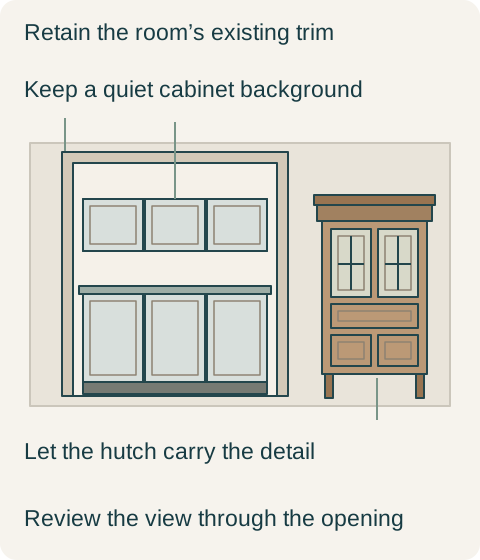
Make a visual division of work. The retained architectural trim might carry the traditional outline, the new cabinet fronts might provide a quieter background, and a freestanding dining piece might hold the most decorative detail. This is not a percentage calculation. It is a way to prevent the new cabinets, ceiling trim, lighting and furniture from all repeating the same ornate gesture simply because each looked attractive separately.
Teaching example Hypothetical adjoining-room study. The opening, hutch and simplified cabinets show a distribution of detail, not a universal transitional-style formula.
Choose where the transition actually happens
A transition can occur at a doorway, between an enclosed dining room and a working kitchen, or within one visible wall. Its location changes the design problem. Separate rooms can tolerate a stronger difference because the opening frames each view. In a continuous space, unrelated top treatments and cabinet silhouettes remain visible together. Draw that shared view rather than assessing each room from its most flattering corner.
Look for a concrete connection that does not require duplication. A square cabinet frame can relate to the rectangular divisions of an older wall panel without copying its carved molding. A calm cabinet color can let an existing wood table remain distinct without pretending that the new doors match its aged surface. The connection should be easy to describe. If the explanation depends on an abstract style label, look again at the actual shapes and materials.
Keep the new kitchen’s working parts coherent
The cabinet family still needs a usable relationship between doors, drawers, appliance panels and visible ends. Mixing detail at room scale does not mean assigning a different front profile to every function. Choose a consistent working vocabulary for the main run, then decide whether any separate furniture-like unit deserves different treatment. An accent is easier to understand when the surrounding cabinets give it a steady reference.
Hardware and lighting can connect the room, but they should not be expected to repair an unresolved cabinet composition. Compare the selected pull on the complete door-and-drawer arrangement before treating it as the traditional ingredient. Likewise, a decorative pendant may be enough emphasis above an otherwise restrained island. Adding ornamental panels, legs and a strong counter edge to the same island changes the balance; those are additional decisions, not automatic companions.
Retain the dining-room character without copying its cabinet
Consider a hypothetical home with a wide cased opening, a traditional dining hutch and a new kitchen visible beyond. The owners want easier-to-read cabinet fronts but worry that a plain kitchen will look disconnected. Their first proposal repeats the hutch’s detailed doors and heavy top treatment across the kitchen. From the dining table, the old hutch and new cabinet wall compete for the same kind of attention.
They keep the opening trim and the hutch. For the kitchen they select a restrained square-framed front, straightforward drawer faces and a quiet top finish appropriate to the measured room. They omit the proposed island legs and decorative end frames, keeping that island as a simple working volume. The retained hutch becomes the detailed furniture piece; its role no longer has to be repeated by the entire kitchen.
The chosen view contains both traditional character and simpler new work. The owners accept that the cabinet doors do not imitate the old hutch. Their purchase retains the actual storage and appliance arrangement, with the decorative options removed from the order. They also keep the existing table rather than buying another traditional accent to explain a style the house already expresses.
Compare omissions as carefully as additions
When reviewing alternatives, show what has been removed. A proposal with fewer applied details should not quietly lose a needed finished side, a functional filler or a complete ceiling junction. Those parts may remain essential even when the visible treatment is simple. Ask for a complete restrained version and a complete more detailed version using the same basic cabinet plan, so their appearance and scope can be compared fairly.
Do not order the transitional label. Order the selected front family, visible end treatment, top and base details, finish and hardware arrangement. Keep a room view that includes the retained architecture beside those choices. If a substitution adds a more elaborate profile or changes the island’s silhouette, revisit that view. The practical aim is a new kitchen that belongs with the parts of the home you value, while making the everyday working area as straightforward as you intended.
Pure White
Cream White
Light Warm Gray
Gray
Navy
Black
Oak Tone
Dark Walnut Tone
Design study These finish studies are design references, not a list of currently orderable colors. Screens and lighting change the appearance; compare a physical sample before choosing.See all finish options →
Choose the top treatment with the whole cabinet elevation visible. More layers change the silhouette, end returns and complete trim order; they do not add storage.
Choose antiqued mirror for the reflected scene and concealed storage you want. Compare the full door group, its patterned surface and the view when it opens before replacing transparent glass.
The sample shows the door frame, a separate center panel, the face frame and the cabinet box. Each component has its own place in this Shaker construction.
Shaker construction: door frame, center panel, face frame and cabinet box. The cutaway helps locate these parts; confirm each material in the specifications for the selected cabinet.
01 / Door frame
The Shaker door has rails and stiles around a separate center panel. The frame and center panel are different components; confirm their materials in the specifications for the selected cabinet.
02 / Face frame
The face frame surrounds the opening at the front of the cabinet box and sits behind the doors. The face frame, door frame and cabinet box are separate parts.
03 / Cabinet box
The sample exposes the cabinet sides, interior surfaces and layered edges. The image does not establish the wood species or material specification of a selected cabinet.