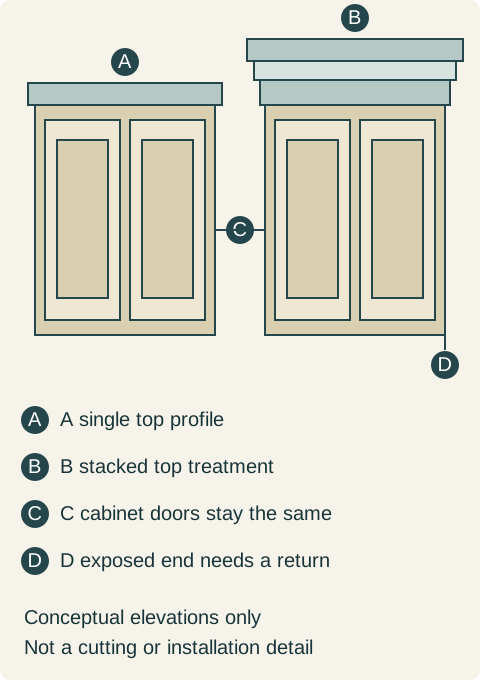
Cabinet crown molding: one profile or a stacked assembly?
Choose the top treatment with the whole cabinet elevation visible. More layers change the silhouette, end returns and complete trim order; they do not add storage.
A stacked crown can give a cabinet run a stronger top edge, but it should earn its place in the complete room. Compare it with a simpler profile above the same doors, at the intended height and with the same exposed ends. Adding several bands to a small sample is easy. Making that assembly look deliberate above a whole kitchen, without changing the storage or creating an awkward meeting with the ceiling, takes a more complete comparison.
Keep the door choice fixed while comparing the top
Start with a front elevation of the selected wall and tall cabinets. Include the hood, windows, ceiling and any room molding that stays. Make alternatives by changing the cabinet top treatment while holding the remaining design constant. Otherwise a more attractive finish or a different cabinet height can be mistaken for the effect of the crown.
KraftMaid's decorative-details examples identify both crown molding and stacked crown molding. The kitchens also change other features. Their displayed totals therefore cannot isolate the price of the crown upgrade or serve as a quote for another kitchen.
A single profile gives the eye one principal transition. A stacked assembly combines pieces into a larger visible treatment, often with additional bands or setbacks. Neither label tells you the completed height and projection. Ask for the assembled shape, not just a list of attractive individual moldings.
The cabinet top treatment and the room's existing ceiling molding are separate assemblies. They may meet, overlap in the view or stop at different positions. A straight-on rendering can hide that relationship. Include a view from the doorway and the exposed end of the run, where a projection or unfinished stop becomes easier to see.
Decide whether the crown should meet the ceiling
First choose the intended relationship: a top treatment ending below the ceiling, or an assembly that meets it through an agreed finishing detail. Do not let the last available molding in a catalog make that decision. Both relationships can look intentional when the complete room supports them.
For a below-ceiling treatment, show the remaining wall above it. A substantial crown with a thin accidental-looking strip above can be less satisfying than a simpler treatment with a deliberate open band. Judge the actual proposal rather than applying a universal gap proportion. Ceiling height, sightline and the surrounding room all affect the impression.
For a ceiling-meeting treatment, keep the measured ceiling separate from the level cabinet line. An uneven ceiling does not disappear because a rendering uses parallel lines. The installer needs an accepted way to finish the actual junction; this guide does not prescribe trimming or fastening. Do not tilt the cabinet run merely to make a decorative band follow an irregular ceiling.
Adding more trim also does not create another storage compartment. If the purpose is to gain storage above the existing doors, compare a real additional cabinet with its own access arrangement. A tall decorative band can change appearance while leaving the usable cabinet exactly as it was.
Teaching example The same cabinet fronts under two conceptual top treatments: A uses a single profile; B combines several bands. C marks the unchanged doors and D an exposed end where the treatment must finish. Shapes are illustrative elevations, not molding sections or fastening instructions.
Follow the treatment around the exposed ends
Trace where every run begins and ends. A crown passing along the front must finish appropriately where a cabinet side is visible. Include the actual end panel thickness and the neighboring tall unit. A price for only the front length may omit the parts and work that complete the visible assembly.
Corners, depth changes and a hood interrupt the continuous line. Decide whether the treatment continues, steps or stops at each one. Do not assume a profile that looks good across the main wall will also finish neatly above a deeper refrigerator enclosure. The completed side and corner views should agree with the front elevation.
Show the highest door's opening movement too. The appearance choice must respect the actual front and hardware arrangement. A decorative projection is not acceptable if it occupies space needed by an opening front. Use the selected cabinet details, rather than assuming that all overlays leave the same room for an added band.
A simpler crown wins in a kitchen with strong window trim
Consider a hypothetical kitchen with plain framed doors, a retained wide window casing and a hood already serving as a visual focal point. The owners initially choose a layered crown from a showroom sample because it gives the isolated cabinet an impressive finish. They have not yet compared the whole elevation.
When the complete view is prepared, the layered treatment adds another strong horizontal band alongside the window casing and hood. At the exposed end beside the refrigerator, its return also creates a larger visible step than the owners expected. None of those details is a fabrication error; the combined appearance simply feels busier than their preferred room.
The alternative keeps the same doors and cabinet height but uses a simpler top profile. The installer confirms a suitable assembly and finishing detail for the measured ceiling relationship and end returns. In the room view, the window and hood remain prominent while the cabinet line finishes quietly. The storage layout is unchanged, so the choice does not require relocating the household's dishes.
The owners choose the simpler treatment and remove the omitted build-up pieces from the order. They still include the necessary returns and matching exposed surfaces. Their decision is not that stacked crown is always excessive. It is that the larger assembly did not improve this kitchen enough to justify the additional visible detail and work.
In a room with taller proportions and little competing trim, the complete stacked version might instead give the cabinet wall the finish the owners prefer. Compare that actual version at room scale. A modest door profile does not prohibit a stronger crown, and an elaborate door does not automatically require it.
Compare the finished trim package
Request the complete difference between the accepted alternatives: supplied profiles, any build-up components, finished returns, exposed surfaces and installation. Keep the same cabinet order underneath. If one proposal also changes upper-cabinet height or the hood treatment, separate those changes so the cost comparison remains intelligible.
Record finish identity for all visible pieces. A crown supplied in a similarly named white or wood tone is not automatically a match for the selected doors. Examine the proposed combination under the room lighting, particularly where several horizontal layers produce different shadows.
Finally, retain the assembled front and end views with the order. The buyer should be able to point to the agreed result, not reconstruct it from a bag of profile names. A successful crown treatment completes the kitchen you selected; it is not a decorative afterthought that quietly changes its proportions.
Pure White
Cream White
Light Warm Gray
Gray
Navy
Black
Oak Tone
Dark Walnut Tone
Design study These finish studies are design references, not a list of currently orderable colors. Screens and lighting change the appearance; compare a physical sample before choosing.See all finish options →
Choose antiqued mirror for the reflected scene and concealed storage you want. Compare the full door group, its patterned surface and the view when it opens before replacing transparent glass.
The sample shows the door frame, a separate center panel, the face frame and the cabinet box. Each component has its own place in this Shaker construction.
Shaker construction: door frame, center panel, face frame and cabinet box. The cutaway helps locate these parts; confirm each material in the specifications for the selected cabinet.
01 / Door frame
The Shaker door has rails and stiles around a separate center panel. The frame and center panel are different components; confirm their materials in the specifications for the selected cabinet.
02 / Face frame
The face frame surrounds the opening at the front of the cabinet box and sits behind the doors. The face frame, door frame and cabinet box are separate parts.
03 / Cabinet box
The sample exposes the cabinet sides, interior surfaces and layered edges. The image does not establish the wood species or material specification of a selected cabinet.