A traditional kitchen: organize detail around a clear focal group
Plan traditional cabinetry as a complete room. Use balanced groups and a deliberate hierarchy of detail without forcing every cabinet into a mirrored arrangement.
A traditional kitchen can contain rich detail and still feel orderly. The useful starting point is a clear focal group, supported by quieter cabinet runs. Decide where the eye should settle before choosing decorative panels, posts and top treatments. Repeating the most elaborate option on every available surface can weaken the very feature you wanted to emphasize, while making the complete purchase harder to understand.
Choose the principal group from the actual room
The focal group might be the cooking wall, a glazed dresser or a pantry composition seen from the entry. Choose it from the room’s actual sightlines rather than automatically assigning the role to the largest appliance. A hood may be visually important from the preparation area but nearly hidden behind an island from the main entrance. The prominent group is the one the household will actually see.
MasterBrand describes traditional cabinetry through decorative detail, furniture-like features and order created by symmetry and balance. This is a manufacturer’s design description, not a rule that all kitchen functions must be duplicated on opposite sides of a centerline.
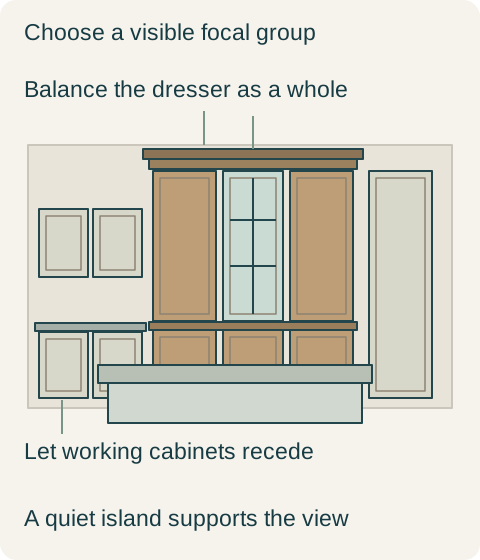
Draw the selected group as a whole: its top, sides, center and base. Then add the surrounding cabinets without immediately copying its strongest detail. This makes it easier to distinguish the main composition from the supporting storage. It also helps decide whether a separate island should compete as a second ornate furniture piece or provide a calmer foreground.
Teaching example Hypothetical traditional-room study. The centered dresser group and quieter surrounding cabinets illustrate visual hierarchy, not a mandatory symmetry or installation layout.
Balance the visible group without mirroring every function
Symmetry can be useful within a selected group. Matching visible side elements around a center can make that area feel composed. The rest of the kitchen still has to accommodate the doorway, window, refrigerator and household storage. Do not move a useful function or create an awkward cabinet merely because a front elevation looks more formal when everything is reflected.
Distinguish a balanced outline from identical interiors. Similar-looking outer groups can house different useful arrangements, where the selected cabinet system supports them. Conversely, the two sides may remain visibly different and still feel balanced if their overall weight and detail are considered. Review the broad light and dark shapes first, then the small profiles. A repeated knob cannot compensate for a large unresolved imbalance in the cabinet masses.
Give ornament a level of importance
Assign the strongest decorative treatment to the chosen focal group. Let the main working run repeat a simpler common vocabulary, and keep service areas quieter where that suits the room. This is a design hierarchy, not an instruction to buy poorer materials for secondary areas. Finish quality, functional hardware and complete exposed surfaces should remain part of every group that is purchased.
Look closely at how the detail repeats across small drawers, broad doors and end panels. A decorative outline that appears generous on a large door can occupy much of a small front. Rather than demanding the same motif everywhere, use an offered companion front or a plain supporting surface where appropriate. The complete family should look related without pretending that every shape has the same proportions.
A dresser becomes the feature, while the working wall settles down
Imagine a hypothetical kitchen entered from beside a window, with a broad storage wall directly ahead and the cooking area off to the side. The owners initially choose an elaborate hood, ornamental island ends and an equally elaborate glazed dresser. In the entry view, the hood is partly obscured, while the island and dresser compete. Paying for all of that detail does not produce the clear traditional room they expected.
They make the dresser wall the principal group because it is visible on arrival and holds tableware used in the adjoining dining space. Its central glazed section is flanked by coordinated closed storage, with a defined top treatment. The working cabinets retain a related, simpler front family. The island loses the applied decorative end frames and remains a quieter foreground, with its visible sides fully finished.
The refrigerator stays in its useful location instead of moving across the room to create a mirrored elevation. The owners choose the dresser-led scheme and keep the detailed dresser package in the order while removing the competing island embellishments. The kitchen still contains asymmetry, but the entry view now explains which cabinet group matters most. Their decision spends on visible composition rather than on equally elaborate treatment everywhere.
Judge the side view as part of the furniture character
A furniture-like group has depth. From the doorway, a projecting top, a side panel and the return at the end may be more conspicuous than the central door. Show those surfaces on the proposal and decide how the composition stops. A detailed front attached to an unresolved plain side can look incomplete even when every front-facing part matches the selected style.
Keep decorative projections separate from the clearances needed for movement, opening fronts and the selected appliances. A more substantial traditional outline should not consume space that the working plan requires. The appearance study cannot establish installation or ventilation dimensions; those come from the actual products and project design. Resolve them before accepting a decorative element whose shape depends on the available space.
Compare a complete hierarchy of details
Ask for the focal group and the supporting runs to be shown together with their actual decorative scope. If the price is too high, remove a competing accent or simplify a secondary run before stripping necessary finished surfaces from the entire kitchen. That preserves the reason for choosing the design. Keep the accepted room view with the order, including the plain areas that are intentional, so a later revision does not quietly restore ornament that was deliberately omitted.
Pure White
Cream White
Light Warm Gray
Gray
Navy
Black
Oak Tone
Dark Walnut Tone
Design study These finish studies are design references, not a list of currently orderable colors. Screens and lighting change the appearance; compare a physical sample before choosing.See all finish options →
Choose the top treatment with the whole cabinet elevation visible. More layers change the silhouette, end returns and complete trim order; they do not add storage.
Choose antiqued mirror for the reflected scene and concealed storage you want. Compare the full door group, its patterned surface and the view when it opens before replacing transparent glass.
The sample shows the door frame, a separate center panel, the face frame and the cabinet box. Each component has its own place in this Shaker construction.
Shaker construction: door frame, center panel, face frame and cabinet box. The cutaway helps locate these parts; confirm each material in the specifications for the selected cabinet.
01 / Door frame
The Shaker door has rails and stiles around a separate center panel. The frame and center panel are different components; confirm their materials in the specifications for the selected cabinet.
02 / Face frame
The face frame surrounds the opening at the front of the cabinet box and sits behind the doors. The face frame, door frame and cabinet box are separate parts.
03 / Cabinet box
The sample exposes the cabinet sides, interior surfaces and layered edges. The image does not establish the wood species or material specification of a selected cabinet.