Choose top-freezer refrigerator handing around the landing counter and wall
A useful door direction keeps the intended transfer route workable and the required opening possible. Check both compartments and confirm the actual model supports the chosen arrangement.
Choose the hinge side by testing the refrigerator’s relationship to its landing counter, approach route and nearby wall. The convenient direction for transferring food may differ from the direction that has enough opening room. Resolve that conflict with the actual supported model configuration before committing the surrounding cabinets; a reversible-looking door is not confirmation that reversal is available.
State the physical hinge side rather than relying on shorthand
GE Appliances defines refrigerator handing while facing the appliance front: right-hand means hinges on the right, and left-hand means hinges on the left. Use the selected manufacturer’s terminology, then also mark the hinge and handle locations on the plan so the intended arrangement remains clear across drawings and discussions.
Record the freezer and fresh-food doors separately at their actual heights. A plan drawing may make their paths appear identical, but each interacts with a different part of the surroundings. Do not infer that a convenient handle location determines all opening requirements or that changing a handle alone changes the door’s hinge arrangement.
Trace the route from shelf to landing counter
Choose the counter where groceries will wait and where a retrieved item will actually be placed. Test the full sequence: arrive carrying the load, put it down if necessary, grasp the handle, open, retrieve or store, and close. Keep the open leaf in the drawing while following the item. A nearby counter can be separated from the user by that leaf.
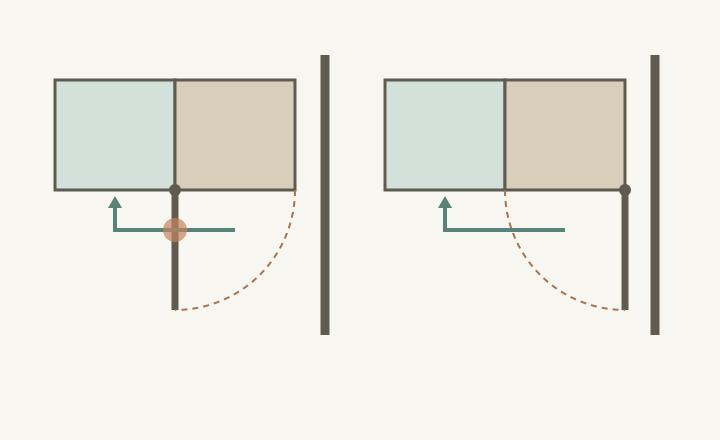
In a hypothetical kitchen, the landing counter is left of the refrigerator and a wall is on the right. Hinges at the left let the door turn away from the wall, but the opened leaf stands between the shelf and the landing. Hinges at the right may clear that transfer route, while the wall constrains the opening required for the selected model. Neither choice passes merely because its first movement looks easier.
ABCD
Diagram The left-hinged concept interrupts the illustrated transfer toward the counter; the right-hinged concept leaves that route open but still needs a wall-clearance check. Simplified leaves are not actual hinge geometry, allowed opening angles or complete upper and lower door drawings.
A
The open leaf crosses this transfer route.
B
The wall remains part of the first arrangement.
C
The alternative leaves the illustrated landing route open.
D
Wall-side opening still requires the selected model information.
Repeat at freezer and fresh-food task heights
Try a representative freezer container as well as an everyday fresh-food item. Check the user’s reach, view of the destination and ability to maintain a secure grip during transfer. The upper door can encounter a wall cabinet, trim or projecting object that the lower door misses. Conversely, a lower counter or nearby handle may govern the fresh-food door’s movement.
Keep the same intended landing in the trial unless the household actually plans to use another one. If freezer access requires moving around an open door with the item raised, compare that movement with an alternative arrangement using an empty representative container. Do not treat the lower compartment’s successful trial as proof that the upper task also works.
Confirm the available configuration before planning reversal
GE’s reversal guidance refers readers to the owner’s manual for their specific model. Verify the exact model and configuration, including any relevant finish or version, and obtain the applicable instructions or manufacturer confirmation. The guidance is not evidence that every top-freezer refrigerator can be reversed.
Confirm how the complete upper and lower door arrangement must be configured, what parts are specified and who will perform the work. Keep this decision separate from a general cabinet layout sketch. Do not improvise hinge changes or assume a showroom unit’s appearance establishes the supplied or supported arrangement for the unit being selected.
Compare the compromise with the household routine
If the wall-compatible handing interrupts the landing route, try another usable landing, a supported appliance position or another appropriate model. Follow groceries into the refrigerator as well as food out. A change that helps a single retrieval may make putting away a mixed bag less convenient, particularly when a door must close before changing compartments or reaching the counter.
Save the front-facing hinge sketch, tested compartment tasks, landing location, controlling obstacles and confirmation of the supported configuration. State any necessary change in sequence explicitly. The chosen handing should make the recurring routine understandable and workable, with the wall check and model confirmation completed rather than left as assumptions for installation day.
Pure White
Cream White
Light Warm Gray
Gray
Navy
Black
Oak Tone
Dark Walnut Tone
Design study These finish studies are design references, not a list of currently orderable colors. Screens and lighting change the appearance; compare a physical sample before choosing.See all finish options →
An open-depth dimension may start at the appliance back, while the aisle starts at its closed front. Reconcile the reference points before testing full drawer travel and retrieval.
Cabinet face, counter edge, refrigerator body, door and handle are separate reference planes. Compare installed positions before describing a refrigerator as flush.
The sample shows the door frame, a separate center panel, the face frame and the cabinet box. Each component has its own place in this Shaker construction.
Shaker construction: door frame, center panel, face frame and cabinet box. The cutaway helps locate these parts; confirm each material in the specifications for the selected cabinet.
01 / Door frame
The Shaker door has rails and stiles around a separate center panel. The frame and center panel are different components; confirm their materials in the specifications for the selected cabinet.
02 / Face frame
The face frame surrounds the opening at the front of the cabinet box and sits behind the doors. The face frame, door frame and cabinet box are separate parts.
03 / Cabinet box
The sample exposes the cabinet sides, interior surfaces and layered edges. The image does not establish the wood species or material specification of a selected cabinet.