Tile countertops: planning grout joints, edges and cabinet support
A tile countertop is an assembled work surface, not just a tile color. Compare the joint layout, front finish, sink detail and completed height with the cabinet plan.
A tiled countertop can be a deliberate design choice when you like the visible module and have a complete construction proposed for it. It is a poor substitute for a slab if the only reason for choosing it is a tile price that leaves out the rest of the counter. Before ordering cabinets, decide how the tile layout, front edge, sink and finished height will work together. Those decisions determine what the completed surface looks and feels like.
A tile sample does not show the countertop being purchased
One loose tile shows a face, some thickness and perhaps a manufactured edge. It does not show the substrate, setting materials, joints, exposed front or opening around the sink. Ask for a section through the proposed finished counter, including where it rests on the cabinet. The top's overall build height matters even when the tile itself looks thin.
Schluter's countertop system illustrates this assembly approach with a substrate and finishing profiles. Its RONDEC-CT front incorporates a tile insert; RONDEC-STEP provides a different, solid-looking edge treatment. These are specific options, not a requirement to use those products on every tiled counter.
Choose the exposed edge while looking at the cabinet fronts below. An inserted tile strip can extend the surface pattern onto the face. A contrasting metal profile makes a continuous line of its own. Neither is simply the invisible end of the same tile. At a peninsula, consider the end and the side facing the seating as well as the front seen from the work aisle.
Decide whether the grid is a feature or an inconvenience
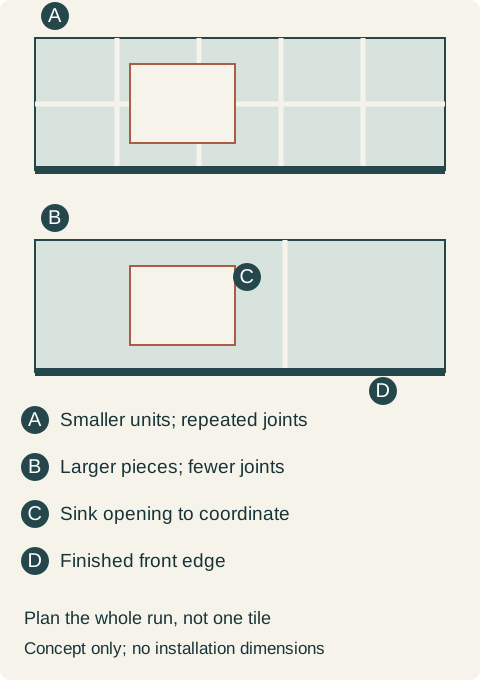
A smaller module creates more repeated joints across the working surface. Larger pieces can reduce that number, but their relationship with the actual run still needs drawing. Do not assume that a large tile yields one uninterrupted counter just because its catalog size looks close to the cabinet depth. The sink opening, end cuts and corners remain part of the layout.
Lay out the selected tile using its actual size and the specified joint arrangement. Nominal size is not a finished cutting plan. Show where the first full piece starts, where cuts fall and how the pattern meets the front edge. If the tile has a directional face, mark its intended orientation too. Rotating a cut piece to reduce waste may change a visible pattern that the owner expected to remain consistent.
Compare the joints with the cabinet elevation without forcing every tile line to follow a door division. A counter and a cabinet run have different modules. Trying to align both everywhere can produce awkward cuts beside the sink or at an exposed end. Pick the relationships that matter from the principal view and allow the drawing to show the others honestly.
Teaching example Conceptual plans: the upper option repeats smaller tile units; the lower option uses larger pieces with fewer field joints. Red outlines indicate a hypothetical sink opening. Neither drawing establishes approved tile sizes, joint widths or structural support.
Test the surface with the tasks that will happen there
Use a representative assembled sample to judge the transition between tile faces and joints. Slide the cutting board or serving tray you expect to use across it, and place the small appliance feet on the actual arrangement. A smooth individual tile does not show how a completed joint or front profile feels during those actions.
Discuss cleaning with the installer and the manufacturers of the selected tile and joint materials. Do not buy a whole counter on a blanket statement that grout always stains or that a named grout makes maintenance disappear. The buyer needs the specified finished combination and its care information. Decide whether the appearance of joints is acceptable even when they are properly made and maintained.
Keep claims about temperature, impact and staining tied to the particular products and assembly. A tile's suitability for one application does not establish that every countertop construction using it is appropriate. The cabinet installer needs the proposed top's support and attachment requirements; a low tile price does not resolve those responsibilities.
Coordinate the sink rather than treating its hole as an afterthought
The selected sink changes the edges, mounting and work around the opening. A top-mounted rim and a sink located beneath the tiled surface produce different visible and hidden details. Ask the installer and fabricator to identify the supported sink arrangement before completing the tile layout. Do not infer an approved mounting method from the sink silhouette in a picture.
Show the cut pieces around the opening and their relationship to the front strip and rear deck. Include the faucet position and any other selected openings. The sink is often where a tidy pattern drawn across an empty rectangle stops being practical. If the layout requires a change to the sink position, check the cabinet and plumbing consequences before moving it on the drawing.
A complete comparison can change the original preference
Consider a hypothetical kitchen whose owner likes a small-format tile in a showroom. The first proposal carries the small module across the counter with a matching tile-insert front. On the drawing, the repeated joints and front inserts form a much busier pattern than the single sample suggested. The owner also prefers to move a broad baking board around the preparation area.
The second proposal uses larger countertop-suitable pieces and a continuous contrasting front profile. Its layout places the remaining field joints away from the owner's preferred board position, while the sink detail and end cuts are resolved with the selected assembly. In this example, the owner chooses that proposal after reviewing the finished sample and complete price. The original small tile is retained only as a possible wall treatment, with that application evaluated separately.
Someone who specifically wants a tiled grid may choose the first option instead. The useful comparison is not small tiles are bad and large tiles are good. It is whether the actual layout delivers the desired surface, edge and daily use without leaving a sink or support problem for installation day.
Price and approve the assembled counter
Compare the tile, substrate, setting and joint materials, front and end treatments, sink work, fabrication and installation. Identify site work and any cabinet changes required by the proposed build height. If a quotation covers tile alone, keep it labeled as that; it is not a competing installed-counter price.
Retain the approved layout and section with the cabinet order. Confirm which surfaces and edges are included and who verifies final site dimensions. A well-chosen tiled countertop can have a purposeful pattern and a finished relationship to the cabinets. That result comes from selecting the whole construction, not from hoping that an attractive tile will resolve every edge by itself.
Pure White
Cream White
Light Warm Gray
Gray
Navy
Black
Oak Tone
Dark Walnut Tone
Design study These finish studies are design references, not a list of currently orderable colors. Screens and lighting change the appearance; compare a physical sample before choosing.See all finish options →
A patterned surface and a patterned slab body are different features. Compare an actual cut edge and sink opening before choosing the fabrication detail.
The sample shows the door frame, a separate center panel, the face frame and the cabinet box. Each component has its own place in this Shaker construction.
Shaker construction: door frame, center panel, face frame and cabinet box. The cutaway helps locate these parts; confirm each material in the specifications for the selected cabinet.
01 / Door frame
The Shaker door has rails and stiles around a separate center panel. The frame and center panel are different components; confirm their materials in the specifications for the selected cabinet.
02 / Face frame
The face frame surrounds the opening at the front of the cabinet box and sits behind the doors. The face frame, door frame and cabinet box are separate parts.
03 / Cabinet box
The sample exposes the cabinet sides, interior surfaces and layered edges. The image does not establish the wood species or material specification of a selected cabinet.