Tile backsplash or slab backsplash: buy the wall surface you want to live with
Compare a complete tile-and-grout installation with a specified slab surface. The choice changes the wall’s repeated joints, material transitions, care and finished edges.
Choose tile when you want the wall to be made from visible repeated units and you accept the selected grout as part of the finished surface. Choose slab when a larger uninterrupted field is the result you prefer and the actual panel arrangement delivers it. Neither option is a complete specification by itself. “Tile” can describe very different materials, while “slab” describes a format that still needs a material identity.
Name the two actual surfaces before comparing them
A glazed ceramic tile and engineered quartz slab make one useful comparison. A marble mosaic and porcelain slab make another. Do not transfer a claim about one pairing to every tiled or slab backsplash. Write down the material, finish and product in each proposal, then compare the complete installed wall rather than two unrelated photographs.
Cambria presents quartz slabs as a backsplash option that creates a continuous-looking design field. That establishes a real slab application; it does not mean every wall can be supplied as one piece or that every material sold in slab form has the same properties.
A tile layout repeats the shape of each piece and the gaps between pieces. Even a solid-color tile therefore produces a pattern. A slab’s visual pattern may instead come from its own color, veining or texture. These are different ways of composing a wall, not a ranking of traditional and modern kitchens. A plain slab and a strongly veined slab will also behave very differently beside the same cabinets.
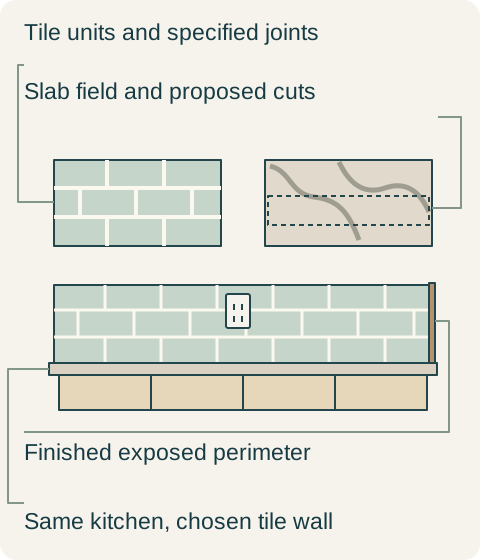
Teaching example Original hypothetical format comparison. The lower elevation keeps the cabinets and countertop fixed while selecting a tiled backsplash. Joint spacing, panel shapes and openings are illustrative, not fabrication dimensions or installation instructions.
Compare enough tile to see the intended repeat. Show the proposed grout and actual joint arrangement, not loose pieces pushed tightly together. For the slab option, show the area that will become the backsplash, not only the full slab photograph. A dramatic vein that looks good across a whole panel can become isolated fragments in the strip beneath upper cabinets.
Keep the countertop and cabinets unchanged while making this comparison. If every tile option is shown with a different door, light and countertop, you cannot tell which wall treatment you prefer. View the wall from the entry and from the ordinary working position. The decision concerns the installed field around appliances and daily objects, not the most flattering close-up.
Grout is a selected material, not an unspecified inconvenience
Fireclay Tile describes grout as both an installation material and a design element in a backsplash. Its discussion distinguishes the tile face from the grout between pieces. A tile purchase should therefore identify the grout as well as the tile.
Do not assume that choosing tile automatically means periodic grout sealing. LATICRETE lists SPECTRALOCK PRO Premium Translucent as an epoxy grout that never needs sealing. This is a specific counterexample, not a recommendation that the product suits every selected tile or joint.
Ask for the care instructions for the proposed tile-and-grout combination. Evaluate whether you like cleaning its actual surface and joints, including any relief or irregular texture you selected. Eliminating a sealing task does not eliminate cleaning. For the slab alternative, read the instructions for that named material and finish rather than borrowing the routine for a different slab product.
A large panel still needs a finished perimeter
Look at the exposed side, the top termination and the meeting with the countertop. A tile proposal may use a finished tile edge or a separate trim; a slab proposal needs its own resolved edge. Compare those visible details beside the cabinet end. Neither proposal is complete if the sample hides an unfinished edge that will be exposed in the room.
Show outlets, window trim and other interruptions on the same wall drawing. In the tile layout, inspect the cut pieces surrounding them rather than assuming the repeat will finish with whole tiles everywhere. In the slab layout, inspect the openings and any panel joints. Fewer repeated grout joints does not mean the wall-to-counter connection and every change of plane disappear.
The tile field wins without changing the cabinet design
In a hypothetical kitchen, the owners have already selected simple cabinet fronts and a restrained countertop. They compare glazed rectangular tile with a veined quartz backsplash. Both proposals cover the same wall area. The slab’s most attractive sweeping feature sits largely outside the low strip under the cabinets, leaving short disconnected fragments in the proposed cut arrangement.
The tile option instead produces a repeat that remains recognizable across the narrow strip and beside the window. The installer’s layout resolves the end cuts and exposed trim, and the proposed tile-and-grout assembly has an accepted care plan. The owners like the tile’s visible rhythm; they do not try to disguise it as a single slab.
They buy the tiled wall, retain the chosen cabinets and countertop, and include the agreed grout, finished perimeter and installation. They reject the veined slab for this particular composition, not because all slab backsplashes are costly or difficult to clean. A different slab design could have changed the comparison, but it is not what these owners selected.
Compare completed prices and keep the material record
A useful tile total includes the selected tile quantity, grout, setting materials, edge treatment, wall preparation and labor. A useful slab total includes its material allocation, fabrication, openings, finished edges, wall preparation, handling and installation. Resolve the same coverage and any associated fixture work in both proposals. Price per square foot alone cannot show what has been omitted.
Keep the accepted layout and product identities after installation. If retaining spare tile is part of the purchase, label it with the order and store it appropriately. Spare pieces can help identify a future repair material, but they do not promise that removal will be simple or an aged installation will match perfectly. Likewise, a spare slab fragment does not by itself establish a repair method.
Choose the wall whose material, joints and perimeter you accept as a whole. Tile is not a failed attempt at a seamless wall, and slab is not automatically a superior version of tile. The successful choice gives the intended kitchen surface in the agreed installation, with the care and visible details already understood.
Pure White
Cream White
Light Warm Gray
Gray
Navy
Black
Oak Tone
Dark Walnut Tone
Design study These finish studies are design references, not a list of currently orderable colors. Screens and lighting change the appearance; compare a physical sample before choosing.See all finish options →
A full-height backsplash is more than extra countertop square footage. Decide its boundaries, visible edges, interruptions and slab layout with the cabinet elevation.
Compare the actual countertop products, heat-source routine and fabrication proposal. A fired porcelain slab and resin-bound quartz are different materials, but neither label replaces a complete kitchen specification.
The sample shows the door frame, a separate center panel, the face frame and the cabinet box. Each component has its own place in this Shaker construction.
Shaker construction: door frame, center panel, face frame and cabinet box. The cutaway helps locate these parts; confirm each material in the specifications for the selected cabinet.
01 / Door frame
The Shaker door has rails and stiles around a separate center panel. The frame and center panel are different components; confirm their materials in the specifications for the selected cabinet.
02 / Face frame
The face frame surrounds the opening at the front of the cabinet box and sits behind the doors. The face frame, door frame and cabinet box are separate parts.
03 / Cabinet box
The sample exposes the cabinet sides, interior surfaces and layered edges. The image does not establish the wood species or material specification of a selected cabinet.