Taking a slab backsplash to the cabinets: draw the whole wall before pricing it
A full-height backsplash is more than extra countertop square footage. Decide its boundaries, visible edges, interruptions and slab layout with the cabinet elevation.
A countertop sample can look convincing when held against a cabinet door and still leave most of the backsplash decision unresolved. Taking the same material up the wall introduces a different shape: the underside of upper cabinets, a taller area behind the hood, a window, electrical boxes and an exposed end. Those boundaries determine what gets fabricated. They should be drawn before a full-height backsplash is added to the countertop quote.
Choose where the slab starts and stops
Cambria describes full-height quartz backsplashes that extend the countertop design up the wall, as well as contrasting combinations. That establishes a design option, not a requirement to use matching material everywhere. A slab only behind the range, a continuous surface under the uppers, and a wall extending to the ceiling are different scopes even when all are called full height.
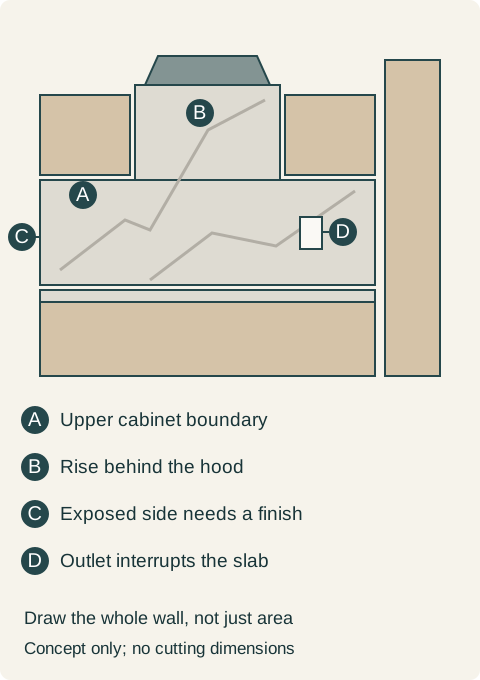
Use the actual cabinet elevation. Mark the top of the backsplash at each part of the wall rather than drawing one horizontal line across the room. Where upper cabinets stop, decide whether the surface ends with them, continues to another architectural boundary, or rises to a separate termination. Include the narrow strip beside a tall cabinet; it can be conspicuous even though its area is small.
The exposed side needs a decision too. A raw section of slab, a finished edge and a return around a corner do not describe the same appearance or fabrication work. Review the side from the room entrance, not only from directly in front of the sink. This is particularly important where a pale cabinet end meets a dark or strongly veined vertical surface.
Keep the countertop-to-wall joint in the drawing
A continuous-looking material is not necessarily one continuous piece. The horizontal countertop and the vertical backsplash meet at a change of plane. Ask the fabricator to show that junction and the proposed panel seams. Do not describe a slab backsplash as having no joints merely because it has fewer repeated joints than a tiled wall.
Similarly, continuing a design name does not automatically continue a vein. Approve the proposed arrangement of the actual pieces when pattern continuity matters. A small sample can help choose color; it cannot show whether a strong diagonal vein ends against an upper cabinet or meets the next piece in a way you like.
Teaching example Conceptual wall elevation: the backsplash follows the upper cabinets, rises behind the hood and meets a tall cabinet at one side. The outlet interrupts the surface. Not a cutting template or an appliance-clearance drawing.
Calculate the area, then stop treating it as the order
For a hypothetical wall, the area below the upper cabinets is 96 inches wide and 18 inches high, or 12 square feet. The hood area adds a separate rectangle 36 inches wide and 24 inches high above that strip, or 6 square feet. Together these cover 18 square feet. These are example drawing dimensions, not recommended cabinet or cooking clearances.
The calculation describes the surface being covered. It does not prove that a leftover countertop piece can supply it. A long narrow strip and a taller hood panel must fit the available material in their intended orientation. Joining smaller remnants may reduce material use but introduces visible seams; preserving a vein may require a different allocation.
Cambria's pricing explanation ties the number of slabs to the complete project layout and selected design, and notes that aligning large veins can require extra material. Ask for a layout showing the countertop and backsplash pieces together. A price based only on net wall area cannot explain which pieces, seams and pattern arrangement it includes.
Resolve interruptions while the cabinets can still change
Place the hood, window trim, outlets and switches on the same elevation as the cabinet doors. Include visible cover plates, not merely a small symbol for each electrical box. A plate can interrupt the feature vein you intended to center behind the range. The responsible trade must determine suitable locations and details; a cleaner rendering is not a reason to omit required equipment.
Check any return against door and drawer movement. Surface thickness can change the relationship at a tall cabinet end or a narrow side wall. Have the cabinet designer and fabricator coordinate the finished planes rather than subtracting a generic thickness from a rough wall measurement. Appliance guidance also governs the suitability of material and clearances around cooking equipment; the backsplash drawing does not replace it.
If the plan includes a shelf attached through the slab, show its position and fixing coordination before fabrication. It should not arrive as an unrecorded addition after the wall is finished. This is a scope question for the installer and designer, not an instruction to drill a finished stone panel yourself.
Compare a real alternative, not an incomplete allowance
For the example wall, one option is a slab across the entire strip and hood rise. Another uses tile below the upper cabinets with a separate slab feature behind the range. A third stops a short backsplash above the countertop and finishes the remaining wall differently. Draw all the visible boundaries for each; otherwise the least complete proposal will appear cheapest.
In this hypothetical kitchen, the owner keeps the slab across the whole strip and the hood rise because a tile-to-stone transition would add another boundary beside the framed cabinet doors. The owner accepts separate panels with the proposed visible seam instead of insisting on one uninterrupted vein, and includes a finished exposed side in the scope. That choice trades perfect pattern continuity for a consistent material across the wall; the fabricator still has to confirm the actual piece layout.
Ask which quote includes finishing the exposed end, preparing the supporting wall, templating, cutouts, delivery and installation. Identify who coordinates the hood and electrical work. These items may be provided by different businesses, so record responsibility without assuming the countertop fabricator supplies every trade.
Make the selection with the cabinet layout still in view. If a small change to an upper cabinet creates a much cleaner backsplash boundary, compare the total result before releasing either order. Once cabinetry and the wall shape are settled, have the fabricator confirm when final measurements can be taken and which drawing controls the work. The useful approval is a complete elevation with an agreed piece layout, not just a material name followed by square footage.
Pure White
Cream White
Light Warm Gray
Gray
Navy
Black
Oak Tone
Dark Walnut Tone
Design study These finish studies are design references, not a list of currently orderable colors. Screens and lighting change the appearance; compare a physical sample before choosing.See all finish options →
The sample shows the door frame, a separate center panel, the face frame and the cabinet box. Each component has its own place in this Shaker construction.
Shaker construction: door frame, center panel, face frame and cabinet box. The cutaway helps locate these parts; confirm each material in the specifications for the selected cabinet.
01 / Door frame
The Shaker door has rails and stiles around a separate center panel. The frame and center panel are different components; confirm their materials in the specifications for the selected cabinet.
02 / Face frame
The face frame surrounds the opening at the front of the cabinet box and sits behind the doors. The face frame, door frame and cabinet box are separate parts.
03 / Cabinet box
The sample exposes the cabinet sides, interior surfaces and layered edges. The image does not establish the wood species or material specification of a selected cabinet.