Choose a steam oven’s water arrangement before completing the cabinet plan
Manual filling and connected water create different household tasks and installation reservations. Confirm the exact version, including its remaining maintenance access, before assigning surrounding storage.
Decide the steam oven’s exact water arrangement before finalizing its cabinet position. A manually filled reservoir creates a recurring handling route; a connected version creates an installation and service arrangement that must be confirmed. Neither description alone tells you everything the user will need to reach. Keep everyday cooking access, water handling and professional service as related but distinct parts of the plan.
Resolve the version, not just the product family
Record the complete model identity and the instructions that apply to that version. Do not treat a drawing of a similar front as proof that the water arrangements are interchangeable. A cabinet can fit the oven body while lacking the route or connection arrangement required by the chosen variant. Resolve those differences before promising a fixed shelf or drawer beside the appliance.
Wolf’s cited guidance distinguishes manual-fill and plumbed steam ovens. The connected example needs supply and drain connections yet retains a tank for descaling; the manual-fill example cannot simply receive a water line. This is a specific configuration distinction, not a rule for every manufacturer.
For a refillable version, follow the reservoir through the room
Find the reservoir’s actual access position and the permitted filling and emptying procedure. Check where the person stands, how the component is supported and where it can be set down. If the instructions require carrying a container to water, trace that route with the oven front in its applicable state. A nearby sink on a plan is not enough if the open door blocks the approach.
Use a cold, lightweight demonstration suitable for the task rather than hot water or a steaming appliance. Test seeing the fill opening and returning the container, as well as taking it out. An installation height that feels convenient for viewing controls may be less convenient for guiding a filled reservoir. Confirm the actual user’s handling before fixing the surrounding appliance stack.
ABCD
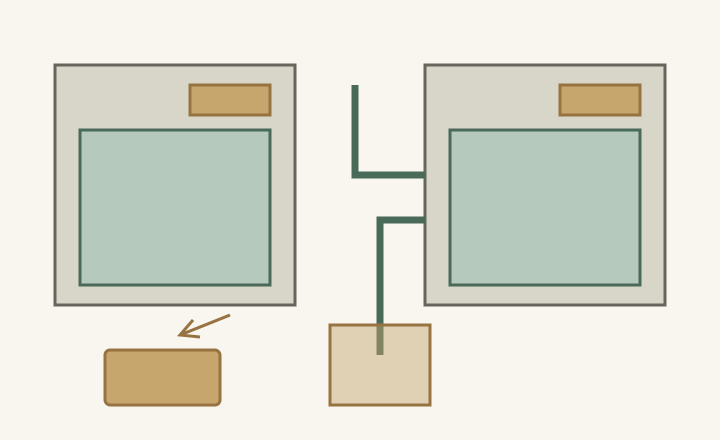
Diagram The lines represent installation responsibilities, not pipe routes, connection locations or drainage geometry. Both illustrations are conceptual; the selected oven instructions determine its actual components and access.
A
Identify the chosen manual-fill arrangement.
B
Check the complete reservoir handling task.
C
Connected water can still leave tank maintenance.
D
Reserve the confirmed connection and service arrangement.
For a connected version, preserve both installation and user access
Have the responsible installer confirm the required supply, drainage and access arrangement for the selected version and location. Carry the resulting reservations into the furniture drawing. Show where neighboring storage gives way to connections or access, instead of drawing a thin line through a volume already occupied by a full-depth drawer. The cabinet plan should reflect the confirmed installation, not invent its plumbing details.
Then review the maintenance section separately. Identify any tank, tray or other user-accessible component that remains part of the routine. Connecting the water supply does not justify closing an access flap behind trim or filling its movement space with a nearby pull. Professional service access and user maintenance may occur at different places and should not share a vague single note.
Avoid solving the wrong version’s problem
In a hypothetical tower, the household dislikes carrying a reservoir across the kitchen and changes the selection to a connected version. The furniture drawing keeps the old cavity and assigns a deep drawer immediately beside it. No one confirms the required drainage arrangement until the cabinet layout is committed. The new selection removed one handling task but introduced a condition the plan had never reserved.
Compare the verified connected installation against the actual manual-fill routine. The useful choice may involve moving the oven, changing adjacent storage or retaining the refillable option at a more practical height. Do not label one system universally easier. The answer depends on the household’s repeated tasks and the installation that the specific room can support.
Keep separate decisions visible through the final selection
Record the model and version, the user’s water and care tasks, the confirmed connection reservations and the service method. After changing the appliance, recheck all of them. A shared exterior size is not evidence that a previous water plan still applies, and a completed plumbing arrangement does not approve tray handling or the movement of hot cookware.
Keep the ordinary oven loading and landing check alongside this water review. Approve the position when both are workable with the finished cabinet details. This preserves a clear decision: the chosen water system fits the installation and the user can complete its actual recurring tasks.
Pure White
Cream White
Light Warm Gray
Gray
Navy
Black
Oak Tone
Dark Walnut Tone
Design study These finish studies are design references, not a list of currently orderable colors. Screens and lighting change the appearance; compare a physical sample before choosing.See all finish options →
Choose the cabinet position after following water, beans and waste through the selected machine’s real access procedure. A comfortable cup height can still leave routine care awkward.
Compare locations by the vessels leaving the drawer, their intended destination and the people using that area. A matching appliance stack is only part of the decision.
The sample shows the door frame, a separate center panel, the face frame and the cabinet box. Each component has its own place in this Shaker construction.
Shaker construction: door frame, center panel, face frame and cabinet box. The cutaway helps locate these parts; confirm each material in the specifications for the selected cabinet.
01 / Door frame
The Shaker door has rails and stiles around a separate center panel. The frame and center panel are different components; confirm their materials in the specifications for the selected cabinet.
02 / Face frame
The face frame surrounds the opening at the front of the cabinet box and sits behind the doors. The face frame, door frame and cabinet box are separate parts.
03 / Cabinet box
The sample exposes the cabinet sides, interior surfaces and layered edges. The image does not establish the wood species or material specification of a selected cabinet.