Check the speed oven’s cabinet opening before using its front trim to judge fit
An outer front can cover a gap without confirming the required opening, support or attachment. Match the exact appliance and accessory configuration to the cabinet detail behind it.
Judge a built-in speed oven by its required cabinet opening and installation assembly, not by whether its visible front covers the hole. A broad front can conceal a mismatch that still affects support, attachment or the appliance’s required position. Confirm the exact model and any supported accessory configuration before approving the cabinet drawing or reusing an existing opening.
Keep the opening and visible front as separate outlines
GE Appliances distinguishes an oven’s overall dimensions, cabinet cutout and required overlap. Its definitions show why these are not interchangeable measurements. Use the selected speed oven’s own instructions for the actual values and configuration rather than applying a general wall-oven size or a matching-looking trim frame.
Mark the structural opening, any face-frame opening, the appliance body and the complete front assembly. Read whether the shown trim is part of the appliance, a required installation component or a separately approved accessory. Do not assume that a frame with a similar outside width is compatible, or that the front trim itself supplies the required support.
A covered gap can still leave a mounting problem
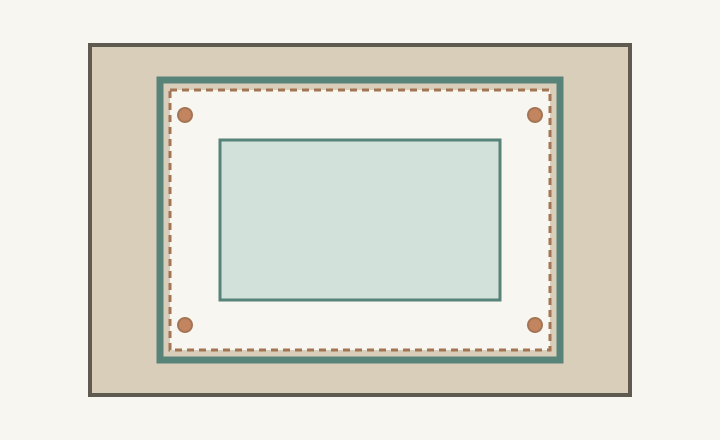
In a hypothetical cabinet, an existing opening is larger than the selected installation drawing allows. The new oven’s outer front covers the opening visually, but the intended mounting locations fall over the void rather than the required cabinet material. A front-elevation check would appear successful while the specified attachment cannot be completed as drawn.
ABCD
Diagram The outer green outline covers the dashed opening, but the colored points lack the illustrated cabinet backing. These are hypothetical relationships, not real mounting positions, fastener instructions or a prescribed repair. The actual support and attachment come from the selected appliance’s installation detail.
A
The visible front extends beyond the opening.
B
The dashed line marks the opening behind it.
C
The body can fit while other installation conditions fail.
D
A covered location is not automatically a backed mounting location.
Resolve the mismatch through a cabinet detail that meets the appliance requirements, or choose an appropriate alternative product or configuration. Do not substitute a larger decorative frame for a verified support and fastening arrangement. Equally, a front that looks large enough cannot compensate for an opening too small for the body or the required installation space.
Check the whole appliance-and-accessory assembly
GE’s Advantium storage-drawer guidance says applicable drawers attach below the oven and require the corresponding cutout information. The example is limited to compatible models and accessories. It illustrates why choosing an accessory can change the installation being measured, not merely add a decorative strip under an unchanged oven.
Specify whether the proposed arrangement includes a storage drawer, another appliance or a particular trim option. Match the documents to that complete combination. A drawer below a speed oven might be an appliance accessory or independent cabinetry; the similar appearance does not make their openings, supports or attachment details interchangeable.
Check the space behind and around the visible face
Record the support position, usable cabinet depth and the specified location of connections and ventilation provisions. Follow the selected product information with the responsible installer. Do not let a wider front distract from a rear condition that prevents the appliance reaching its required position, or from a shelf or partition occupying space the installation needs.
At the front, show neighboring rails, doors and handles beside the complete trim. Check the oven door’s movement and any accessory drawer in the intended use states. A rail added to continue the cabinet pattern may interfere with the required front area or opening path even when its color and alignment make the elevation look more deliberate.
Approve the concealed detail and the appearance together
Prepare a section and elevation that identify the required opening, front outline, support and specified attachment surfaces. Keep each dimension tied to the applicable model document. If the existing cabinet needs modification, have the responsible cabinet professional and installer agree on the revised detail before making changes; the article’s concept is not a construction instruction.
Retain the exact appliance and accessory identification with that drawing. Recheck if either changes, even when the advertised width remains the same. The useful acceptance result is that the complete supported assembly fits and operates as intended, and that the finished front meets the agreed appearance, with neither result being used to stand in for the other.
Pure White
Cream White
Light Warm Gray
Gray
Navy
Black
Oak Tone
Dark Walnut Tone
Design study These finish studies are design references, not a list of currently orderable colors. Screens and lighting change the appearance; compare a physical sample before choosing.See all finish options →
Set out the cooking surface, microwave and upper cabinet together. The mounting arrangement, permitted vent route and both appliances’ instructions determine whether the proposed position works.
A drawer front fitting under the counter does not establish usable storage. Verify the supported installation, reserve the required underside space and check the highest stored item through the drawer’s movement.
The sample shows the door frame, a separate center panel, the face frame and the cabinet box. Each component has its own place in this Shaker construction.
Shaker construction: door frame, center panel, face frame and cabinet box. The cutaway helps locate these parts; confirm each material in the specifications for the selected cabinet.
01 / Door frame
The Shaker door has rails and stiles around a separate center panel. The frame and center panel are different components; confirm their materials in the specifications for the selected cabinet.
02 / Face frame
The face frame surrounds the opening at the front of the cabinet box and sits behind the doors. The face frame, door frame and cabinet box are separate parts.
03 / Cabinet box
The sample exposes the cabinet sides, interior surfaces and layered edges. The image does not establish the wood species or material specification of a selected cabinet.