An integrated solid-surface sink or a separate basin: choose the whole assembly
A smooth-looking sink junction can join separate fabricated components. Compare the basin you will use, the finished joint and the cabinet beneath it before choosing an integrated look.
A solid-surface sink can make the countertop appear to flow into the bowl. That can be attractive beside simple cabinet fronts, but integrated does not identify a single method of construction. Before buying, find out whether the proposal is a fabricated bowl joined to a deck, a molded top with a fixed basin, or a separate sink mounted beneath the opening. Those choices affect what you can select and what the cabinet must accommodate.
Ask what joins the bowl to the countertop
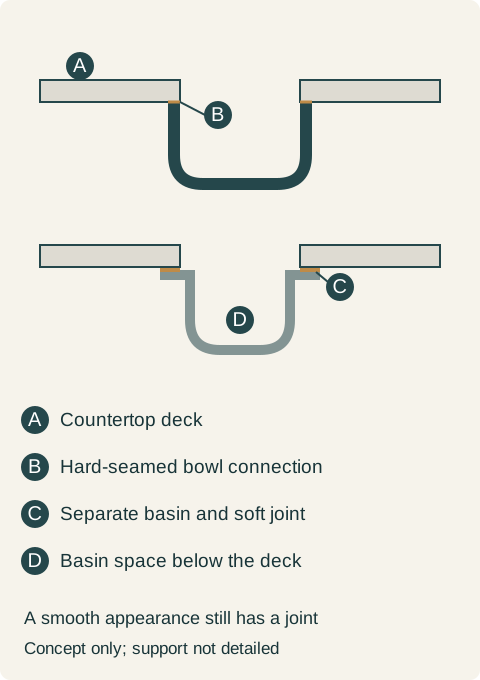
Corian's North American installation bulletin distinguishes a hard adhesive seam, finished flush at the bowl junction, from a silicone soft-seam undermount. This describes particular mounting methods; it does not mean every sink sold as integrated was molded with its surrounding top.
For the buyer, the difference should be visible in a finished sample or section. With the hard-seamed arrangement, review the transition from deck to bowl and the proposed colors together. With a separate basin, review the opening edge, material change and joint. Neither can be evaluated properly from a distant photograph in which the sink is dark or hidden by accessories.
A flush transition does not guarantee an invisible color match. The countertop may carry a pattern while the bowl is a plain color. Ask to see that exact combination, including how the opening interrupts the pattern. Do not approve a dark patterned deck on the assumption that every part of the basin will share its appearance.
Choose the bowl before committing to the look
Start with the washing task. Put the largest ordinary pan or serving dish against the dimensions and shape of the proposed bowl. Check the bottom area, corners, divider if present and drain position, not only the outside opening. The basin that makes the smoothest photograph may not be the basin the household prefers to wash in.
Compare the fixtures and accessories that matter to the routine. A rack or fitted board designed for a particular stainless-steel sink should not be assumed to work on a solid-surface bowl with a similar opening. Record what is actually included and supported. If an accessory changes where the user sets a hot pan or cuts food, follow the relevant product instructions rather than treating the continuous appearance as permission to use every surface identically.
Also consider where the faucet and controls sit relative to the basin and rear boundary. The bowl choice and its placement determine the surrounding deck available for them. A drawing with a generic sink symbol leaves that coordination unresolved even when the countertop color is final.
Teaching example Conceptual sections: a hard-seamed bowl meets the finished countertop opening flush; the separate-basin example has a visible material change and a soft joint. Joint and support details depend on the selected system. Not a fabrication drawing.
Look beneath the seamless-looking surface
The basin still occupies the cabinet. Show its underside, drain connection, any specified support and the surrounding cabinet structure on the same section. A clean junction above does not remove a front rail, enlarge the cabinet opening or create space for a deeper drawer below.
In a kitchen sink base, coordinate the selected drain equipment with the actual bowl position. In a vanity, coordinate the bowl with the drawer arrangement and plumbing. These are different assemblies, so do not copy a support or fastening detail from one application to the other. Have the responsible fabricator and cabinet supplier confirm the proposed combination before releasing the order.
Ask which parts arrive already joined and which are assembled on site. That answer affects delivery, handling and the sequence with the cabinets. It does not establish a universal rule that an integrated assembly is easier to install or that a separate basin is always easier to service. The actual construction and access determine those matters.
Make the comparison with a complete household example
Consider a household replacing a kitchen with plain painted cabinet doors. The owners want a quiet countertop and dislike the strong contrast of their existing metal basin. The hard-seamed proposal gives them the pale bowl-to-deck transition they prefer, and their usual pots fit the offered bowl. It is therefore a genuine alternative, not just a photograph chosen before the washing task was considered.
The separate stainless-steel option includes a fitted accessory arrangement the owners enjoy. They compare that benefit against the quieter appearance, with both quotes including the same faucet scope and the cabinet coordination each needs. They choose the hard-seamed solid-surface assembly only after accepting the different bowl shape and giving up the unsupported accessories from the metal option. The sink-base drawing is revised to the chosen underside and connection arrangement.
A household that values the fitted accessories more could reasonably choose the separate basin. That would not be a failed version of the integrated design. It would preserve a specific washing routine while accepting the visible material change. The decision is clearer when the two complete assemblies are compared rather than labeling one seamless and the other ordinary.
Discuss future work without promising effortless replacement
Ask the fabricator what a repair or future bowl change would involve in the proposed assembly, and who would assess it. Keep the material, bowl and joint system identified in the project record. Do not assume that a bonded bowl lifts out intact, or that any separate basin can be exchanged through the cabinet without affecting the countertop. Access and the opening already fabricated matter in both cases.
Review cleaning and care instructions for the actual deck, bowl and joint. A smoother transition is an appearance and handling benefit to judge directly; it is not evidence that cleaning can be skipped or that the entire assembly is immune to staining, heat or damage. The supplied instructions should match the components on the final drawing.
The final selection should name the basin, deck, colors, mounting arrangement, accessories and cabinet relationship. Keep a finished junction sample or an agreed close-up reference with the drawing when appearance is important. That gives the installer and buyer a concrete result to discuss, instead of leaving the word integrated to carry several different promises.
Pure White
Cream White
Light Warm Gray
Gray
Navy
Black
Oak Tone
Dark Walnut Tone
Design study These finish studies are design references, not a list of currently orderable colors. Screens and lighting change the appearance; compare a physical sample before choosing.See all finish options →
The exposed rim changes cleaning access, the visible opening and sometimes the operation of workstation accessories. Choose the edge relationship with the actual sink.
Match the fixed bowl position, underside shape and required support to the actual cabinet, rather than treating similar overall widths as compatibility.
The sample shows the door frame, a separate center panel, the face frame and the cabinet box. Each component has its own place in this Shaker construction.
Shaker construction: door frame, center panel, face frame and cabinet box. The cutaway helps locate these parts; confirm each material in the specifications for the selected cabinet.
01 / Door frame
The Shaker door has rails and stiles around a separate center panel. The frame and center panel are different components; confirm their materials in the specifications for the selected cabinet.
02 / Face frame
The face frame surrounds the opening at the front of the cabinet box and sits behind the doors. The face frame, door frame and cabinet box are separate parts.
03 / Cabinet box
The sample exposes the cabinet sides, interior surfaces and layered edges. The image does not establish the wood species or material specification of a selected cabinet.