Coved backsplash or a separate upstand: choose the whole countertop junction
A rounded countertop-to-backsplash transition changes fabrication, appearance and room details. Compare a finished cove sample with a separate splash before approving the counter.
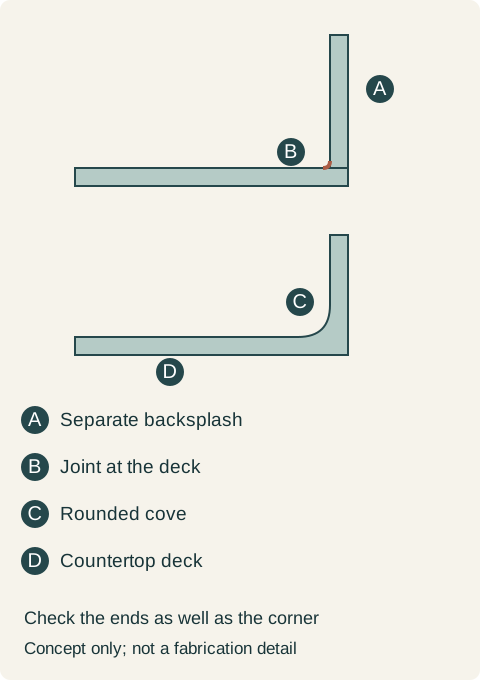
Choose a coved solid-surface backsplash when the rounded transition is a feature you want to use and see, and the complete fabrication suits the room. Choose a separate backsplash when that simpler junction, its appearance and its installation scope better meet the project. Calling either option matching solid surface does not describe the joint. Ask to see how the horizontal deck becomes the vertical splash, including the ends and corners.
The same color can produce different junctions
Corian's backsplash guide distinguishes a separate splash sealed to the deck from a fabricated cove. It also warns that traditional coving can look different from the deck in veined or reflective colors. A flat swatch therefore cannot approve the finished inside corner.
The distinction matters because the buyer sees a transition, not isolated matching pieces. A small sealed joint remains a joint even when its color blends well. A cove changes that sharp intersection into a rounded surface, but the finished appearance depends on the chosen material and fabrication. Neither description means every connection to the surrounding room disappears.
Hold a representative completed sample in the orientation it will have in the kitchen. View it from a normal standing position and from an angle. Look along the curve and at its transition into the flat deck. If the sample uses another color or pattern, it demonstrates geometry only; it does not settle the appearance of the selected material.
Pattern continuity is a separate choice from an easy-to-wipe shape
Corian describes thermoformed coves as an option for maintaining visual continuity in directional aesthetics where conventional coving can interrupt the appearance. This is a particular fabrication approach, not a general promise that every solid-surface pattern can turn a corner invisibly.
A buyer who wants the curve for wiping may accept a visible pattern transition. Someone choosing a strong directional design may care just as much about that transition as about the curve itself. Have the fabricator show the actual offered method and material together. Do not approve a plain-color sample and later assume the veined selection will behave identically.
Compare a conventional cove, a documented thermoformed option and a separate splash only where each is actually offered for the chosen project. Ask what changes in fabrication, finish and price. A quotation should identify the selected method clearly enough that a different fabricator could understand what was approved, without treating this article as workshop instructions.
Teaching example Conceptual sections: the upper junction has a separate backsplash and a sealant joint; the lower junction has a rounded cove. Colors distinguish parts only. The drawing is not a fabrication or wall-attachment detail.
Look beyond the straight length
The exposed end of the splash is part of the finished counter. A long straight demonstration can hide the work needed where the splash stops, turns into a side return or meets a tall cabinet. Ask for those views on the proposed drawing and on a relevant finished example. The end should not become an unresolved cut surface merely because the central curve looks good.
Consider how a short backsplash relates to the rest of the wall. Its upper edge still meets another surface. A window sill, outlet, wall finish or adjacent cabinet may limit its height or termination. Choosing a cove does not remove those room boundaries. Show them before approving the fabrication, especially where a return approaches the side of a cabinet or an appliance.
Keep the distinction between the countertop junction and the installation against the wall clear. The fabricator must address the actual wall conditions and applicable installation details. Do not substitute a rigid material connection wherever a flexible junction was specified, or assume that a coved assembly can be forced against an irregular wall without further coordination.
Check the usable rear deck with the actual objects
A rounded transition occupies space at the meeting of deck and splash. A rectangular appliance or storage tray cannot be assumed to sit tight into that curved area in the same way it might approach a square corner. Use the actual item with the sample or a representative mockup. Check where its feet or base rest and what remains available in front.
At the sink, include the faucet base, handle motion and any selected deck accessories in the proposed layout. This is not a reason to assign a generic minimum spacing. It is a reason to check the actual cove and fixtures together rather than choosing the curve after the holes are fixed. The cabinet, basin and rear deck should retain their agreed relationships.
Avoid interpreting easier wiping as no cleaning or maintenance. Review the care information for the selected finished surface and any remaining joints. A cove can simplify the particular inside corner while the sink connection, exposed ends and surrounding wall still require attention. The benefit should be described at the detail it actually improves.
Follow the decision through a complete proposal
Consider a hypothetical kitchen with a short solid-surface splash beneath an existing wall finish. The owner wants a rounded inside corner and initially chooses a strongly veined color from a flat sample. A conventional cove sample shows a pattern change at the curve that the owner dislikes. That reaction does not mean the sample is defective; it means the appearance is not the one the owner wants to buy.
The fabricator offers a documented thermoformed approach for the selected design and a separate splash as alternatives. In this example, the thermoformed proposal includes the exposed end and side return, and the owner accepts its completed sample and quoted scope. The faucet and rear tray position are also checked with the curve before final holes are approved. The owner selects that complete proposal rather than merely writing coved on the order.
Another household may prefer the separate splash because its joint is acceptable and it fits the intended room treatment with less fabrication work in the offered proposal. That is a valid result too. Compare the work actually quoted; do not apply a universal cost percentage or assume a more elaborate joint automatically makes the whole kitchen better.
Keep the accepted detail attached to the order
The order should retain the chosen material, fabrication method, splash height and termination details, plus the accepted appearance sample. Identify any site verification needed before fabrication and the person responsible for approving the final drawing. A later color or method substitution reopens the sample review because the curve may no longer look the same.
At completion, compare the installed transition and its ends with the agreed result. The useful upgrade is a junction that performs the task and has the appearance the buyer actually selected. A smooth curve in a catalog is only the beginning of that decision.
Pure White
Cream White
Light Warm Gray
Gray
Navy
Black
Oak Tone
Dark Walnut Tone
Design study These finish studies are design references, not a list of currently orderable colors. Screens and lighting change the appearance; compare a physical sample before choosing.See all finish options →
A full-height backsplash is more than extra countertop square footage. Decide its boundaries, visible edges, interruptions and slab layout with the cabinet elevation.
A smooth-looking sink junction can join separate fabricated components. Compare the basin you will use, the finished joint and the cabinet beneath it before choosing an integrated look.
The sample shows the door frame, a separate center panel, the face frame and the cabinet box. Each component has its own place in this Shaker construction.
Shaker construction: door frame, center panel, face frame and cabinet box. The cutaway helps locate these parts; confirm each material in the specifications for the selected cabinet.
01 / Door frame
The Shaker door has rails and stiles around a separate center panel. The frame and center panel are different components; confirm their materials in the specifications for the selected cabinet.
02 / Face frame
The face frame surrounds the opening at the front of the cabinet box and sits behind the doors. The face frame, door frame and cabinet box are separate parts.
03 / Cabinet box
The sample exposes the cabinet sides, interior surfaces and layered edges. The image does not establish the wood species or material specification of a selected cabinet.