Judge a sink drawer by its usable compartments after the plumbing cutout
A shaped drawer can bring small groups forward, but its remaining area may not form a home for a large caddy. Match objects to continuous regions and verify the complete plumbing and service arrangement.
Evaluate a drawer shaped around a sink or plumbing as a set of actual usable regions, not as an ordinary full-width drawer with a small deduction. The cutout can divide the remaining space into narrow sides and a shallow front strip. Those regions may be excellent for separate small groups while failing to accommodate the large container that motivated the storage plan.
Start with the drawer shape at its actual height
Blum’s US sink-cabinet page presents a U-shaped drawer using space beside the sink. It illustrates a possible arrangement; it does not establish compatibility with every basin and plumbing configuration.
Obtain the selected sink, drain assembly and other installed equipment information, together with the drawer system’s requirements. Plot their actual locations at each proposed drawer level. A top view of the basin alone cannot describe a drain connection lower down. A centered faucet on the elevation does not prove the entire assembly beneath it is centered or symmetrical.
Include the drawer’s inner sides, back, runners and any organizer when establishing the final storage shape. Distinguish a proposed outline from a configuration the cabinet maker has confirmed. Do not treat cutting a notch in an ordinary drawer as a complete design or assume the result retains the original drawer’s permissions and load rating.
Assign objects to continuous storage regions
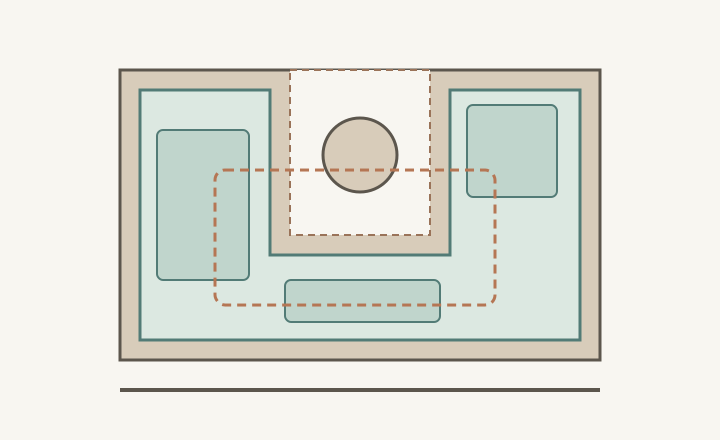
Place each retained object or container into a specific region in its normal stored orientation. Show the grip needed to remove it. Adding the side areas and front area together cannot make them a continuous rectangle. A wide caddy that bridges the cutout on paper may occupy space reserved for the sink or plumbing in the real cabinet.
ABCD
Diagram Small solid outlines fit within the illustrated regions. The large dashed container crosses the central reserved area and therefore fails this assignment. The circle and dashed central area are schematic; they do not specify plumbing or required service clearances.
A
The central area is reserved, not storage.
B
A small group fits the left region.
C
Another group occupies the right region.
D
The large dashed container crosses the cutout despite fitting the outer rectangle.
Compare keeping small groups separate with keeping them together in a removable caddy elsewhere. Separate groups can be easy to see when the drawer opens; a caddy may suit carrying supplies to another place. Choose according to that actual task. Counting more little pockets is not automatically better if the user needs the entire kit to move together.
Keep movement and servicing in the same drawing
Check the drawer and its loaded contents through opening and closing, using the specific installation requirements. Account for flexible hoses and their intended movement where present. Do not create clearance by tying, bending or relocating plumbing to match an unverified drawer sketch. Coordinate any proposed system changes with the responsible cabinet and plumbing professionals.
Ask how the relevant plumbing components remain accessible for their intended service, and how the drawer or organizer is removed if the approved procedure calls for it. A drawer can operate in daily use while obscuring a part that must later be reached. Record that access method separately from normal storage; a decorative opening symbol does not explain the service sequence.
Compare the same sink kit before and after the cutout
In a hypothetical layout, a removable sink-tool caddy fits the outer rectangle of the proposed drawer. Once the actual central cutout and inner sides are included, it cannot sit in any continuous region. Several smaller containers fit individually, but they no longer travel together as the household’s usual kit. The decision is about changed use as well as lost area.
Compare accepting separate local groups, assigning the intact caddy to a verified neighboring drawer, or choosing another supported sink-base arrangement. Include any contents displaced from that neighboring drawer. Do not call the whole original kit accommodated merely because its total volume is smaller than the sum of the remaining pockets.
Record a contents plan rather than a capacity impression
Save the confirmed drawer shape at each level, the installed equipment arrangement, item assignments, loaded-travel result and servicing method. Note which groups now live elsewhere. Recheck when the sink, drain equipment or organizer changes. The useful gain is the collection that can actually be stored, retrieved and returned without compromising the confirmed installation—not the area of an attractive drawer front.
Pure White
Cream White
Light Warm Gray
Gray
Navy
Black
Oak Tone
Dark Walnut Tone
Design study These finish studies are design references, not a list of currently orderable colors. Screens and lighting change the appearance; compare a physical sample before choosing.See all finish options →
A drawer-shaped panel below the sink does not promise a drawer. Compare a fixed front with a compatible tip-out by the items it would hold, the complete mechanism and the routine for taking them out and putting them back.
Bin volume does not tell you how much of a cabinet run the system consumes. Compare complete assemblies, their operating tasks and the neighboring storage left after each allocation.
The sample shows the door frame, a separate center panel, the face frame and the cabinet box. Each component has its own place in this Shaker construction.
Shaker construction: door frame, center panel, face frame and cabinet box. The cutaway helps locate these parts; confirm each material in the specifications for the selected cabinet.
01 / Door frame
The Shaker door has rails and stiles around a separate center panel. The frame and center panel are different components; confirm their materials in the specifications for the selected cabinet.
02 / Face frame
The face frame surrounds the opening at the front of the cabinet box and sits behind the doors. The face frame, door frame and cabinet box are separate parts.
03 / Cabinet box
The sample exposes the cabinet sides, interior surfaces and layered edges. The image does not establish the wood species or material specification of a selected cabinet.