Protect the preparation surface before adding tall storage to a single-wall kitchen
A taller cabinet can add storage while removing the only continuous work area. Check the meal-preparation task before allocating the remaining wall length.
In a single-wall kitchen, reserve a usable preparation surface before filling the remaining wall with tall storage. The refrigerator, sink, cooking equipment and their actual requirements already shape the run. What remains should support the food preparation the household performs, rather than simply maximize the number of cabinets. A large storage gain can be a poor exchange if it removes the only place where a board, bowl and ingredients work together.
Define what the preparation surface must do
Choose an ordinary meal and place its representative board, bowl, ingredients and tools on a suitable test surface. Include the movement of hands and the temporary position of items before and after use. The required footprint is more than the closed dimensions of the board alone. Record which objects can be put away during the sequence and which must remain together. This establishes a household task, not a universal counter-length target.
List the equipment expected to stay on the counter, such as a frequently used small appliance. Its parked footprint removes space even when it is not operating. Decide whether it has a practical storage and retrieval routine elsewhere. Do not count the same strip as clear preparation space and permanent appliance parking in different versions of the plan without acknowledging that change.
Map continuous work space separately from leftover fragments
Draw the verified positions and full requirements of the selected sink and appliances. Identify each uninterrupted counter segment that remains. Narrow pieces on opposite sides of an interruption cannot be added together to hold a single large task. A segment’s depth and approach also matter: useful length on the elevation does not establish that someone can stand and work there with doors operating.
Mark the segment intended for the main preparation task, including access to its tools and the next destination for prepared items. Keep nearby cabinet openings in the check. An apparent clear surface can become awkward if the utensil drawer opens into the person’s standing position or if retrieving a bowl requires moving the active setup. Treat those problems as part of the preparation decision, not as details to resolve after cabinet selection.
ABCD
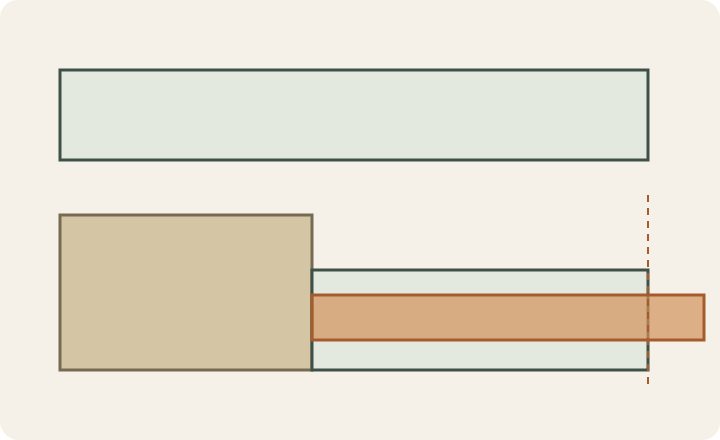
Diagram The upper strip shows the original assumed work length. Below, tall storage replaces part of it and the chosen board exceeds what remains. The illustration is a task tradeoff, not an installation elevation.
A
Original continuous preparation strip.
B
Proposed tall-storage footprint replacing part of the strip.
C
Remaining counter segment.
D
The chosen board extends past the available boundary.
Calculate the loss before accepting the storage gain
In a hypothetical layout, the clear preparation strip is 42 inches long. Proposed tall storage replaces 18 inches, leaving 42 - 18 = 24 inches. The chosen board needs 28 inches along that direction, so it exceeds the remaining strip by 4 inches before any other items are added. These are teaching dimensions, not standard cabinet widths or a required preparation length. The example shows why extra cabinet capacity must be compared with a specific displaced task.
Compare alternatives that preserve the actual task
Rotating a board can change its required length along the wall, but the new orientation must also fit the usable depth and the way the person works. Test it with the bowl and ingredients still present. A turned rectangle that fits the outline is not automatically a workable preparation position.
First check whether the storage demand can be reduced or reassigned. Less-used items may belong elsewhere, and the inside arrangement of existing cabinets may change which objects need counter storage. An upper cabinet can add capacity without occupying the same base footprint, but its reach and relationship to the work below still need evaluation. Do not assume any added cabinet is usable simply because it fits the drawing.
A separate preparation surface can be an alternative only if it is genuinely available and connected to the workflow. Test carrying ingredients and prepared items between it and the wall run, with household traffic included. A dining table occupied at meal preparation time is not a reliable substitute. A proposed island or cart also needs its own operating and movement check; its presence should not excuse a work area that fails during ordinary use.
Keep the preparation decision visible through revisions
Record the representative meal, the continuous segment reserved for it, permanent counter equipment and the storage items being reassigned. Mark any alternative surface and the condition that keeps it available. Compare each cabinet revision against those same requirements rather than accepting storage capacity in isolation. The resulting single-wall plan should state where the everyday preparation happens and how that space survives the rest of the kitchen’s routine.
Pure White
Cream White
Light Warm Gray
Gray
Navy
Black
Oak Tone
Dark Walnut Tone
Design study These finish studies are design references, not a list of currently orderable colors. Screens and lighting change the appearance; compare a physical sample before choosing.See all finish options →
Being able to walk to the end does not prove you can retrieve a tray, turn and return. Check the carried object, the person and the open fronts together.
The sample shows the door frame, a separate center panel, the face frame and the cabinet box. Each component has its own place in this Shaker construction.
Shaker construction: door frame, center panel, face frame and cabinet box. The cutaway helps locate these parts; confirm each material in the specifications for the selected cabinet.
01 / Door frame
The Shaker door has rails and stiles around a separate center panel. The frame and center panel are different components; confirm their materials in the specifications for the selected cabinet.
02 / Face frame
The face frame surrounds the opening at the front of the cabinet box and sits behind the doors. The face frame, door frame and cabinet box are separate parts.
03 / Cabinet box
The sample exposes the cabinet sides, interior surfaces and layered edges. The image does not establish the wood species or material specification of a selected cabinet.