The useful orientation is the one that lets the pan come out. Check its rim, the cabinet opening and the withdrawal path before choosing divider spacing.
Vertical dividers work best when the pans slide toward you along a clear path. The first choice is therefore orientation, not the number of slots. A pan standing on edge with its narrow rim toward the opening needs cabinet depth; the same pan turned sideways needs a much wider opening. Decide which direction works with the actual cabinet before buying an organizer.
Measure the pan outside its rim
Use the largest pan that belongs in this location, including rolled rims and handles. Decide which edge will rest on the cabinet floor or organizer and where your hand will grasp it. If the pan normally carries a cooling rack or fitted lid in storage, test that complete stored group, not just the bare pan.
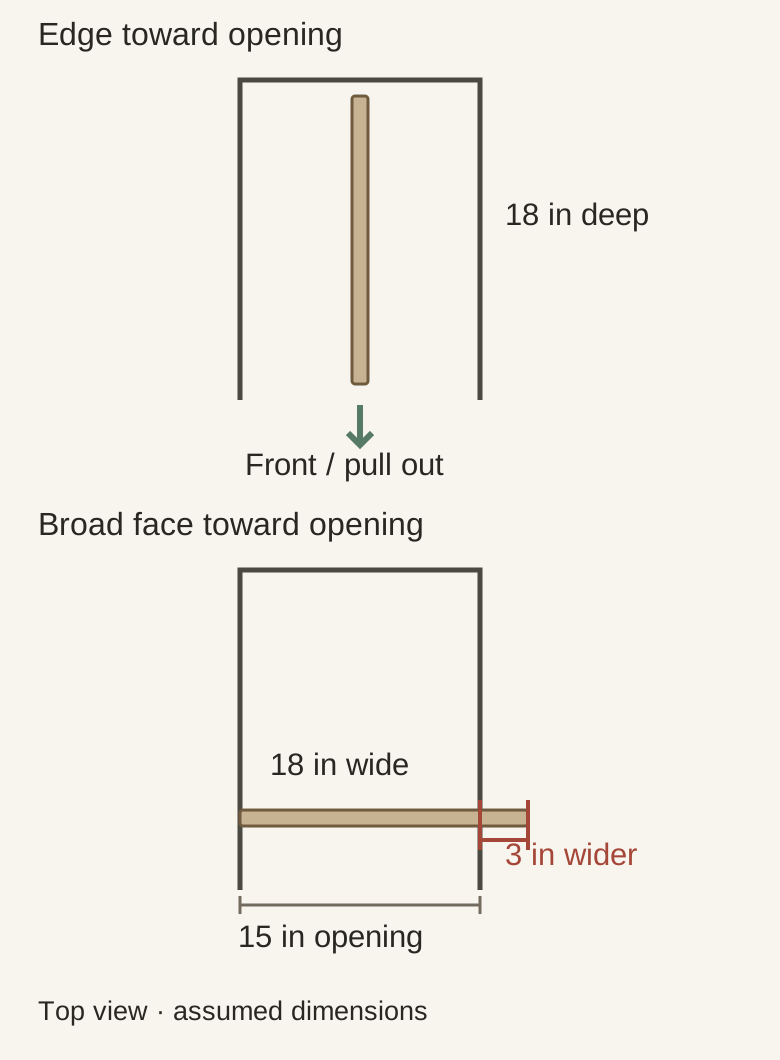
In this hypothetical example, the tray measures 18 by 13 inches, with a 1-inch rim depth. The cabinet has a 15-inch clear opening, 20 inches of clear storage depth and 14 inches of clear height. Standing the tray with its 18-inch dimension running into the cabinet uses 13 inches of height. Turning its broad face toward the opening instead presents an 18-inch width, which exceeds the opening by 3 inches.
Follow the full withdrawal path
Diagram Hypothetical top views: the same tray changes its required opening width when turned. Height, hands, hinges and divider hardware must also be checked.
The edge-first arrangement in the example is a candidate to test, not a completed fit approval. The opening and usable depth must remain clear through the whole movement. Check the face frame, hinge, door position and front rail. A tray that fits behind the opening may still be trapped if it has to move sideways before it can come forward.
Put a cardboard outline or the actual pan through the proposed path with the door in its normal open position. Bring it fully out to the place where you can take its weight. If the method requires a precise twist, removing a neighboring tray or opening another cabinet, decide whether that is acceptable for a pan used often. Do not assume diagonal removal will remain convenient once all slots are occupied.
Allow room for fingers and different rims
Divider spacing must accommodate both the stored rim and a workable grip. Very closely spaced slots can look efficient while leaving no place to separate similar pans. Test the ordinary pull with neighboring pans present. A broad rim can catch an adjacent rim even when the flat metal bodies would fit comfortably.
Group by removal method rather than forcing every item into identical slots. Sheet pans may slide edge-first while a deeper roasting pan needs another location. Keep frequently used pans near the easiest grip position; reserve an awkward slot for an item only if its actual removal remains manageable. Ask about divider attachment and the organizer’s applicable loading rather than assuming the slots support any cookware.
Test returning the pan as well as removing it
A good arrangement lets a clean, dry pan return without being threaded past several neighboring edges. Try putting it back while the adjacent slots are filled and the door stays where you normally leave it. If a rack separates from its pan during this movement, give it its own identified slot or another suitable place instead of relying on friction to hold the group together.
Record the chosen orientation, clear opening and usable divider zone when discussing the cabinet order. The nominal cabinet width alone does not communicate these needs. Select the cabinet and organizer as a working combination: pan fits, hand can reach it, full withdrawal is clear and return is straightforward. That is more useful than maximizing how many upright objects appear to fit in a closed cabinet.
Pure White
Cream White
Light Warm Gray
Gray
Navy
Black
Oak Tone
Dark Walnut Tone
Design study These finish studies are design references, not a list of currently orderable colors. Screens and lighting change the appearance; compare a physical sample before choosing.See all finish options →
A pan collection can fit and still exceed the applicable system limit or be awkward to lift. Verify what the rating includes, total the real load and assess the user’s retrieval separately.
The sample shows the door frame, a separate center panel, the face frame and the cabinet box. Each component has its own place in this Shaker construction.
Shaker construction: door frame, center panel, face frame and cabinet box. The cutaway helps locate these parts; confirm each material in the specifications for the selected cabinet.
01 / Door frame
The Shaker door has rails and stiles around a separate center panel. The frame and center panel are different components; confirm their materials in the specifications for the selected cabinet.
02 / Face frame
The face frame surrounds the opening at the front of the cabinet box and sits behind the doors. The face frame, door frame and cabinet box are separate parts.
03 / Cabinet box
The sample exposes the cabinet sides, interior surfaces and layered edges. The image does not establish the wood species or material specification of a selected cabinet.