Scandinavian kitchen cabinets: make the quiet look work on a busy morning
Plan a Scandinavian-inspired kitchen around the light, wood and daily items already in the room. Compare a pale cabinet wall with a wood island, and a wood base run with pale upper storage.
A Scandinavian-inspired kitchen does not have to become an all-white room with nowhere to put the toaster. Start with the surfaces you will keep, then choose where the wood, pale fronts and everyday objects belong. The cabinet purchase should support the calm room you want while breakfast is being made, not only after everything has been cleared away for a picture.
Let the existing room set the palette
Look from the dining area toward the kitchen before choosing a door. Include the floor, window frames, table and any ceiling beams that will remain. If those features already contribute strong wood color, adding another full wall of wood cabinetry may not give you the lighter effect you imagined. Pale fronts can provide a useful break; wood can remain on a smaller feature or on the furniture you already own.
Alternatively, a room with a plain pale floor and simple walls may need more visible wood to feel the way you want. Try wood lower cabinets with pale upper cabinets, keeping the tall pantry as part of the pale wall. This gives the wood a defined lower band without making every vertical surface a different finish. These are starting compositions to test in your room, not recipes for the only authentic Scandinavian kitchen.
Dura Supreme's Scandinavian guide includes a kitchen pairing pale cabinet fronts with a wood island. That example shows one allocation of materials; the surrounding choices here are proposals to test in your own room.
Compare complete elevations, not a collection of pale chips
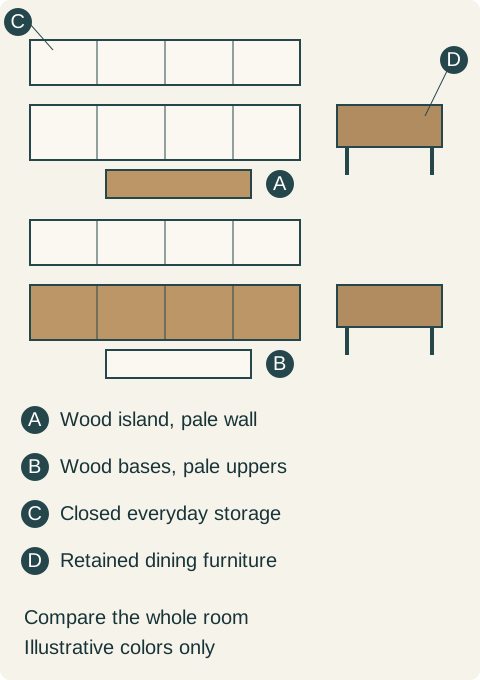
Make a simple front view of the sink wall and the tallest cabinet run. Color in the actual doors, drawers, fillers and visible ends. On one version, keep the wall cabinets and tall units pale and put the wood on the island. On another, use wood base fronts and a pale island. Include the refrigerator's visible finish in both, even if it interrupts the color arrangement you preferred.
The two versions answer different questions. A wood island can read as a separate piece next to the dining furniture. Wood bases can connect the working perimeter into a continuous band, but a pale island will stand out against it. Look at the view you see most often rather than judging only the front facing the range. A room with no island can use the lower run or dining furniture for its wood element; adding an island is not a requirement of the style.
Place the real finish samples upright, including the proposed end panel. Bring in a representative floor sample and the countertop selection. A neutral palette still contains differences in warmth and sheen. If the chosen white looks gray beside the retained floor, testing another white is more useful than adding a decorative wood feature to disguise the mismatch.
Teaching example Original design study, not a measured plan or a product color sample. A places wood on the island and keeps the cabinet wall pale; B uses wood lower fronts with pale upper storage. The dining furniture remains part of both comparisons.
Give everyday objects a home before removing upper cabinets
The photograph that attracted you may have only a short shelf with matching bowls. Your kitchen may need storage for lunch boxes, a rice cooker, medication kept outside a humid bathroom, or an assortment of mismatched mugs. Identify what really belongs in the kitchen and where it is used. Keep medical storage requirements with the product instructions; an attractive cabinet is not automatically a suitable location.
Choose the closed storage needed for those items before deciding how much open wall you can keep. A small shelf for frequently used dishes can be pleasant if the household wants to maintain it. It is less convincing when the remaining dishes have to move onto the counter or into a distant room. Closed upper cabinets in a quiet finish may serve the intended appearance better than shelves overloaded with everyday packages.
Also show the appliances that stay on the counter. Hiding them all can make the morning routine unnecessarily awkward. Reserve a useful position for the appliance that is used repeatedly, with its required operating space and connections reviewed separately. The design can look deliberate with a visible coffee maker if the surrounding counter is not also the only place left for food storage.
A family keeps the oak table and changes the cabinet allocation
Consider a hypothetical kitchen adjoining a dining area with an oak table and a patterned oak-look floor. The owners initially choose pale wood fronts everywhere, white counters and open shelves. When they place those choices together, the cabinet grain adds another large pattern, and the open shelves cannot hold the family's ordinary dish collection without becoming crowded.
They revise the plan to pale closed perimeter cabinets and a restrained wood finish on the island. The retained table remains the other wood feature. The wood island is selected against the whole floor, not to match the lightest plank. Everyday dishes stay behind the upper doors, a short shelf holds the serving bowl used daily, and the breakfast appliance remains at its planned counter position. The room gains the quieter composition they wanted without requiring them to hide evidence that anyone cooks there.
For a household without the wood table or patterned floor, the other composition may work better: wood lower cabinets, pale uppers and a simple dining table. Do not transfer the first family's finish list without transferring its room conditions. What matters is which surface supplies the visible wood and which one gives the eye a break.
Keep the front simple without making operation awkward
A simple slab or restrained framed front is worth comparing at actual size. Include a shallow drawer and the tallest door, not only a large sample door. Decide whether a visible pull, recessed grip or another approved opening system suits the hands that will use it. Removing handles to make a drawing look cleaner is not a useful improvement if the household dislikes opening the resulting doors.
Carry that decision through the refrigerator panels and exposed cabinet ends. Avoid adding an ornate trim treatment solely because it appears in the selected product line; compare a simpler supported treatment if the larger room calls for it. Likewise, do not assume a pale wood appearance guarantees solid wood, a particular species or an environmental certification. Ask for those material facts separately from the style selection.
Approve the kitchen in its ordinary working state
Review the layout with stools or chairs pulled into use and the usual counter appliances shown. Check that the open shelf, serving area and cabinet doors still make sense together. Lighting deserves an evening check with the actual samples; a bright daytime photograph cannot show how the pale surfaces will look under the fixtures you intend to use.
For the cabinet order, keep the chosen door, finish, wood placement, exposed ends and opening hardware tied to the same elevations. Identify which existing furniture stays in the composition. That makes the design reproducible and lets a proposed substitution be judged against the room it will actually enter. The useful result is a kitchen that looks composed during everyday use, with the storage that makes that possible.
Pure White
Cream White
Light Warm Gray
Gray
Navy
Black
Oak Tone
Dark Walnut Tone
Design study These finish studies are design references, not a list of currently orderable colors. Screens and lighting change the appearance; compare a physical sample before choosing.See all finish options →
An open shelf displays its contents every day. Compare a fully stocked wall cabinet with the shelf arrangement you actually want to see, then locate everything that no longer belongs there.
A cabinet color that looks warm online can read differently next to your floor. Compare an identified physical sample in the positions and lighting where the cabinets will live.
The sample shows the door frame, a separate center panel, the face frame and the cabinet box. Each component has its own place in this Shaker construction.
Shaker construction: door frame, center panel, face frame and cabinet box. The cutaway helps locate these parts; confirm each material in the specifications for the selected cabinet.
01 / Door frame
The Shaker door has rails and stiles around a separate center panel. The frame and center panel are different components; confirm their materials in the specifications for the selected cabinet.
02 / Face frame
The face frame surrounds the opening at the front of the cabinet box and sits behind the doors. The face frame, door frame and cabinet box are separate parts.
03 / Cabinet box
The sample exposes the cabinet sides, interior surfaces and layered edges. The image does not establish the wood species or material specification of a selected cabinet.