RTA cabinets arrive ready to assemble; assembled cabinets arrive with the cabinet box already built. Stock usually describes a predefined selection of sizes and configurations. These are different questions. A stock cabinet may be sold assembled or ready to assemble, depending on the line. Start with the layout that fits, then compare the work and delivery conditions of the actual products.
Find out what is assembled and what is still separate
Ask whether the quoted package includes the box, doors, drawer boxes, fronts, shelves, hinges, runners, legs or toe-kick system. “Assembled” may describe the box while handles, fillers, trim and final adjustment remain site work. For RTA, ask for the assembly manual for the exact cabinet type before ordering. A sink base, drawer base and tall pantry may not assemble in the same sequence.
Make a responsibility list with your installer. Who checks parts, assembles boxes, installs drawers, drills handles, joins cabinets and adjusts the finished fronts? Treat assembly and installation as separate tasks even if the same person does both. The Home Depot’s installation guide distinguishes inspecting assembled cabinets from assembling RTA units, then continues to leveling, joining and adjusting the installation.
A size catalog is more useful than the word standard
Use the current size list for the selected line. Record cabinet width, height and depth and what those endpoints include. A nominal depth might describe the box rather than the finished front and handle projection. Overall height may depend on legs, a platform or a separate toe kick. A product code that looks familiar is not enough to identify those details.
For a published planning reference, KraftMaid describes a common base-cabinet height of 34.5 inches and shows a 1.5-inch countertop producing a 36-inch finished height. That is not the specification of every cabinet or countertop, and it does not settle a project needing a different working height. Verify the actual cabinet support system and selected top together.
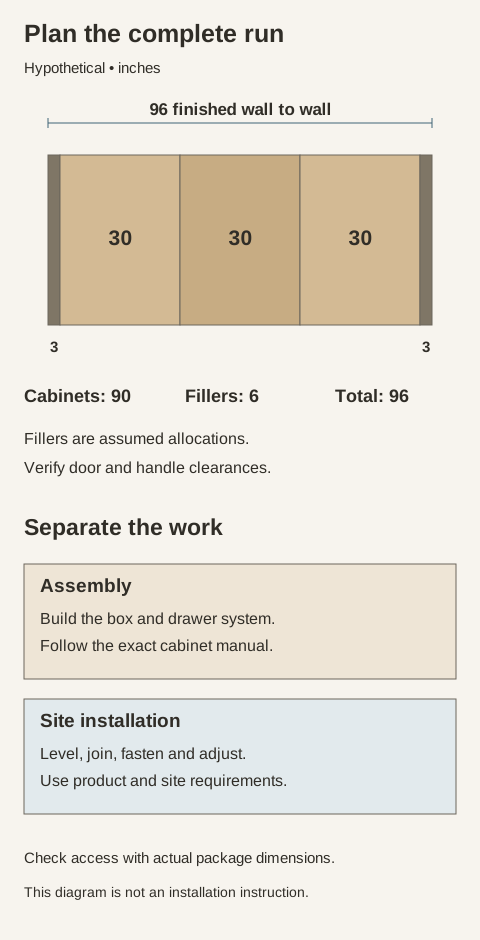
Diagram Hypothetical dimensions in inches. The fillers are example allocations, not recommended universal clearances. Confirm the chosen hardware and site conditions before approving a layout. Prepare and save project notes →
Add the entire run, including the quiet-looking pieces
Measure the wall at the cabinet’s intended positions and keep photographs of outlets, pipes, corners and trim with the sketch. A long measurement along an empty wall can miss a projecting casing or an out-of-square return. Mark appliance openings separately and use each appliance’s installation specification. Do not trade away an appliance clearance just to make cabinet widths total the wall length.
Price the assembly work you will actually need
An RTA comparison should include assembly labor if you will hire it out, plus any tools or consumables required by the exact instructions. Do not assume every system uses glue, staples or the same fasteners. Ask the assembler to review the manual and scope before quoting. If you will do the work yourself, reserve a clean, level workspace and a way to keep parts identified by cabinet.
Check how the drawer system and door adjustment are handled after the boxes are built. A box can look square on a bench and still need careful leveling and alignment on site. Assembled cabinets also need installation; paying for factory assembly does not remove wall conditions, fastening requirements or final adjustment. Compare the manufacturer’s installation instructions with the installer’s proposed method.
Check the path to the room before choosing the delivery format
Measure the narrowest doorway, hallway turn, stair landing and elevator opening on the route. Compare them with the actual shipping package, not just the installed cabinet dimensions. A tall assembled unit may not turn through a landing, while cartons of parts may need more sorting and protected assembly space. Neither format is automatically the better choice for a condominium or an occupied remodel.
Ask where delivery stops and who moves the order inside. Record whether stair carry, unpacking, packaging removal and appointment restrictions are included. Have the receiving person count cartons and inspect the order using the seller’s written procedure. Keep labels and pictures of damaged packaging. Check replacement and missing-part arrangements before the installation crew is waiting on site.
Compare the same layout in both formats
A cheaper cabinet total may come from fewer drawer units, omitted end panels or a different finish, not the delivery format. Start from one marked plan and one item list. Price the same cabinets, finished ends, fillers, moldings and hardware. Show assembly, freight and installation separately where possible. A seller’s statement that a cabinet is in stock still needs an item-specific availability and release confirmation for your order.
Get the current cabinet schedule and the matching dimensions for every item.
Confirm what arrives assembled and which loose parts or finish pieces are included.
Have the person doing assembly review the actual instructions and quote the agreed work.
Check the package route, receiving space and delivery endpoint in writing.
Add fillers, panels and appliance openings to the measured drawing before signing off.
Keep any unknown availability, delivery or replacement term open until the seller answers it.
Use the project-notes page to save the cabinet schedule, access measurements and questions about assembly. Keep photographs of tight turns and the proposed installation area separately alongside your downloaded notes. Copy or download your notes for the seller and installer; the page does not send a submission or upload photos.
Finish references
Pure White
Cream White
Light Warm Gray
Gray
Navy
Black
Oak Tone
Dark Walnut Tone
Design study These finish studies are design references, not a list of currently orderable colors. Screens and lighting change the appearance; compare a physical sample before choosing.See all finish options →
Compare the actual countertop products, heat-source routine and fabrication proposal. A fired porcelain slab and resin-bound quartz are different materials, but neither label replaces a complete kitchen specification.
Compare a complete tile-and-grout installation with a specified slab surface. The choice changes the wall’s repeated joints, material transitions, care and finished edges.
Granite is a broad commercial name; quartz surfacing is a manufactured product. Choose with the selected slabs, care requirements and complete fabrication in view.
The sample shows the door frame, a separate center panel, the face frame and the cabinet box. Each component has its own place in this Shaker construction.
Shaker construction: door frame, center panel, face frame and cabinet box. The cutaway helps locate these parts; confirm each material in the specifications for the selected cabinet.
01 / Door frame
The Shaker door has rails and stiles around a separate center panel. The frame and center panel are different components; confirm their materials in the specifications for the selected cabinet.
02 / Face frame
The face frame surrounds the opening at the front of the cabinet box and sits behind the doors. The face frame, door frame and cabinet box are separate parts.
03 / Cabinet box
The sample exposes the cabinet sides, interior surfaces and layered edges. The image does not establish the wood species or material specification of a selected cabinet.