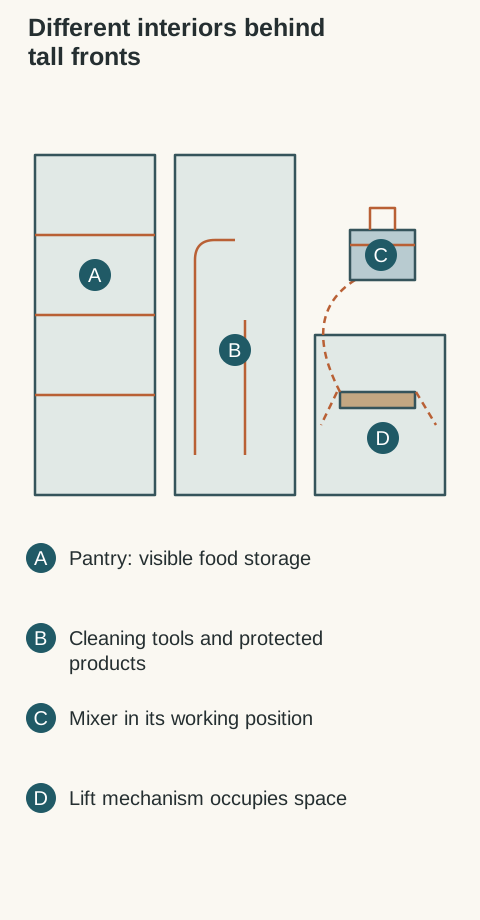
Tall cabinetry is useful when its interior matches the job. A pantry, broom cabinet and mixer compartment can have similar doors while needing very different openings, supports and access. Give each a separate inventory. Combining everything behind a coordinated front should not blur food storage, chemical storage or appliance handling.
Plan the pantry around packages and visibility
Record the packages normally bought, including large refill bags and occasional serving supplies. Compare adjustable shelves with interior drawers using those packages. Shallow arrangements can make a small collection visible; a deeper shelf may suit bulky items but needs a plan for the rear row. Keep frequently used food within the household's comfortable reach.
Check the door opening before choosing rollouts. Hinges and handles can limit drawer travel, and an inner drawer needs the outer door parked first. Set shelf spacing from actual package heights, including the hand needed to lift a package. Keep the original storage directions for foods; a pantry cabinet does not create suitable conditions for every product.
Give cleaners their own protected compartment
Separate household cleaners from food, dishes and drink supplies. Record the tallest original bottles and any storage conditions on their labels. Include a way to contain small drips without hiding an ongoing leak, and make the compartment cleanable. A decorative decanting bottle should not become the basis of the layout.
HRSA Poison Help advises keeping household cleaners and potentially poisonous substances in locked cabinets or out of children's reach, and keeping household products in original containers. Choose appropriate access protection for the household and follow labels. A cabinet placed high on a wall is not automatically a complete child-safety solution.
Diagram Conceptual section distinguishes the mixer operating envelope from its stored location. The lift is schematic, not an installation, spring-adjustment or capacity detail.
Plan tall cleaning tools in their storage position
Measure broom heads, vacuum bodies, handles and attachments together. Draw fixed shelves and hinges that may narrow the opening. A loose accessory needs a retained place rather than a pile that falls out when the door opens. Consider how a long tool is withdrawn without striking the ceiling, a light or the person using the cabinet.
If a cordless vacuum will charge inside, use the equipment manufacturer's conditions for ventilation, charger location and electrical connection. Have an electrician coordinate the required receptacle and route. Do not treat a cleaning cabinet as a general charging enclosure, and do not run a cord through a door gap where it can be pinched.
Distinguish storing the mixer from using it
A heavy mixer needs a manageable path from storage to a stable working surface. Compare leaving it on the counter, storing it on a suitable accessible shelf or using a dedicated lift. Record the actual machine, bowl and accessories, then review the cabinet and supporting assembly. A drawer rating by itself does not approve a lift or an operating surface.
Rev-A-Shelf's RAS-ML instructions describe a spring-loaded mechanism with installation hazards. A qualified installer should use the instructions supplied for the selected lift and verify cabinet compatibility, shelf construction and permitted use. Do not adapt mounting or spring settings from a generic diagram. A lift may occupy the space where a drawer would otherwise go.
Include filling, attaching the bowl, lifting a tilt head or moving a bowl-lift mechanism, removing a beater and cleaning. KitchenAid distinguishes tilt-head and bowl-lift access; use the actual model information for the envelope. The mixer can fit while stored and still lack room to load ingredients when raised.
Test access to controls and the cord route in both stored and working positions. If operating on a lift is contemplated, confirm that both equipment and lift instructions permit the arrangement. Keep fingers out of moving mechanisms. Select the simplest arrangement that the user can handle comfortably, then record the approved contents and complete support assembly in the order.
The final choice should show what each tall compartment contains, how it opens and how the heaviest item gets to work. Keep chemicals separate and model-specific appliance instructions attached to the plan.
Pure White
Cream White
Light Warm Gray
Gray
Navy
Black
Oak Tone
Dark Walnut Tone
Design study These finish studies are design references, not a list of currently orderable colors. Screens and lighting change the appearance; compare a physical sample before choosing.See all finish options →
Buy a coordinated suite when every included appliance earns its place. Mix brands when a specific everyday task justifies the difference, after comparing the visible fronts and the complete installed purchase.
Compare the offered wood drawers by required length, opening method and complete construction. MOVENTO is not an automatic upgrade for every drawer, and one runner family need not serve every location in the kitchen.
Choose the dispenser package with your everyday glasses, bottles and ice routine. A plain refrigerator front can still conceal a water outlet, while a door dispenser changes access without creating a separate drinks station.
The sample shows the door frame, a separate center panel, the face frame and the cabinet box. Each component has its own place in this Shaker construction.
Shaker construction: door frame, center panel, face frame and cabinet box. The cutaway helps locate these parts; confirm each material in the specifications for the selected cabinet.
01 / Door frame
The Shaker door has rails and stiles around a separate center panel. The frame and center panel are different components; confirm their materials in the specifications for the selected cabinet.
02 / Face frame
The face frame surrounds the opening at the front of the cabinet box and sits behind the doors. The face frame, door frame and cabinet box are separate parts.
03 / Cabinet box
The sample exposes the cabinet sides, interior surfaces and layered edges. The image does not establish the wood species or material specification of a selected cabinet.